Position: How Tos - Partition Management - How to Shrink Volume Without Losing Data in Windows 10/8/7?
DiskGenius - Free disk partition software to resize partition, extend C drive, shrink volume or split partition.
ô Free DownloadTable of Contents:
Shrinking volume refers to the task of decreasing the size of a partition, which helps to organize disk space in accordance with specific needs. When you have a large partition that has much free space to spare, it may make sense to spare free space from the volume by shrinking it, for instance you can either create a new partition on unallocated space or add it to other partitions. As we all know, a disk should be partitioned before we can use the space on the disk to store data. There can be multiple volumes on the disk and each works like distinct area, thus you can separate operating systems from personal data and manage data orderly.
Why do you want to shrink volume? In fact, changing partition size is a useful practice if you want to make best of disk space on your computer. For instance, there is a 2TB hard drive on your computer and the disk is divided into two partitions, a 500GB system partition where Windows is installed and a 1.4TB partition for your music, photos, games, working documents, learning material, etc. Thus, this disk is not properly partitioned. There might be too much free space in C drive (system partition), and the other partition contains too many file types. In this case, you can shrink system volume to a suitable size such as 100GB, and you can get 400GB free space which can be used to created a new partition to store data. As the that large partition, you can split it, after which you can store working files on one partition, games on a different partition. Apart from organizing data effective, some user shrinks partition for the purpose of dual boot computer. There is not enough free space on the disk to create a new partition for new operating system, and you can shrink a large partition to get free space. Let's see a real case about this issue:
"How can I shrink partition size further what is allowed in Disk Management? Just bought a 1TB external hard drive to store backups. The external hard drive came with one big partition and I want to divide it into 3 partitions. However, when I try to shrink the big partition, I couldn't to the specified size. The disk management console keeps saying 'Not enough space'. My computer is running Windows 10."
How do I shrink a volume? Changing partition size is one the basic operations that should be mastered by computer users for the sake of taking full advantage of disk space and rationally managing data. Fortunately, many tools are available to shrink partition without losing data in Windows 10/8/7/Vista/XP. Here are some tools you can use to shrink/extend partition:
Disk Management: Disk Management is the Windows internal tool and it provides basic function to manage disk and partitions. Since Windows vista, resizing partition became easier than previous Windows versions. Users can extend partition by adding the adjacent free space, shrink partition, create new partition, etc. But it cannot deal with all partition resizing tasks, for example, unallocated space is not on the right side or not adjacent to the partition. If you want to do extra operations, you need to use third-party disk partition software.
Disk partition software: partition management software enables you to create, deleted, format, shrink, extend, split, expand or resizing partition on your hard drive or other storage devices. DiskGenius Free includes more features than Disk Management and similar third-party software. Apart from regular functions on disk partitions, it also can wipe hard drive, erase partition, permanently delete data, image disk/partition, clone partition /disk, convert GPT/MBR disk, convert virtual disk format, edit hex data, check and repair bad sectors, check partition table errors, manage virtual disks, etc. Besides, it supports file recovery and partition from various storage devices.
DiskPart commands: DiskPart commands help to manage disks, partitions, volumes or virtual disk and you can use it shrink partition if you know how to use it. The shrink command reduces the size of selected volume by the specified amount. Similar to Disk Management, it is able to get free disk space from the unused space at the end of selected volume.
This section will show you how to shrink a volume/partition in Windows 10 Disk Management console. If your computer is running other Windows version, you can also follow this guide.
Step 1. Open Disk Management. Right-click on the Start button and choose Disk Management.
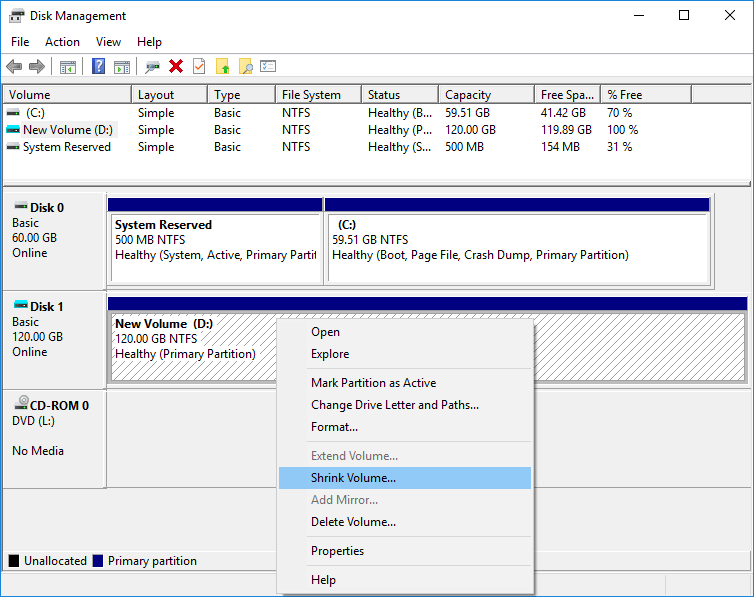
Step 2. Right-click on the partition you want to reduce its size and choose Shrink Volume, as below.
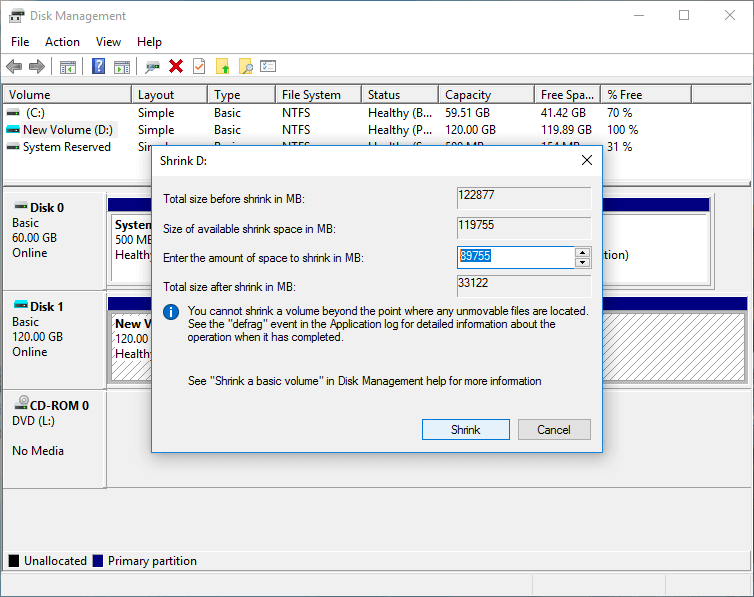
Then Disk Management starts to query the volume for available space to shrink, which may take a couple of seconds, then wait with patience. It'll be better if the partition was properly defragmented in advance. When the calculation finishes, a window pops up.
In Disk Management, you can view all disks and partitions on your computer, locate the one you want to spare free space. In this case, we are going to shrink the 120GB New Volume (D:) which is located on basic disk 1.
If Shrink Volume option is grayed out, then it is not supported for the partition, for example the FAT32 partition of USB flash drive. In this case, you need to use DiskGenius to resize it.
Step 3. Specify the disk amount you want to reduce from the partition. Enter the exact disk space in MB and click Shrink button.
Note: you cannot shrink a partition beyond the point where any unmovable files are located. See the "defrag" event in the Application log for detailed information about the operation when it has completed. See "Shrink a basic volume" in Disk Management help for more information.
Disk Management completes the process quickly and the you'll be back at the original interface and see the shrunk partition and unallocated disk space on the drive. Then you can create a new partition on it.
Limitations on Disk Management:
Disk Management cannot deal with all issues about partition shrink, and here are some limitations.
DiskGenius Free Edition includes the functions to chance partition size without losing data and you can use it to shrink, resize, extend and split partition. In addition, it can add unallocated disk space to any partition. Here we'll show you how to shrink partition with DiskGenius. If you can to extend C drive, allocated free space or resize partition in Windows, please refer previous guides.
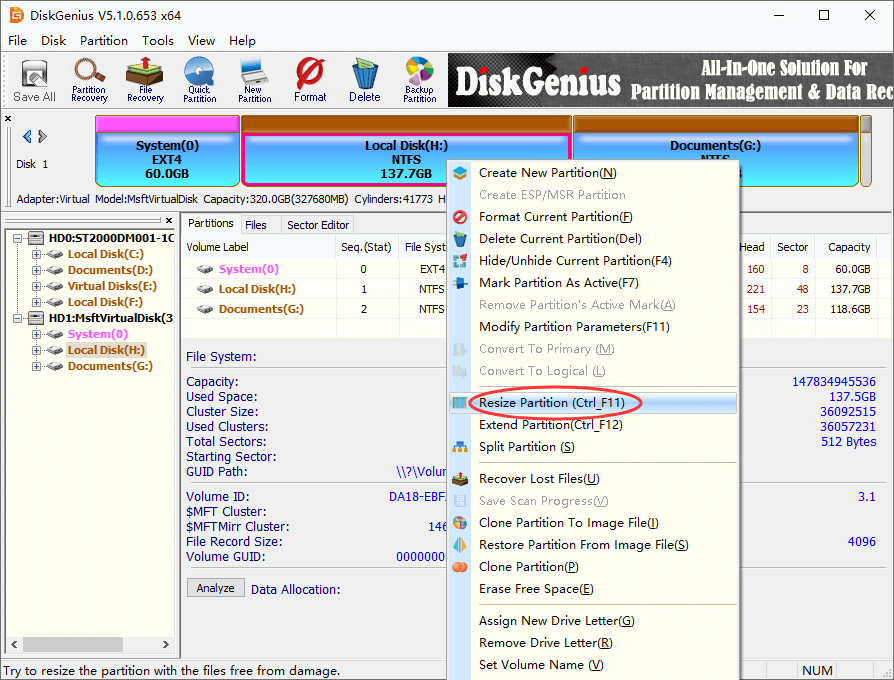
Step 1. Install and launch DiskGenius from your computer and you can see disks and partitions clearly. Select a disk or partition, and you can view parameters.
Step 2. Right-click on the partition you want to reduce its size and choose Resize Partition, as picture below:
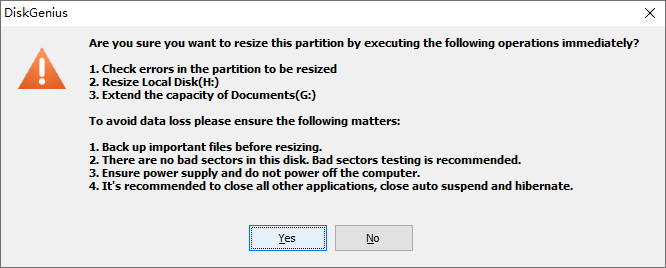
Step 3. On the pop-up Window, set partition size you want to change and click Start button.
There are two ways of specifying partition size: drag either edge of the selected partition from the partition bar; also you can enter the exact size in the middle columns. Besides, you can decide how to deal with the free space that is spared from the volume: keep it unallocated, create a new partition on it or merge it to other partition.

Click Yes and DiskGenius starts to change partition size based on settings you just made.
Windows diskpart commands have the ability to resize volume, delete partition, create partition, format partition, etc. Commands are executed in Command Prompt or PowerShell. It is not suggested to use this method if you are not expertized in computer skills. Here is the process of shrinking a volume on basic disk via DiskPart commands:
Step 1. Right-clicking on Start button and choose Command Prompt (Admin). This opens Command Prompt.
Step 2. In command prompt type diskpart and press Enter key.
Step 3. Type following commands in sequence and press Enter key after each command.
List volume
Select volume # (replace # with the volume number you want to shrink)
Shrink querymax
shrink desired=# (replace # with the actual size in MB you want to shrink the drive.)
The command select volume should choose the correct partition you want to resize. Diskpart command can decrease the size of partition which is formatted in NTFS file system or does not have a file system. If a desired amount is not specified, the volume will be reduced by the minimum amount.
Since neither Disk Management nor Diskpart can resize, extend or shrink a partition which is formatted in ext4 partition, we need to use third-party disk partition software to complete the task. Here we'll use DiskGenius to shrink an ext4 volume.
Step 1. Launch DiskGenius and locate the ext4 partition you want to change size.
Step 2. Right-click on the ext4 partition and choose Resize Partition option from context menu.
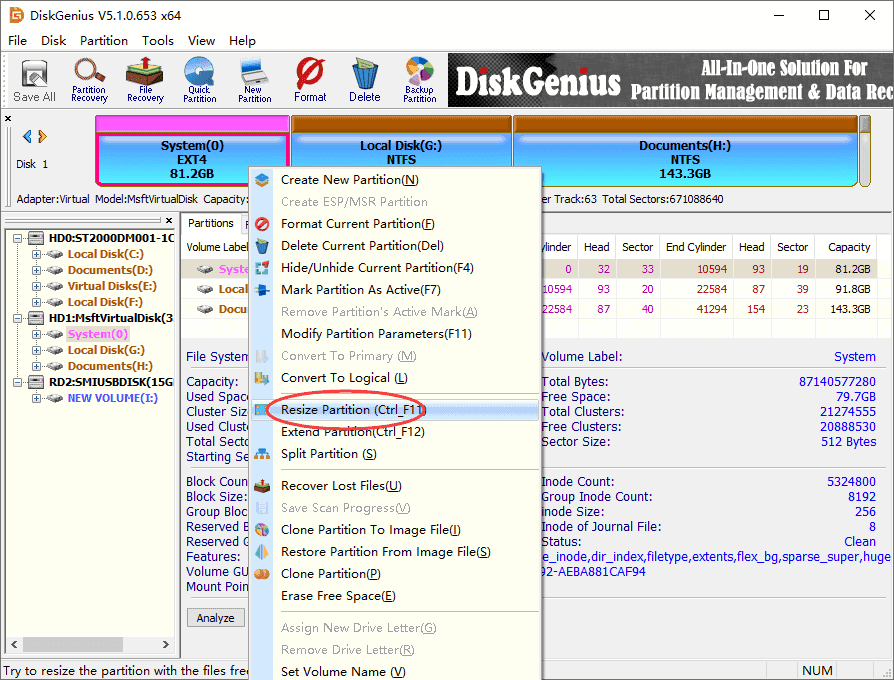
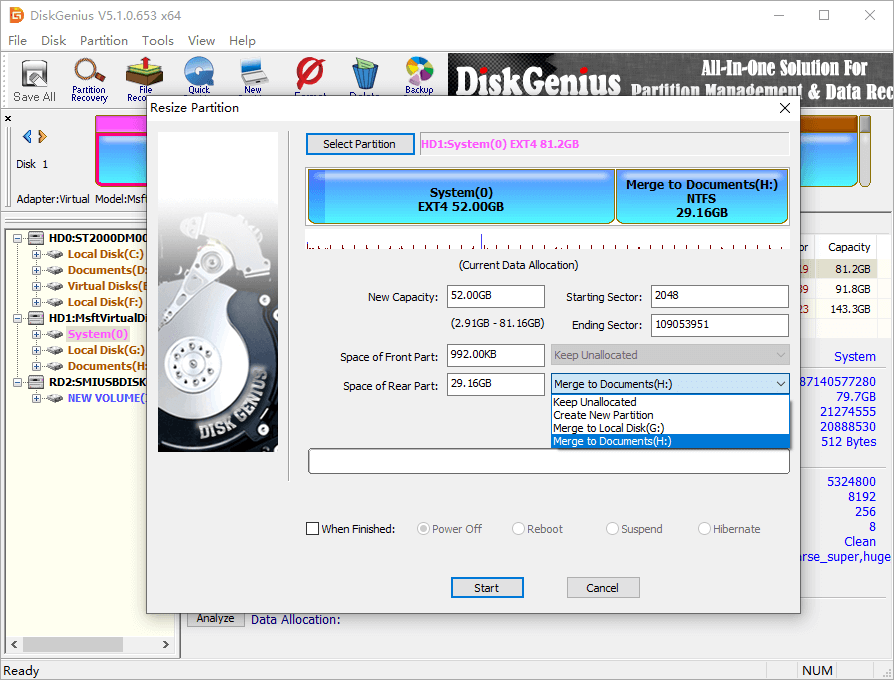
Step 3. The resizing partition window pops up and you can decide the partition size to be reduced.
Free space can be spared from either beginning or ending part of the partition, and there are three options when dealing with the free space. Click Start button once partition size gets set.
We have shown how to shrink the volume space without losing any data via three approaches in Windows 10/8/7 and Windows servers. DiskGenius can help you do the task that Disk Management cannot, such as shrink ext4 volumes, shrink FAT32 volumes for flash drive, move disk space, etc. With this tool, you can manage disk space more efficiently. As always, if you have any questions or need any help regarding disk partition management, please feel free to contacting us.
DiskGenius - Free partition manager to move/resize/partition, copy disk, convert MBR/GPT disk, etc.
ô Free Download Facebook
 YouTube
 X
X