Position: How Tos - Disk Utilities - DiskGenius 5.3.0 Adapts High Resolution Displays and High DPI
DiskGenius - An effective tool to recover RAW partition, restore lost partitions, move Windows to SSD, etc.
ô Free DownloadTable of Contents
Let me start with explaining the term display resolution. The display resolution of a monitor refers to the number of distinct pixels in each dimension that can be displayed. When people say the resolution is 1920 x 1080, that means the width of the screen has 1920 pixels and the height has 1080 pixels. Thus, there are 2073600 pixels in total. The higher resolution of a monitor, the more pixels it has, the items appear sharper. When it comes to computer monitors, you may have heard of 1080P, 4K, 8K, etc. They are developed by manufactures in order to explain display resolution in an easier way. 1080P means 1920 x 1080, which is commonly called FHD or Full HD resolution; 4K refers to 3840 x 2160, which is also known as UHD or Ultra HD resolution.
DPI is the short form of dots per inch, describing the number of dots (pixels) within an inch screen. The high DPI indicates an increased pixel density (dots per inch = pixels per inch). Setting a higher DPI, the items on the screen will appear bigger in condition that the screen size remain unchanged, as it occupies more pixels.
When a monitor has a higher resolution, e.g. 4K screen, it can display more stuff on one screen, and yet the size of images will be smaller, for the distance between pixels becomes shorter. Besides, when you use a high-DPI device, you may also encounter following issues:
What will you do to get a comfortable size for item shown on a high-resolution display? How does Windows handle the issue? The most commonly used solution is adjusting Windows display scaling, by which elements like text and icons will be shown in a larger size. It is quite easy to set display settings to a certain magnification:
Step 1. Right click the empty area of the desktop and choose Display Settings from context menu.
Step 2. Then view the Scale and layout section from the pop-up window.
First you can see a dropdown box which can change the size of text, apps and other items. There should be a Recommended option which is suggested based on what Windows 10 knows the computer display. If Windows does not select a percentage properly, you can select one manually.
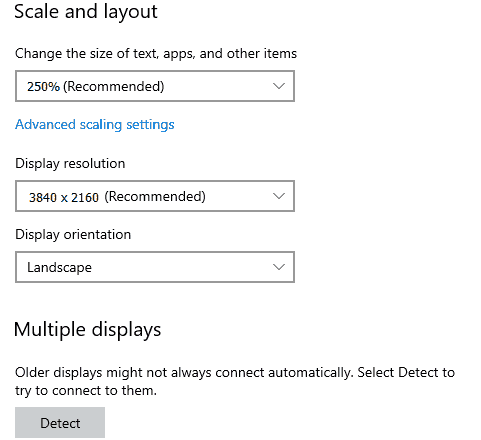
In some cases, some programs' interface will appear blurry when the display scaling and DPI get changed. If your Windows is newer than Windows 10 April 2018 Update, system will try to fix the issue automatically. You can find the option by clicking Advanced scaling settings.
Apart from that, you may still get the issue with some third-party software. When you change the display settings, Windows will attempt to judge whether the program is aware of DPI. In general, a program has the ability to communicate this with operating system, but Windows will regard the program as not DPI aware when the communication fails. In such situation, Windows will handle the issue by way of simulating a screen with smaller resolution and scaling up the display of all element of the program. After that, all elements of the program will appear in a large size, and yet they no longer look sharp/clear. Actually, you can skip the scaling process that is automatically made by Windows: open the file location of the program > right-click the executable file and choose Properties > select Compatibility tab > click Change high DPI settings button. One thing worth noting is that this only works on those programs which are aware of DPI but just fail to communicate with Windows. Therefore, it is important make program code DPI-aware.
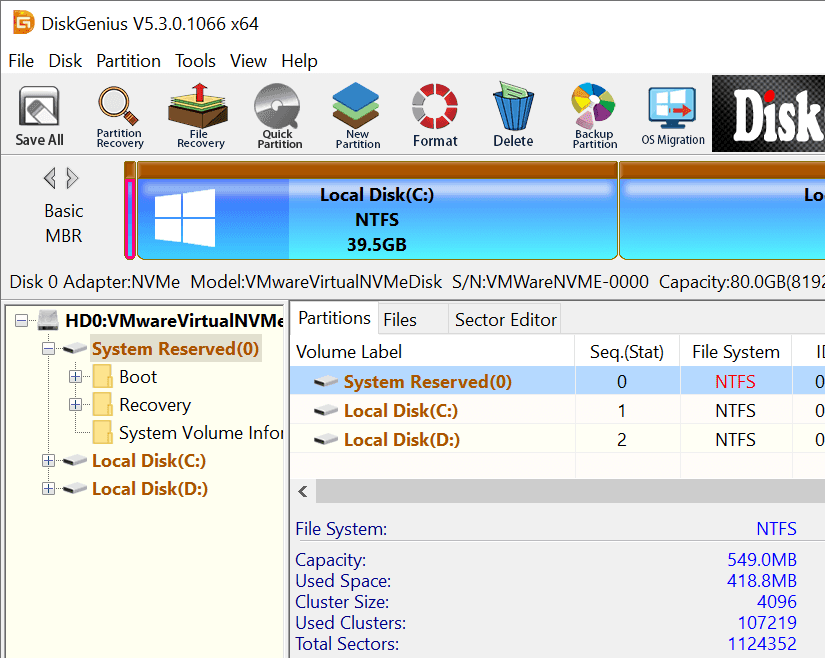
DiskGenius up to version 5.2.1 was not DPI -aware, which means all elements of the program might display not clearly on high-resolution screens. Although that does not affect its functions, it is not good to user experience. Since V5.3.0.1066, DiskGenius made its code DPI-aware, which is able to respond to scaling changes and everything appears clearly on high resolution screen. The following screenshot shows DiskGenius interface after changing display setting to 250% magnification. No matter whether purchased DiskGenius, you can free download the latest version. Software version update is provided free of charge.
DiskGenius V5.3.0 is released recently, and the new version came with more useful features, for example, clone larger hard drive to smaller SSD/HDD, recover deleted or lost CR3 photos, convert a physical Windows OS into VMware virtual machine, TRIM optimization, optimize file recovery function, etc. You can view the detailed changelog on the download page.
Clone larger disk to smaller SSD/HDD
Disk cloning function has been available since the first version was released. It provides three modes of cloning disk, by which you can choose to make a sector-by-sector clone or a file-by-file disk clone. However, none of these disk cloning modes supported to clone a larger disk to a smaller one. Now, with the new version, you can easily clone larger hard drive to a smaller HDD or SSD as long as the destination is large enough to hold all data of source disk. Apart from cloning larger hard drive to smaller SSD/HDD, DiskGenius can also migrate Windows OS to smaller SSD/HDD.
Recover deleted or lost CR3 photos by file type
Data recovery is one of the useful functions provided by DiskGenius, which can help you recover deleted files, recover formatted partition, restore lost or deleted partition to same disk, recover data from RAW drive, etc. When searching for lost data, DiskGenius carries out a deep scanning by default, and files found by this way will be listed under Recovered Type in scanning result. The deep scanning now supports to search for and recover CR3 photos, improving the photo recovery ability.
Convert current physical Windows OS to VMware virtual machine
With DiskGenius Free edition, you can convert current running Windows operating system to VMware virtual machine. The migrated OS can boot properly on the virtual machine, keep original settings, apps and data. The converting process does not need system rebooting, and it even does not disturb your current work.
When DiskGenius first came out, it did not support high DPI monitors well, but now it adapts to it perfectly. Now the interface and all dialogue boxes in the software all displayed clearly on high-resolution screens, improving user experience. We'd like to express our thanks to users whose feedbacks play an important role in improving the software. Should you have any questions or suggestions regarding the program or need help, feel to leave a comment, or submit a ticket on the contact page.
DiskGenius - A free tool to clone large HDD to smaller SSD, migrate Windows 10 to SSD, resize partition, etc.
ô Free Download Facebook
 YouTube
 X
X