Position: How Tos - Disk Utilities - How to Convert a Physical Windows PC to VMware Virtual Machine?
DiskGenius - Freeware to transfer Windows 10/8/7 to SSD or HDD without reinstalling OS and programs.
ô Free DownloadTable of Contents
Virtual machine software helps to create a virtualized environment which works like an individual computer system. Virtualization of a physical PC refers to the process of converting a physical operating system for example Windows into a virtual disk and making the virtual machine boot from the migrated OS. The process is supposed to create a complete copy of existing operating system of your physical computer and make the system bootable inside the virtual machine. In this page, we are going to convert a physical Windows PC into VMware virtual machine, and you can follow this guide to convert Windows 10/8/7/Vista and Windows servers to VMware.
Why should you convert a physical PC to a virtual machine? Quite a few reasons can drive you create a virtual machine, for example, you want to create a test environment so that you can perform required tasks. On your physical computer, you might need to deal with tricky issues, face the risk of losing important data or system crash if any error occurs. However, in the virtual machine, you can take snapshots for a working status for system so that you can roll it back if necessary.
How to convert a physical Windows PC or server to a VMware virtual machine? The traditional method is using VMware vCenter Converter. It is provided by VMware, and you can download it from VMware free of charge. With VMware vCenter Converter, you can convert either Windows or Linux system into VMware virtual machine. Apart from vCenter Converter, DiskGenius Free is an alternative solution for the converting. DiskGenius provides an easier way to perform the conversion, and it enables you migrate physical Windows 11/10/8/7/Vista/Windows Servers to VMware. Moreover, DiskGenius includes many other useful functions, for example, create, load or manage virtual disk (VMDK, VHD, VHDX, VDI) without launching virtual machine, convert virtual disk format among VMDK, VHD and VDI without losing data, create '.img' image file, manage partitions on virtual disk, recover lost files or partitions from virtual disks, clone physical disk to virtual disk, etc.
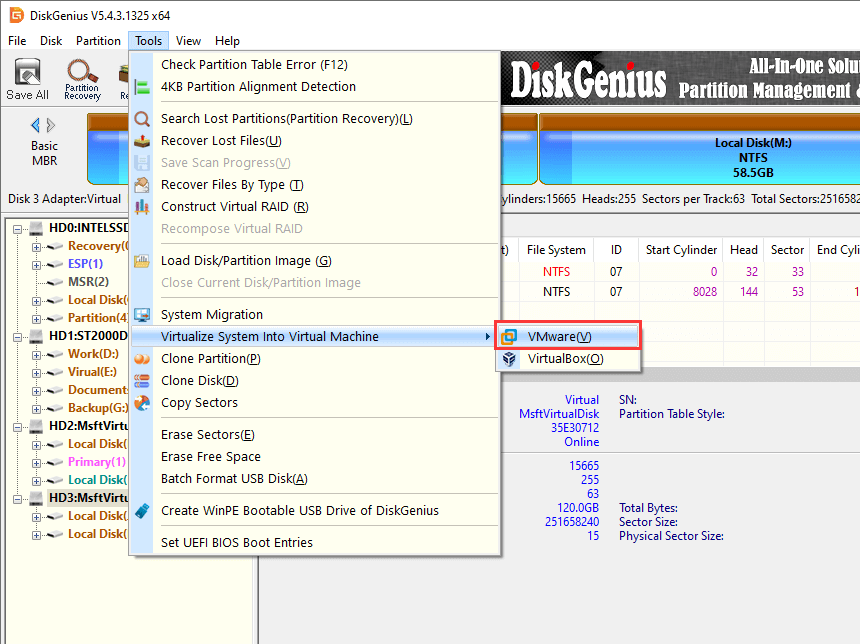
Step 1. Install and launch DiskGenius Free edition on the computer you want to migrate to virtual VMware. Click Tools > Virtualize System Into Virtual Machine > VMware, see the picture below:
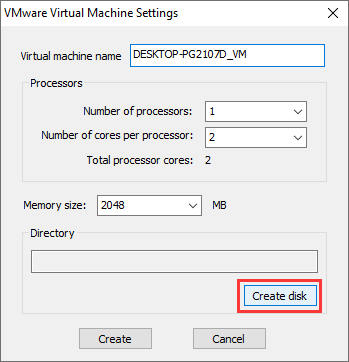
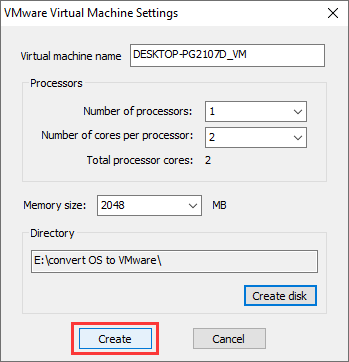
Step 2. Configure Virtual machine settings and click Create disk to create a virtual disk.
You can name the virtual machine, set number of processors, number of cores per processor and memory size for the virtual machine. Then click Create disk button to create virtual disk (.vmdk).
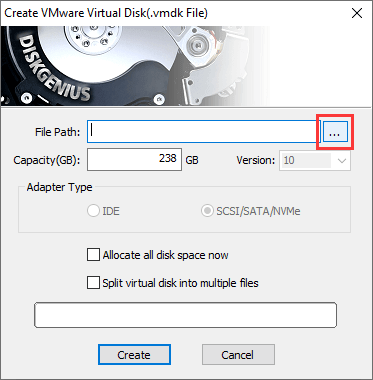
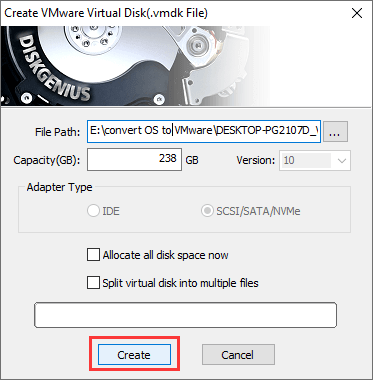
The "Create VMware Virtual Disk" window shows up, and you can click options button to set a location for the virtual disk.
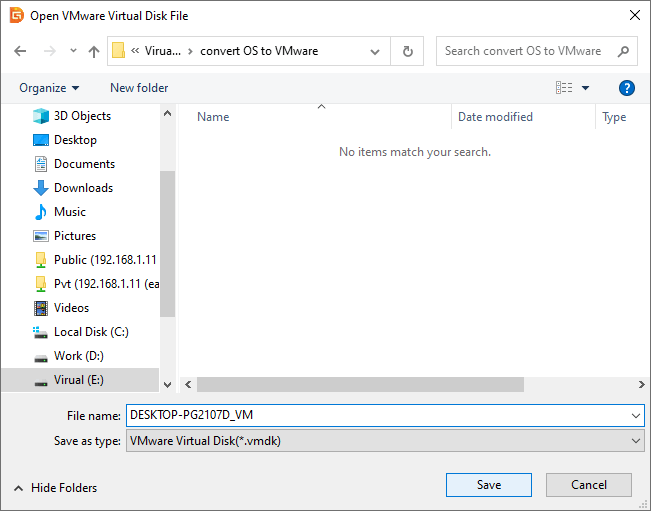
Browse your computer to specify a location for the .vmdk disk and enter a name before clicking Save.
Click Create button and the .vmdk file will be created. As to the capacity, the default value is equal to the size of your system disk, and you can modify it on your own. Just make sure the capacity is large enough to hold the OS.
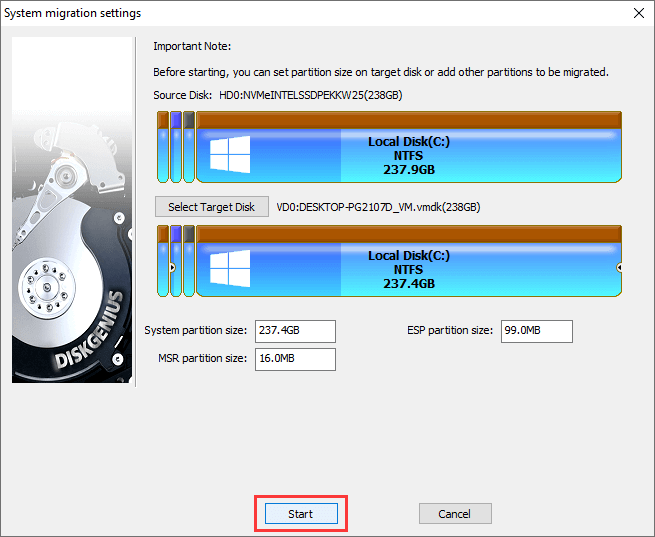
Step 3. Click Create button to start the converting.
Click Start button, and DiskGenius starts to migrate current Windows operating system to the vmdsk virtual disk you just created.
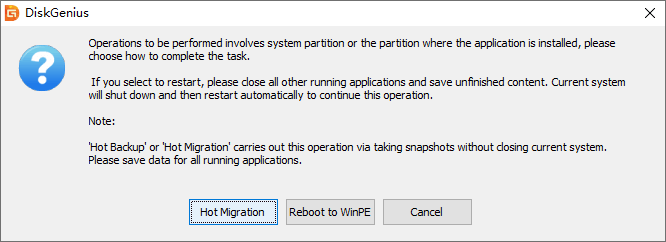
Select How Migration. You can choose either Hot Migration or Reboot to WinPE, and Hot Migration is the recommended options, as it can perform the system migration in the background. Hence, you need to neither reboot system nor interrupt ongoing work.
Wait for the process to complete.

Step 4. Open the virtual machine in VMware Workstation: Launch VMware Workstation, click File and choose Open.
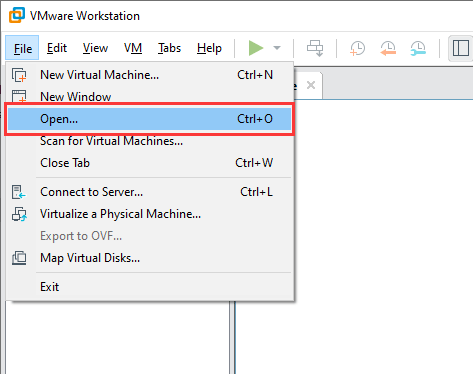
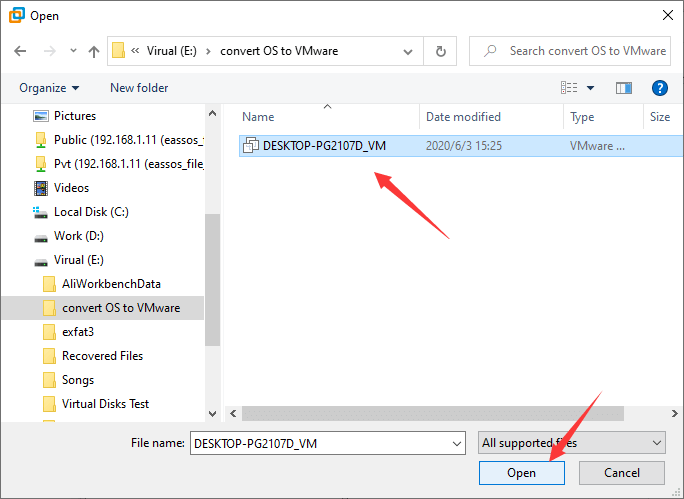
Browse your computer to find the VM you saved in step 2, select it and click Open.
Now the virtual machine is listed in VMware Workstation. Click Power on this virtual machine to boot the system.

Note: there might be licensing issues with the system in the virtual machine. Windows licenses is usually allowed to be used on one computer at a time, and Windows activation may regard that the system in your virtual machine is running on a different physical computer. In that case, you may need to contact Microsoft to fix the issue.
DiskGenius supports to convert virtual disk file from one type to another without losing data, for example convert VHD/VHDX to VMDK/VDI, convert VMDK to VHD/VDI and convert VDI to VHDK/VHD. The converting can be completed without launching your virtual machines.
Note: The function to convert virtual disk format is available for DiskGenius Professional Edition, and you need to upgrade to Professional Edition prior to conversion.
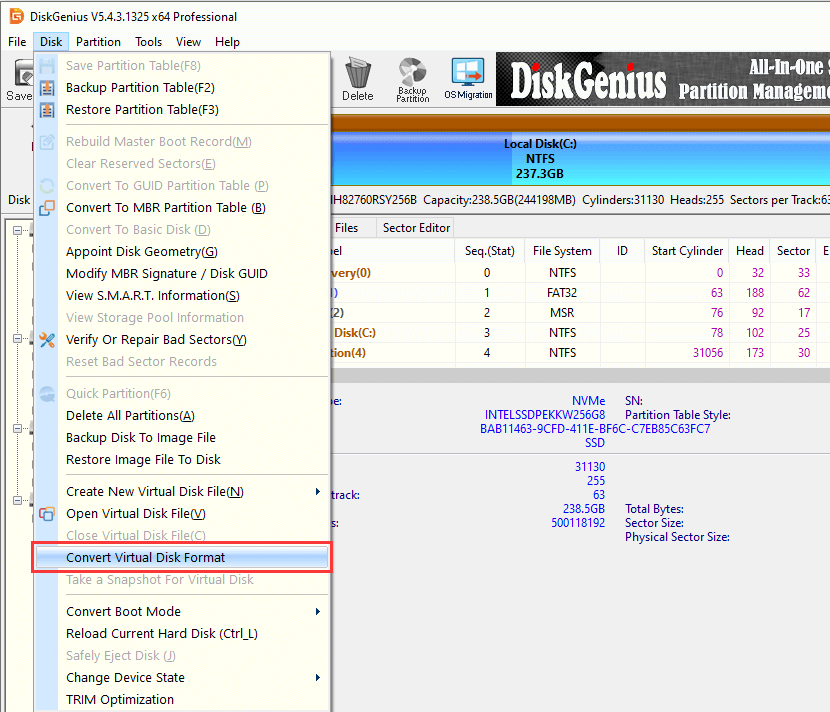
Step 1. Launch DiskGenius, click Disk and choose Convert Virtual Disk Format, as follows:
Step 2. Click Source Virtual Disk button to select the virtual disk you want to change its format.
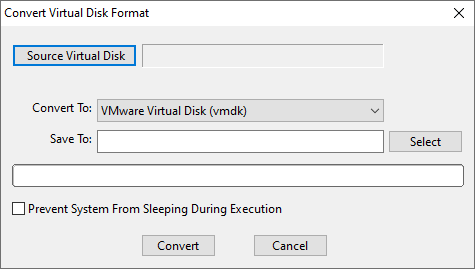
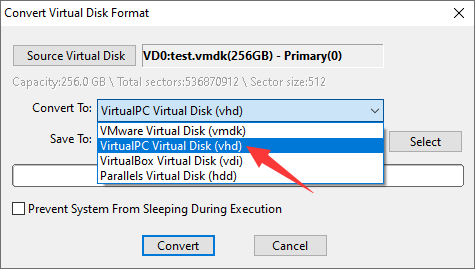
Step 3. From dropdown list you can select a virtual disk format you want to convert, for example, VMware Virtual Disk (vmdk), VirtualPC Virtual Disk (vhd) and VirtualBox virtual Disk (vdi).
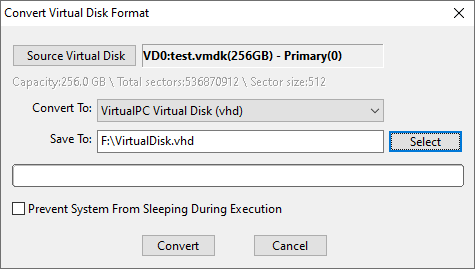
Step 4. Click Select button to specify a location to save the destination virtual disk.
The conversion does not affect the original virtual disk itself to avoid data loss, thus you need to store the new virtual disk file with wanted format.
Step 5. Click Convert button to complete the conversion.
Once converting finishes, you can either load the new virtual disk in DiskGenius or your virtual machine to access its partitions and files.
1. How do I convert a physical PC to a virtual machine?
A few tools can help you convert a physical PC's state into a virtual machine, for example VMware vCenter Converter, Windows Disk2vhd, DiskGenius, etc. With VMware vCenter Converter and DiskGenius, you can easily migrate Windows from physical PC to a virtual machine, and Disk2vhd can help you convert a running Windows OS to a virtual hard drive (VHD). Apart from that, DiskGenius can also help you migrate OS, clone physical disk to virtual disk (vmdk, vhd, vid), convert virtual disk format without losing data, etc.
2. How do I migrate a physical server to VMware?
Here is a simple guide to migrate a physical server to VMware:
Step 1: Launch DiskGenius on the physical server and choose "Virtualize Current System Into VMware Virtual Machine" under Tools menu.
Step 2: Click Create button to create the virtual disk which is going to hold the server system.
Step 3: Click Create button to migrate current server OS to the virtual disk.
Step 4: Open the virtual machine in VMware.
3. What is VMware vCenter converter?
VMware vCenter Converter is a free tool provided by VMware to help users convert local physical Windows/Linux PC into virtual machines. This tool can be download from VMware website.
4. How do I move an existing Windows installation to VMware virtual machine?
Method 1: Download and install VMware vCenter Converter; click "Convert machine" button and follow the wizard to complete the conversion.
Method 2: Download and install DiskGenius Free Edition on your computer. Choose "Tools" and then "Virtualize Current System Into VMware Virtual Machine"; follow the wizard to migrate existing Windows to VMware virtual machine.
In short, it is easy to virtualize a physical Windows PC and make the system bootable inside virtual machine with the help of DiskGenius. With DiskGenius, you can easily manage virtual disk and partition, create backups, recover data from virtual disk, etc. Should you need any help regarding virtual disks, feel free to contact DiskGenius support team.
DiskGenius - Convert VMDK to VHD without losing data, recover lost files/partitions from virtual disk, etc.
ô Free Download Facebook
 YouTube
 X
X