Position: How Tos - Disk Utilities - Fix Wsappx High CPU and High Disk Usage Issue in Windows 10 - 4 Solutions
DiskGenius - A reliable tool to resize partition, test disk, backup system, image disk, recover lost data, etc.
ô Free DownloadTable of Contents
Wsappx is a process that runs in the background of Windows 10 and Windows 8 as a part of Windows Store and Universal app platform of Microsoft, and it is responsible for installing, uninstalling and updating Store apps as well as making sure apps are licensed properly. It was initially introduced in Windows 8 and it can also be found in latest Windows versions like Windows 10. If you expand Wsappx in Task Manager, you can see one or more subservices running: Appx Deployment Service (AppXSVC), Client License Service (ClipSVC) or Windows Store Service (WSService), as follows. Next we'll take a closer look at of these services.
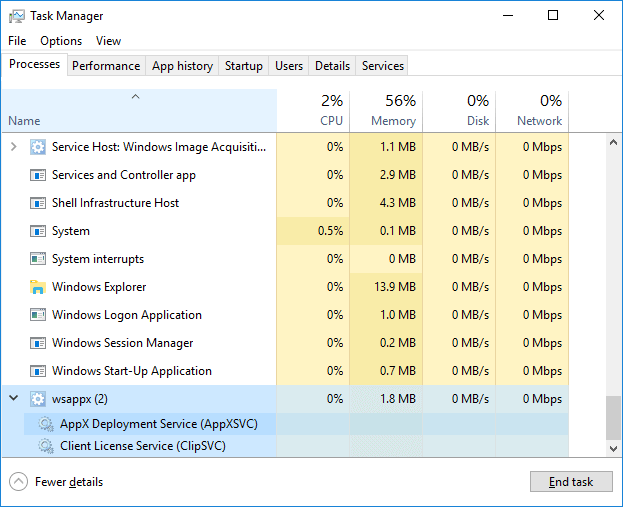
AppX Deployment Service (AppXSVC): The function of AppxSVC is deploying Store apps. It is noticeable that those Universal Windows Platform apps are distributed in Apps packages. To put it differently, this process is in charge of installing, uninstalling and updating Store apps. Hence, Windows becomes able to automatically update apps in the background, such as Paint 3D, Mail, etc. You should be noted that when you install, uninstall or update Windows traditional desktop apps, CPU and disk resources are also used. The difference between them lies in that AppXSVC is managing these tasks instead of individual app installer. You may have found that the process is still running when you are not installing anything. That's because it is updating Store app in the background.
Client License Service (ClipSVC): On Windows 10 computers, the ClipSVC background service handles infrastructure support for the Store. If you disable the service, according to Microsoft, your Store-bought apps will not behave correctly. Its responsibility covers managing license so that you can use Store apps that you've paid for.
Windows Store Service (WSService): It is Windows 8 background service and also handles infrastructure support for the Store. It can be regarded as the same thing as ClipSVC, but it does not show up in Windows 10.
Sometimes, the Wsappx service may consume a significant amount of CPU and resource when you are downloading, updating, installing or uninstalling Store apps, affecting the overall performance of your computer. Many times, you can see the Wsappx service active when Windows Store is being used, for example, the process may start when you open or browse around in Windows Store. As mentioned above, Wsappx service always works in the background, and you may see it is active even when you are not using Microsoft Store apps. That's because there might be new updates of installed apps like Paint, Windows media player, WordPad, etc.
Can Wsappx be virus? Some user maybe confused by the problem. The Wsappx is a part of Windows system and it does not carry any virus even though it slows down computer in some circumstances. Wsappx is annoying for those whose computer has limited RAM or CPU resources. If you are concerned about malware, it is a good idea to run a scan with your antivirus software.
Can I disable it? If you try closing the process in Task Manager, you will see a message box telling that ending this process will cause Windows to become unusable or shut down, which leads to lose any data hasn't been saved. Thus, it is not advisable to disable the process and its subservices, but we can try to prevent it from automatically running in the background, so they will be launched only when needed. How to do that? Continue reading.
It is not a good sign to have high disk or CPU usage or high disk usage, which means there is little resource left to perform other actions. Everything slows down and computer cannot responsive rapidly. If the issue is caused by the process Wsappx, you can follow solutions below to fix the issue.
It seems that the high CPU issue caused by Wsappx does not have direction relation with drivers, and yet outdated or corrupted device drivers indeed cause issues. If your computer keeps trying to update drives automatically in the background and the Wsappx process may turn to unresponsive and occupy CPU resources. In this case, you can try updating device drivers on your own. Here are steps to update drivers in Windows 10.
Step 1. Right-click on the Start button and choose Device Manager option. Then Device Manager window shows up.
Step 2. Locate and expand Display adapters. Then right-click on the listed option to select Update driver, as below.
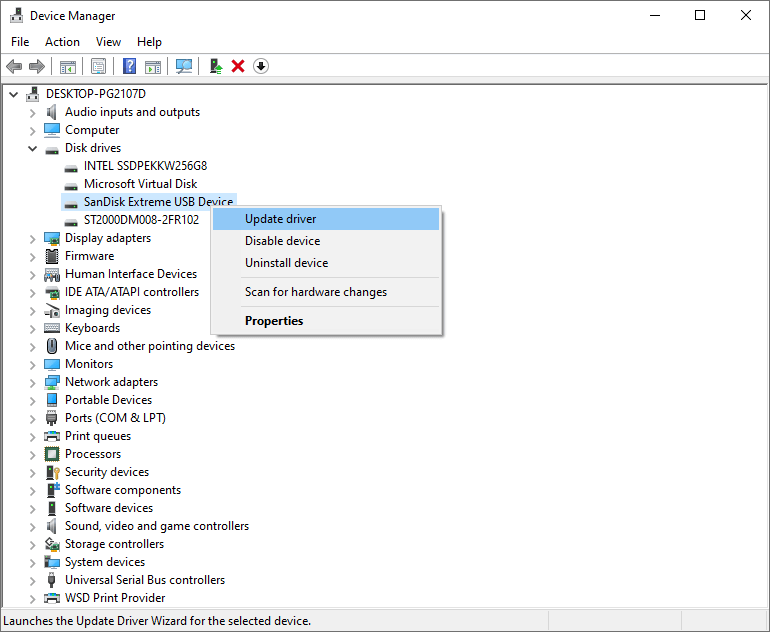
Step 3. On the Update Driver Wizard, select Search automatically for updated driver software and Windows 10 starts to search your computer and the Internet for the latest driver software for your device.
If Windows fails to find desired driver updates, you can try searching for drivers on the official website of device's manufacturer and you can also find clear instructions regarding how to get them installed on your PC.
Disabling the Windows Store can help a lot in reducing disk or CPU issue and you can disable it via either Group Policy Editor or Registry Editor.
Disable Windows Store using Group Policy Editor
Step 1. Press Windows logo key and R key at the same time to open Run dialog. Then type in gpedit.msc and hit Enter key to open Local Group Policy Editor.
Step 2. In the Group Policy Editor, expand the path: Computer Configuration > Administrative Templates > Windows Components > Store.
Step 3. Right-click on Turn off the Store application and select Edit from the context menu.
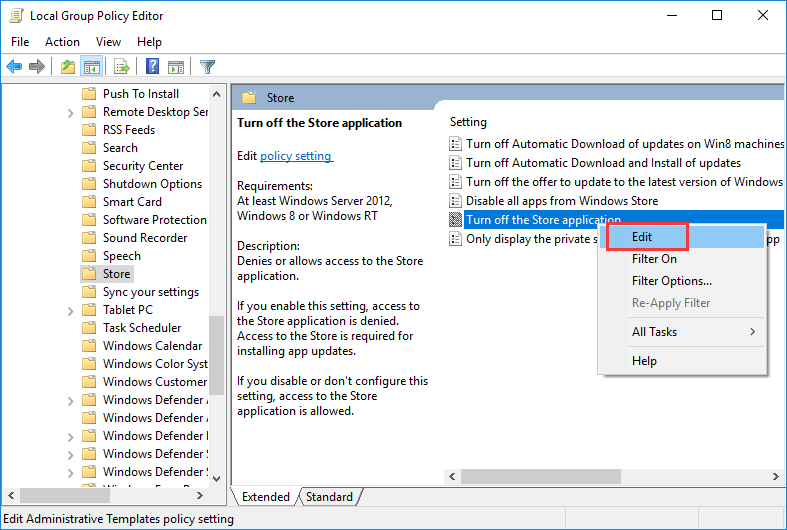
Step 4. Select Enable and click Apply and OK to save changes. Then restart your computer and check if the high CPU or high disk usage issue is fixed.

Disable Windows Store using Registry Editor
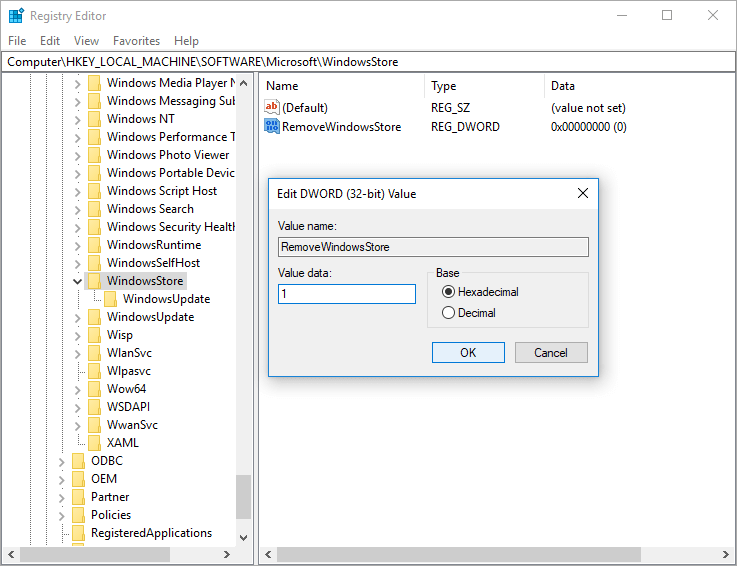
Step 1. In Windows 10, type regedit in the searching bar and press Enter key to open Registry Editor.
Step 2. Navigate the location: HKEY_LOCAL_MACHINE\SOFTWARE\Policies\Microsoft\WindowsStore.
Step 3. Click WindowsStore from the left pane and right-click the empty area of the right pane to select New > DWORD (32-bit) Value. Then this newly created key as RemoveWindowsStore.
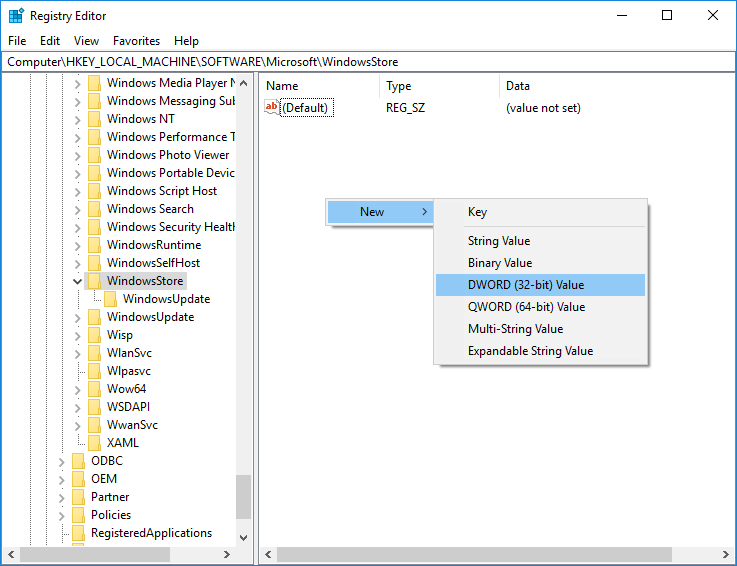
Step 4. Double-click the key RemoveWindowsStore and type 1 under the Value data. Click OK button and then restart your computer.
A disk check should be taken into consideration for those who get this issue recently, for the disk may contain errors or bad sectors.
Step 1. Double-click "This PC" icon from desktop to open Windows File Explorer. Right-click a partition for example H drive and choose "Properties" option.
Step 2. On the pop-up dialog box, click "Tools" tab and click "Check" button. Then choose "Scan and repair drive" option.
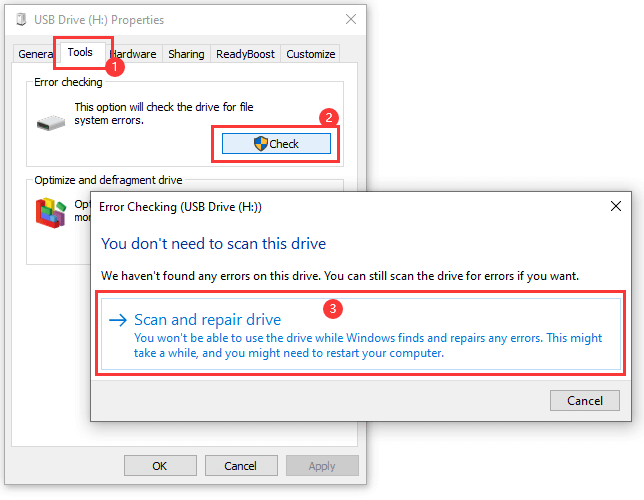
Step 3. Wait for the process to finish. The repeat Step 1 and Step 2 on all other partitions.
It is worth noting that disk checking usually takes time to complete, you may not be able o use your PC for a while if you restart and run it. You can skip it for the moment and reschedule it when you are convenient. Apart from using system command to check disk issue, you can use DiskGenius Free Edition to test hard disk. If your computer or hard drive starts to response slowly, you should scan disk for bad sectors. Here is how to check and repair bad sectors using DiskGenius.
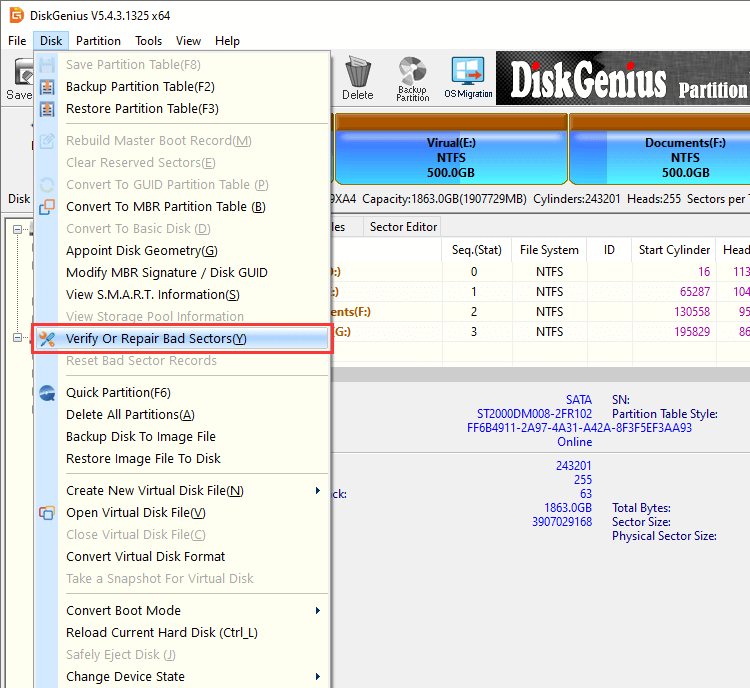
Step 1. Install and launch DiskGenius Free Edition form your computer, select the disk you want to check bad sectors from the left pane and click Tools > Verify Or Repair Bad Sectors.
Step 2. Click Start Verify button from the Bad track verification window and DiskGenius starts to scan the disk and check if there is any bad sector.
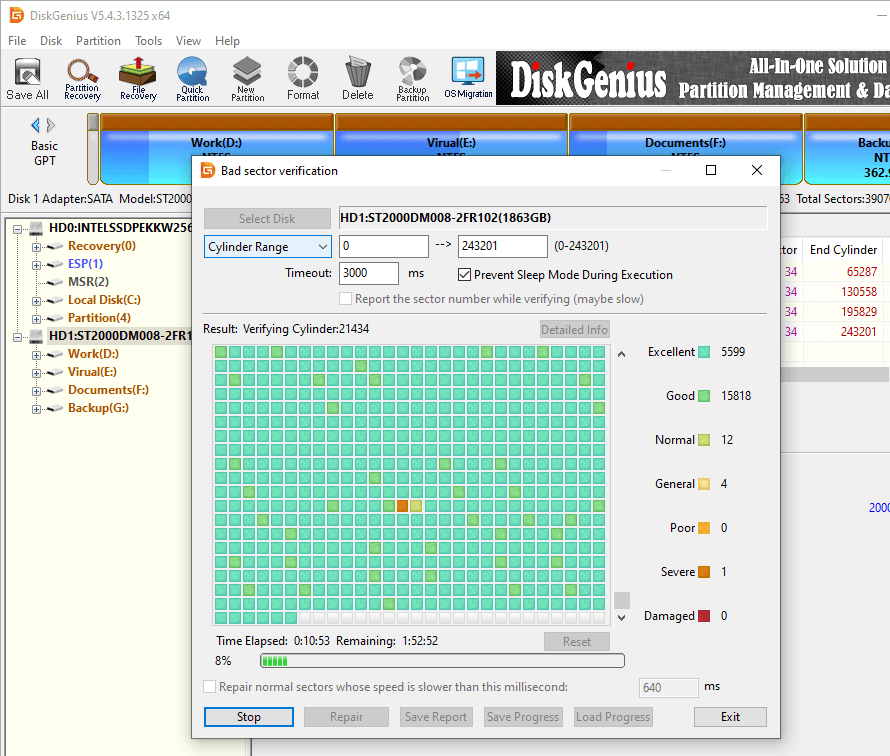
You can click Repair button if DiskGenius finds out bad sectors after scanning. Note: bad sector checking is read-only process and does not damage data, but bad sector repair will damage data stored on or near bad sectors. Thus, you should back up files before trying to repairing bad sectors.
If you are troubled by high disk usage issue all the time on your computer, you can try increasing the virtual memory for the process. To do that, you can follow steps below:
Step 1. Type performance in the searching box and click Adjust the appearance and performance of Windows from searching result. This opens Performance Options window.
Step 2. Switch to Advanced tab and click Change button under virtual memory section. Then on the Virtual Memory window, uncheck the option Automatically manage paging file size for all drives, select the system volume (usually C: partition) and click Custom size option, as follows.
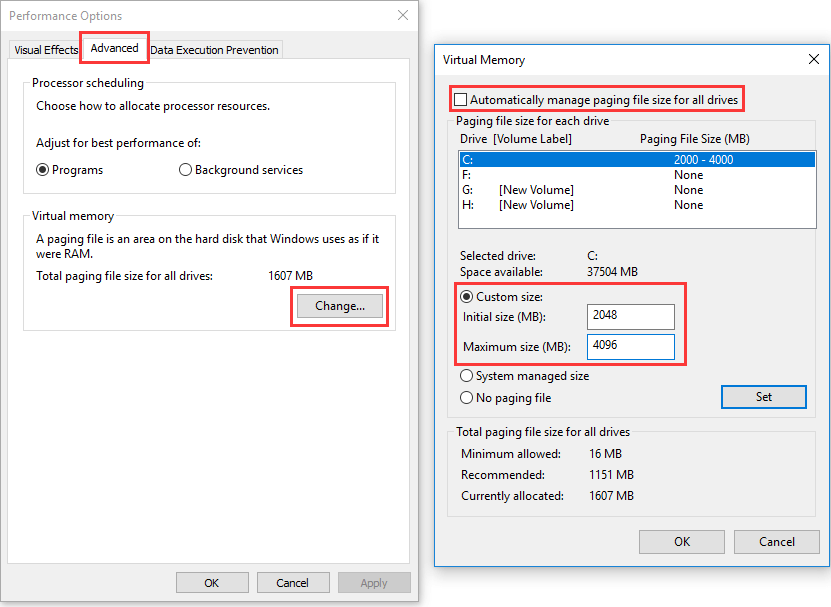
Step 3. In the box for Initial size (MB), enter the value equivalent to the size of your RAM and enter the double of your RAM in Maximum size (MB) box. Then click Set and OK to save changes and restart your computer.
1. Is Wsappx a virus?
No. Actually, it is a part of Windows operating system. If you are upset with malware or virus, you can enable Windows Defender or install some third-party antivirus software to protect your computer.
2. Can I disable Wsappx Windows 10?
No, the process cannot be disabled. It does not run automatically, and in fact, it just launches when needed. For instance, when you start a Store app, the ClipSVC will appear; if you install or uninstall an app, the Appx will take some resource. You may try killing the process in Task Manager, however, you are likely to get a warning message from Windows saying "Editing this process will cause Windows to become unusable or shut down, causing you to lose any data hasn't been saved. Are you sure you want to continue?" If you do not want the process to run in the background, you can simply prevent Windows from installing, uninstalling or updating a Store app.
3. Why do I have two Wsappx?
It is normal to see two Wsappx processes in Task Manager. Wsappx is part of Windows, or specifically, it is associated with Windows Store and the universal app platform. So when you have two Wsappx, there must be different processes or functionalities working on. Thus, there no need to be anxious about this.
4. Why is my disk usage at 100%?
Briefly, when you get 100% disk usage, your computer might be freezing or hanging. Quite a few factors can lead to Wsappx high disk usage problem, for example, the disk is busy at copying and pasting a large amount of data, the disk contains bad sectors, virus, some service is not disabled, computer is installing system updates, there is not enough RAM, etc.
5. How do I fix Appx Deployment Service?
Here are some solutions you can try to fix Apps Deployment Service. Keep in mind that some methods should be executed with the help of expertise users.
Method 1: Install Windows updates and make sure your OS is up to date.
Method 2: Turn off automatic updates for Microsoft App Store via editing Local Group Policy.
Method 3: Disable Superfetch service.
Method 4: Fix the problem by running Windows Store Apps Troubleshooters.
6. Why is Wsappx using so much RAM?
As previously mentioned, the Wsappx is related to Windows Store and Windows Universal App platform, so, in general, when you see high usage of RAM, the process might be installing or updating one of the Windows apps (or some app is updating in the background automatically).
Wsappx is an important process of Windows 10 and 8 operating system, and it helps to install and update apps in Windows Store. Though, it may bring about Wsappx high disk and high CPU problems, you can try methods above to fix the issue easily. We hope these solutions work on your computer and help you improve performance once and for all. If you have any other solutions or suggestions, please share them with us.
DiskGenius - Effective software for data recovery, partition management, disk & partition backup and more.
ô Free Download Facebook
 YouTube
 X
X