The "Partition Recovery" feature can restore lost or deleted partitions through data from the boot sector and other sectors of the partition, and rebuild the partition table. In case of partition loss, whether caused by accidental deletion or virus attacks, this feature can be used to attempt recovery.
Partition location information is stored in the partition table. When a partition gets deleted, the partition's location information is removed from the partition table, but data inside the partition is not erased. DiskGenius searches disk sectors to locate the boot sector of lost partitions, then determines the partition type and size through information in the boot sector and other sectors, thereby achieving partition recovery.
DiskGenius features an easy-to-use and intuitive GUI, and supports recovery of deleted or lost FAT, NTFS, exFAT, Ext2, Ext3, and Ext4 partitions. Even without saving the partition table, you can copy files from discovered partitions and even recover deleted files within them. During the search process, discovered partitions are displayed immediately, allowing you to browse files within the partition instantly to verify if the discovered partition is correct.
Step 1. Select the disk that needs recovering lost partitions and click "Partition Recovery".

Step 2. The "Search Lost Partitions" dialog will pop up.
1. Searching Mode:
Automatic: The program will search the entire disk, from the start to the end of the disk. During the search process, the software will automatically determine whether discovered partitions are valid based on partition structure and data within the partition, and automatically perform the "Ignore" or "Reserve" actions. The entire search process requires no user intervention. Note that in automatic mode, the software will not prioritize keeping existing partitions. After the search is complete, existing partitions will only be kept if no other partitions are found at their locations.
Advanced: Allows users to customize the search range (such as the entire disk, unallocated space, or a specified range). During the search process, users need to manually determine whether to keep each discovered partition, and can preview files within the partition in real time to confirm if the partition is correct.
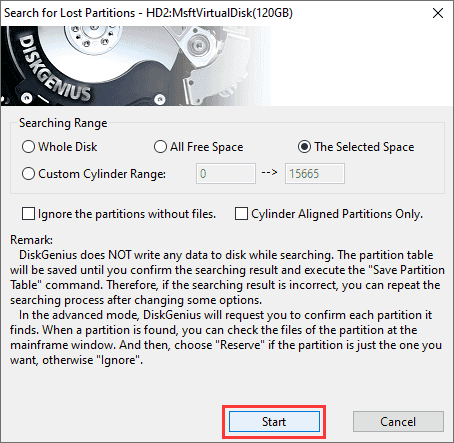
2. Searching Range:
Whole Disk: Ignores existing partitions and searches the whole disk from beginning to end.
All Free Space: Keeps existing partitions and searches all unallocated space for lost partitions.
The Selected Space: Keeps existing partitions and searches for partitions only within the currently selected free space area.
Custom Range:
Cylinder Range: Specify the start and end range by cylinder number.
Sector Range: Specify the start and end range by sector number.
Capacity Range: Specify the start and end range by disk capacity position, using MB or GB as units.
3. More Options:
Ignore the partitions without files. (No prompt): If selected, the software will automatically skip empty partitions during the search without prompting.
Ignore damaged partitions. (No prompt): If selected, the software will skip damaged partitions without prompting.
Reserve existing partitions automatically. (No prompt): If selected, the software will automatically keep partitions that already exist on the disk.
Note: The scanning process is read-only, and DiskGenius does not write any data to the original disk while searching for partitions. Lost partitions found by the software will not be saved to the partition table until you click "Save All". Therefore, if the scanning result is not correct, you can repeat the search.
Step 3. Using "Advanced" mode as an example for detailed operation. After configuring the search range and other options as needed, click the "Start" button to begin the search process.
Each time a partition is found, DiskGenius immediately displays the found partition in the interface and shows the following prompt:
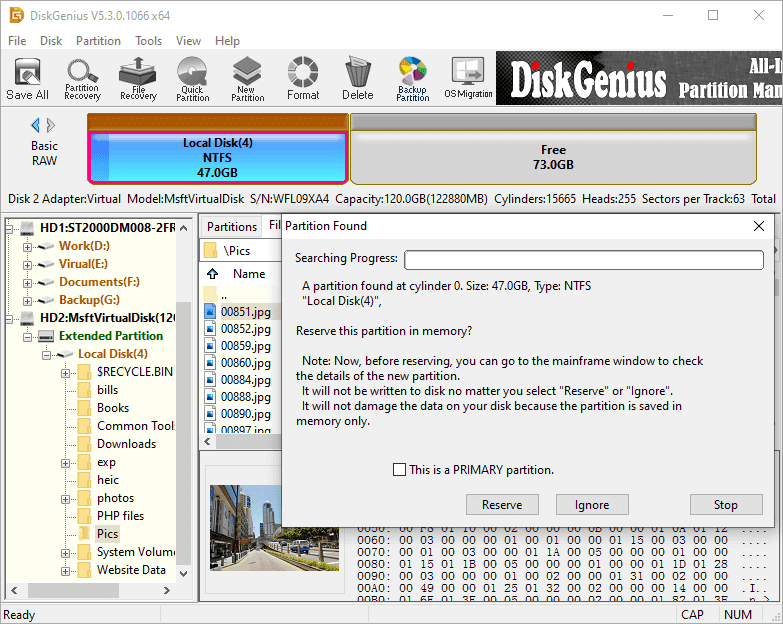
If the found partition contains files, the program will automatically switch to the file browsing window and display the file list within the partition. You can determine whether the partition found by the program is correct by previewing files. You can view files in the partition on the main interface without closing the "Partition Found" dialog box.
If you determine that the partition is not correct after previewing files, click "Ignore". If the partition is correct, click "Reserve" to keep the partition. After clicking "Reserve" or "Ignore", DiskGenius will not save the partition table (no changes to the hard disk), and it will continue searching for other partitions until the search process ends.
Sometimes the dialog box will also display an option for "This is a PRIMARY partition" or "This is a LOGICAL partition". If DiskGenius displays an incorrect partition type, you can convert it by checking this option.
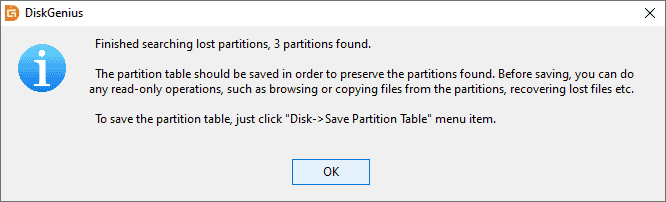
Step 4. After the search is complete, DiskGenius displays a completion prompt. Click "OK" to close the dialog.
If you want to cancel the current scanning process and try to search for lost partitions again, click "Disk" - "Reload Current Hard Disk".
Step 5. Copy Files or Save Partition Table.
After the search is complete, without saving the partition table, you can immediately use this software to access files within found partitions, such as copying files. You can also use the "File Recovery" feature to recover deleted files from those partitions. Lost partitions can only be recognized and accessed by the operating system after saving the partition table (by clicking the "Save All" button).
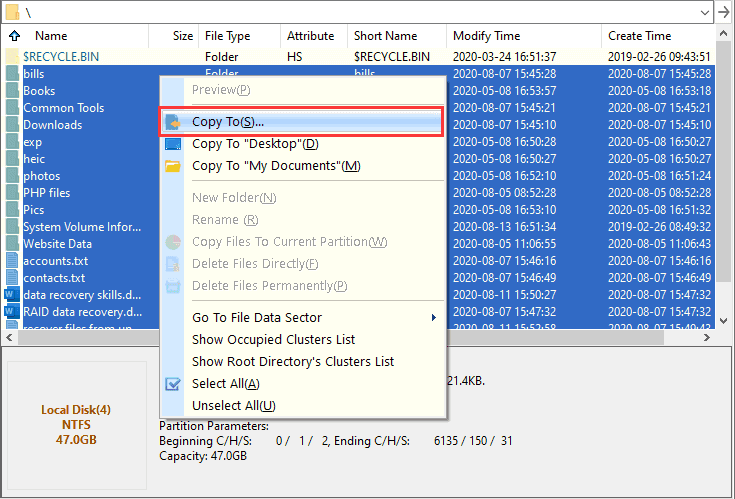
1. Copy files to another drive:
Select files and folders you want to recover, right-click them and choose "Copy To". Then you can recover files to a different drive.
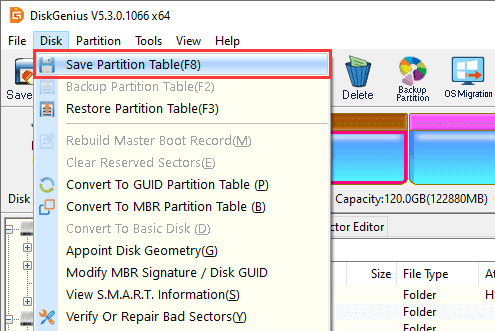
2. Save partition table:
You can click the "Save All" button on the toolbar or click "Disk" - "Save Partition Table" to save lost partitions to the partition table. After this, lost partitions listed in the scanning result will be recognized by the operating system.

 Facebook
 YouTube
 X
X