
Updated on Aug. 07, 2025
Position: Resource - Disk Utilities - How To Delete Computer Files Permanently and Prevent Recovery?
You might think you've deleted your private files by sending them to the Recycle Bin, formatting a drive, or even resetting your computer. But the truth is that most of the time those deleted files are still there. If you're handing over an old PC, selling a used hard drive, or returning a company laptop, there's a serious risk that someone with the right tools could recover your deleted data, including personal photos, work documents, and sensitive credentials.
When you delete a file on Windows or macOS, what really happens? At first glance, it seems like the file disappears. On Windows, it goes to the Recycle Bin. On macOS, it lands in the Trash. Even after you "empty" these, the system still hasn't actually wiped the data.
In most cases, deleting a file only removes its pointer in the file system's index. The actual contents of the file, all the 1s and 0s, still sit on your drive, marked as "free space". Until that space is overwritten by new data, it remains recoverable with readily available recovery tools.
Even formatting your drive may not help. In fact, "quick format" is the default option in Windows, simply erases the file system metadata, making the files invisible but not gone. Anyone with free data recovery software can bring back files from a quick-formatted drive.
When deleting data on a computer, most people simply use "right-click → Delete" or "Shift + Delete." Those with a bit more technical knowledge might choose to format the drive instead. However, the default formatting option is usually "Quick Format," which only removes the file index, the actual data remains on the disk and can be easily recovered. In contrast, a "Full Format" (or slow format) overwrites the original data to some extent, offering a basic level of data erasure. Here's how to do it:
Step 1. Open This PC and right-click the target drive.
Step 2. Click Format.
Step 3. In the format window, uncheck "Quick Format".
Step 4. Click Start and wait for the process to complete.

A full (slow) format takes significantly longer than a quick format a 1TB drive may take anywhere from several dozen minutes to over an hour. During the process, the entire disk is overwritten with zeros (a single pass), which is suitable for users who don't store highly sensitive data. If you're planning to give away or sell the drive, a full format is the basic step.
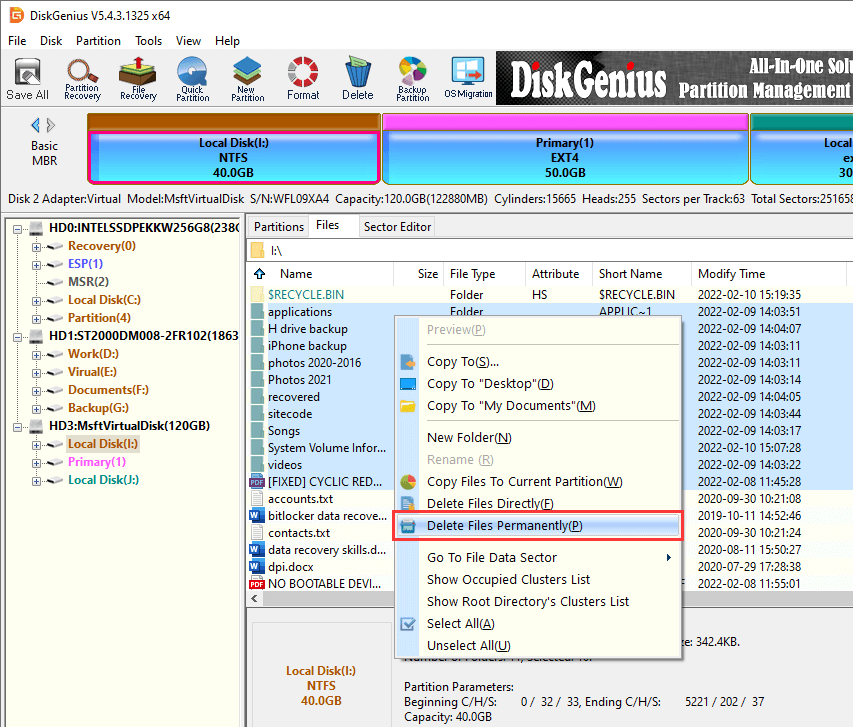
When you want to delete specific files or folders not your entire drive and want to make sure they're unrecoverable, you need a file shredding tool. One powerful and user-friendly option is DiskGenius.
With DiskGenius, you can right-click on any file and choose the option "Delete Files Permanently".
When you use this feature to delete files, the file data is overwritten. You can choose the type of data used for overwriting, for example, zeros, random values, etc. You also have the option to erase the file's index information.
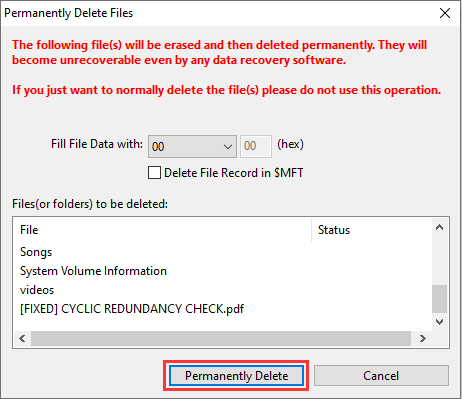
If you only overwrite the file data but leave the index intact, data recovery software may still detect the original file names, but the recovered files will contain corrupted data, because the content has already been overwritten by DiskGenius.
To ensure no trace is left behind, you must also erase the file's index information.
For NTFS partitions, select "Delete file record in $MFT".
For FAT/FAT32 partitions, select "Delete directory entry".
You've deleted some files, emptied your Recycle Bin, and walked away. But remember those deleted files still exist in the free space. To eliminate this risk, you can use DiskGenius Free Edition to wipe all unallocated space where deleted files may linger. Here's how it works:
Step 1. Select the partition you want to clean.
Step 2. Click Tools → Erase Free Space.
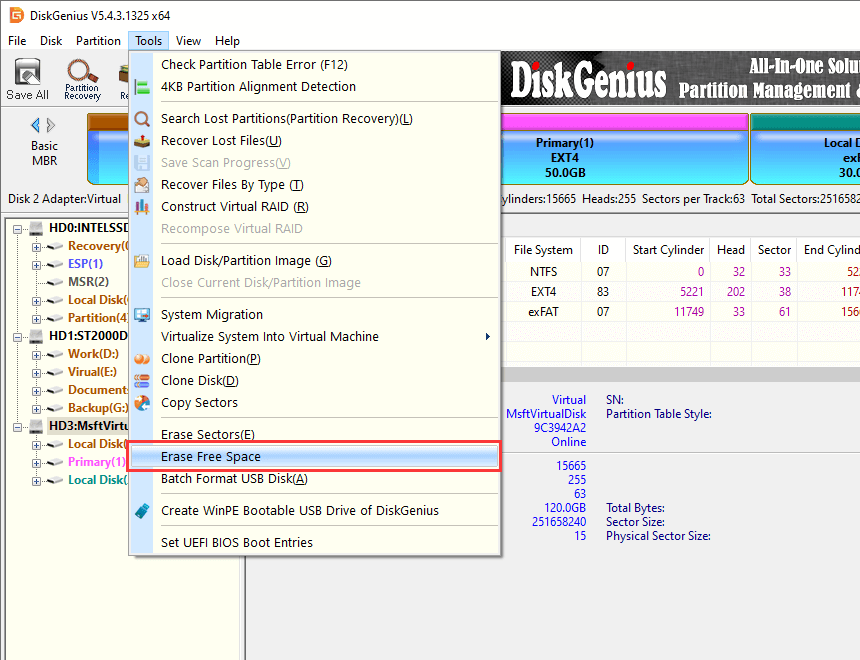
Step 3. Choose your overwrite method (e.g., fill with zeros or a custom hex pattern).
Step 4. Start the wipe.
This method doesn't touch your existing files. It only targets deleted data sitting invisibly in unused space. It's ideal for cleaning up after large file deletions or preparing a drive for secondary use.
If you want to completely wipe the whole hard drive including all partitions, system files, partition table, and hidden metadata you need to erase all sectors at the physical level. This is the most thorough method to erase data:
Step 1. In DiskGenius, select the entire disk in the left panel (not just a partition).
Step 2. Click Tools → Erase Sectors.
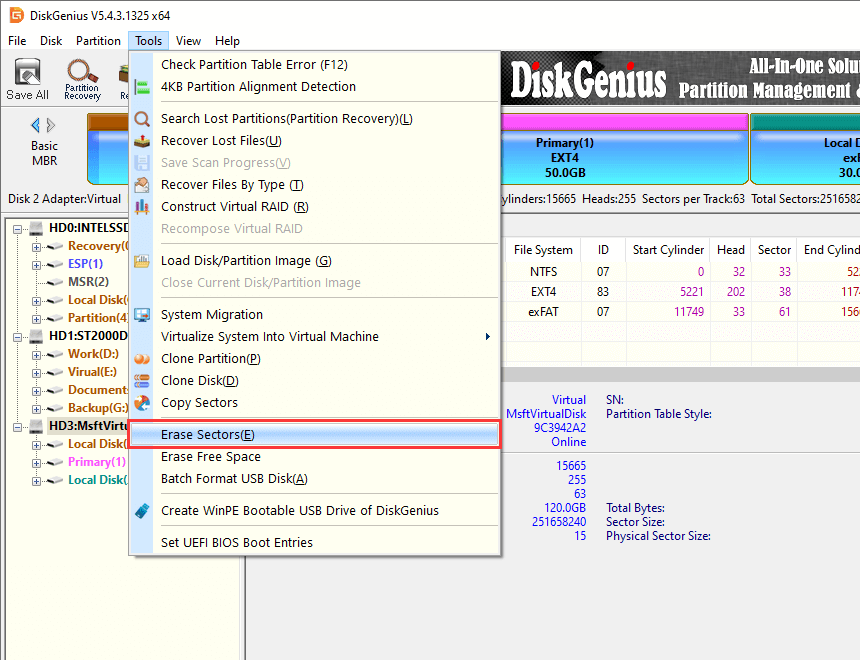
Step 3. Choose your overwrite method (zero-fill, random data, etc.).
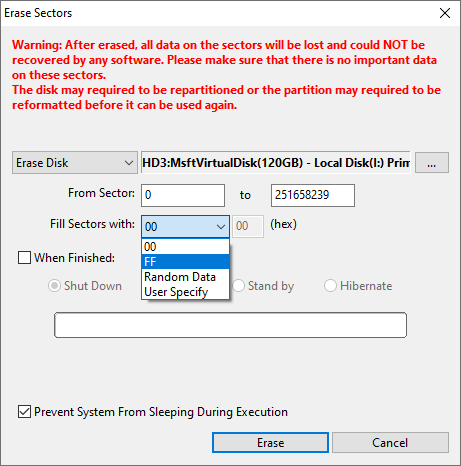
Step 4. Confirm and proceed.
Once this process finishes, the disk is as clean as it gets. You'll need to re-partition and format it to use it again. This is a preferred method for IT departments retiring old hardware or users selling external hard drives.
This method involves manually writing large amounts of useless data (such as oversized videos, virtual disk files, compressed archives, etc.) to the hard drive in order to fill up the entire disk space. The goal is to overwrite any previously deleted files.
Step 1. Copy large videos, ISO files, or dummy data into the drive.
Step 2. Fill it until almost no space remains.
Step 3. Delete the filler files.
Step 4. Optionally, run a full format afterward.
This method is simple but unreliable. It does not ensure full coverage, won't touch hidden partitions or metadata, and lacks multi-pass overwriting. It's a low-effort, high-risk approach best used only in conjunction with other secure deletion tools.
If you're planning to sell or return a full system not just the drive Windows 10 and 11 offer a convenient tool: Reset This PC. One of its advanced options allows you to "clean the drive," overwriting the system disk as part of the reset. To access it:
1. Go to Settings → Update & Security → Recovery.
2. Click Reset this PC → Remove everything.
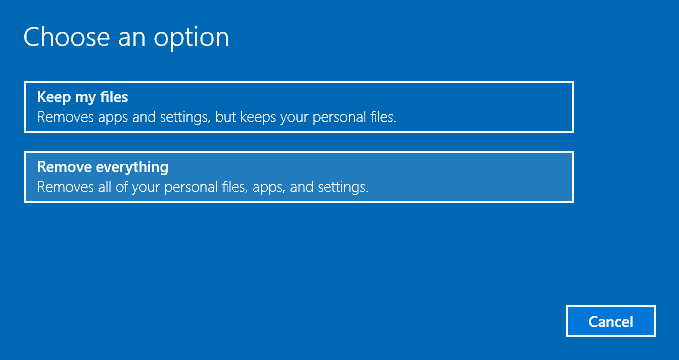
3. Choose either cloud download or local reinstall.
4. Select "Remove files and clean the drive" when prompted.
5. Start the reset.
This method ensures that user files, installed apps, and Windows settings are all erased and replaced. It's more secure than a standard reset and helps prevent data leakage from system drives.
If your hard drives contain extremely sensitive data and multiple software-based wipe attempts are enough, you can consider physically destroying hard drives:
Open the drive casing and drill holes directly into the platters using a power drill or metal spike to damage the read/write surface.
Disassemble the drive and use a hammer to shatter the platters or crush the metal casing, destroying the heads and spindle.
Use industrial-strength magnets or a degausser to disrupt the magnetic fields and erase data tracks (works only for HDDs, not SSDs).
Some organizations choose to hand over drives to certified data destruction companies, which can provide official destruction certificates.
Deleting a file is not the same as destroying it. In an age where data privacy is more important than ever, knowing how to permanently delete files, especially on older HDDs is critical.
If you're dealing with everyday files, a full format or file shredder may be enough. But if your data is sensitive, or your drive is changing hands, go further: securely wipe the hard disk, erase free space, or even destroy the hardware. The methods exist it's up to you to use them wisely.
Q1: Does formatting a hard drive delete everything permanently?
Not necessarily. Quick format only removes file indexes. The actual data remains and can often be recovered using recovery software.
Q2: What's the difference between deleting a file and shredding it?
Deleting removes references to the file. Shredding overwrites the file's physical location on the disk, making it unrecoverable.
Q3: Is resetting a PC enough before selling it?
Not always. To be safe, use the "Clean the drive" option during reset, or wipe the drive using specialized software.
Q4: What is the best free tool to permanently delete files?
DiskGenius offers a free edition that includes secure file deletion, disk wiping, free space wiping, partition wiping.
DiskGenius is a one-stop solution to recover lost data, manage partitions, and back up data in Windows.
Download Facebook
 YouTube
 X
X