Position: Resource - Partition Management - How to Partition a USB Drive on Windows 10/11, macOS, and Linux?
Many people assume only internal hard drives can be partitioned. In fact, USB flash drives can be partitioned too. With sensible partitioning, you can organize and classify files more cleanly and let a single USB stick take on different jobs building a bootable installer, storing encrypted files, or even switching between multiple operating systems without mixing things up.
Partitioning doesn't change the total capacity of your USB drive, but it can make it far more efficient to use. For example, dedicate one partition to everyday documents, set up another as a bootable rescue drive, or carve out a portion as an encrypted vault, so one USB stick does the work of many. (Quick note: before you start, back up anything important; repartitioning can involve formatting in some tools.)
In this guide, we'll walk through everything you need to know about partitioning a USB drive,what the concept means, why partitioning helps, what to prepare, step-by-step methods, how to choose the right file system, and fixes for common issues covering Windows, macOS, and Linux. We'll also call out practical tips and compatibility notes along the way, so the same USB can handle multiple roles reliably across different systems.
The short answer is yes, you can split a USB drive into parts.
But before you get started, you need to know how compatible it is and what devices it won't work with. Different operating systems and electronic devices work with multiple partitions on USB drives in different ways. If you don't choose wisely, some partitions might not be recognized, or they might not work as well as they should.
Here's a quick look at how different platforms handle USB drives with multiple partitions:
• Windows 10 and 11: You can use multiple partitions on a USB drive with these versions.
You can manage each partition separately because they each have their own drive letter (for example, E: or F:). This means you can put work files, game files, and even a bootable installer on the same USB stick.
• Windows 7 and earlier: There are fewer things that work together. Most of the time, only the first partition will be seen, and the others may not be seen at all. Because of this, your multi-partition USB may look incomplete on these older systems.
• Pro tip: If you want to use a multi-partition USB on Windows 7 or earlier, make sure that at least one of the partitions is formatted as FAT32 or exFAT. This will give you the best chance of compatibility.
macOS also supports USB drives with multiple partitions, but file system choice is critical:
• Mac OS Extended (HFS+) or APFS: These formats usually cannot be read on Windows machines, so sharing files across platforms may not work.
• FAT32 and exFAT: These formats are more flexible and work perfectly on both macOS and Windows.
If you want your USB drive to work with both Mac and Windows, you can use exFAT. It works better with big files than FAT32 and doesn't cause many problems with compatibility.
Linux has the best support for partitions and file systems. It can read almost all common formats, such as EXT4, FAT32, exFAT, NTFS, and more.
• Users can easily make more than one partition and give each one a different file system based on what they want to do with it. For example, EXT4 can be used to store Linux data, and exFAT can be used to share files between platforms.
• Tools like GParted let Linux users manage their partitions in more advanced ways, like resizing them or changing their order, giving them the most freedom.
If you want to make more than one partition on Linux, make sure to plan ahead based on your needs and the devices you'll be using to avoid problems with compatibility.
Most TVs, car stereos, and set-top boxes only see the first partition of a USB drive. The rest will be invisible.
If you plan to use your USB drive mainly in these kinds of devices, make sure it has only one partition formatted as FAT32 or exFAT. This will make sure the drive can be recognized correctly.
Partitioning a USB drive doesn't change how much space it has, but it does open up a lot of useful features that go beyond just saving files. Here's why making partitions can be a good idea:
Partitions let you organize your files neatly instead of just throwing them all into one space. You could, for instance, keep your study materials in one partition, your work documents in another, and your entertainment files in a third.
• This keeps your drive from getting too full.
• You can choose to let only one partition on your USB drive be shared with others, which keeps your private files safe. It also lowers the chance of accidentally deleting important files, which is especially helpful if you use the USB drive on more than one computer often.
Not all systems can use the same file systems. Partitioning your USB drive gives it more uses:
• Keep a FAT32 partition for older devices and an NTFS partition for larger files.
• Linux users can make an EXT4 partition to test software, run Linux installations, or store Linux-only data without messing with partitions that Windows can access. This way, you won't have to reformat or move data all the time, and one USB stick will work perfectly in Windows, macOS, and Linux.
A partition can be turned into a bootable drive for installing Windows, Linux, or troubleshooting tools, while another partition remains dedicated to storing your everyday files.
• This lets a single USB device act both as a system installer and as a regular storage drive.
• You save money and don't have to deal with the hassle of carrying around a lot of USB sticks for different tasks.
You can format each partition on the USB drive to different file system after splitting it into more than one partition:
• A FAT32 partition makes sure that older devices like TVs, car stereos, and media players can still use it.
• An exFAT partition can hold bigger files and works well with newer devices and operating systems.
• An EXT4 partition is great for Linux testing or professional system installations for more experienced users.
Since it has a mix of file systems, your USB drive can be used for both regular and special tasks.
If one partition gets corrupted, for example, the files in the other partitions are still safe and sound.
You can encrypt sensitive partitions to make them even more private. BitLocker for Windows works well, and there are also a lot of third-party tools that you can trust to keep people from seeing your files.
It's important to get ready before you start partitioning SSDs, HDDs, or USB drives. When you partition a drive, you change how the storage space is set up. If something goes wrong, you could lose data or have problems with compatibility. To avoid unpleasant surprises, follow these steps first:
Why is backup essential? Because partitioning may erase everything on your USB drive, or accidental errors during the process could corrupt files. That's why every single file, big or small, important or not should be backed up in advance.
You can use one of the following methods to back up USB drive data:
Copy everything to your computer's hard drive, an external hard drive, or another USB drive.
Put files in a cloud storage service like Google Drive, Dropbox, or OneDrive.
If possible, keep more multiple backup copies. Don't forget to check your files again after the backup is done .Check to see if you can open important files like work documents, pictures, or system images and that they aren't damaged. Only after confirming your backup is safe should you move on to partitioning.
What size should each partition be? It depends on how you plan to use your USB drive. Each partition should be big enough to hold all of its files without running out of space, but not so small that you have to resize or move things around all the time. These are some suggestions:
On smaller USB drives (around 8GB or less), one or two partitions are usually enough. Adding more just makes things harder to manage and leaves you with very little usable space.
On larger drives (32GB, 64GB, or bigger), three or four partitions can be handy, giving you more flexibility without clutter. You could, for instance, keep one for work files, another for personal media, one for an OS installer that can be booted, and another for encrypted storage.
Not all file systems are created equal, and different operating systems and devices have different levels of support. Here's a quick look at the differences:
|
File System |
Key Features |
Best For |
|
FAT32 |
Compatibility across nearly all systems; single file size limit of 4GB |
Small-capacity USB drives, cross-platform use |
|
exFAT |
Supports very large files; works with both Windows and macOS |
Large-capacity drives, transfer big files across platforms |
|
NTFS |
Supports file permissions, compression, and large files |
Windows-only use, large file storage |
|
EXT4 |
Native to Linux, supports journaling and permissions |
Linux partitions or boot drives |
💡 You can use different file systems on different partitions if you want to. For instance, make one exFAT partition for big files and another FAT32 partition so that TVs and car stereos can read them.
Finally, think ahead about where and how you'll use your USB drive:
• Support for the operating system: Different operating systems, like Windows, macOS, and Linux, see USB partitions in different ways. For example, macOS might only show the first partition.
• Compatibility with devices: A lot of electronic devices, like TVs, car stereos, set-top boxes, and others, will only see the first partition. If that's your main use case, keep only one partition that works with it.
• Don't use drives that can't be read: You lower the chance of having invisible drive letters or files that can't be opened after partitioning by confirming the usage environment ahead of time.
There are a few different ways to partition a USB drive on Windows. The following presents you with three common methods.
Windows has a built-in graphical disk partition tool called Disk Management. It's simple and easy to use, which makes it a good choice for most people who don't use it a lot.
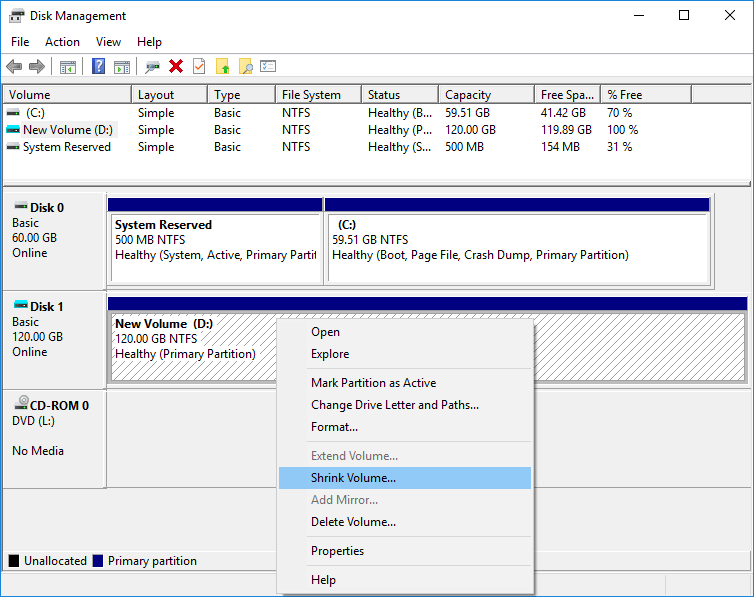
1. Plug in your USB drive, then right-click on This PC and choose Manage. Disk Management will open.
2. Look for your USB drive in the list of disks. To free up unallocated space, right-click the volume you want to split and choose Shrink Volume.

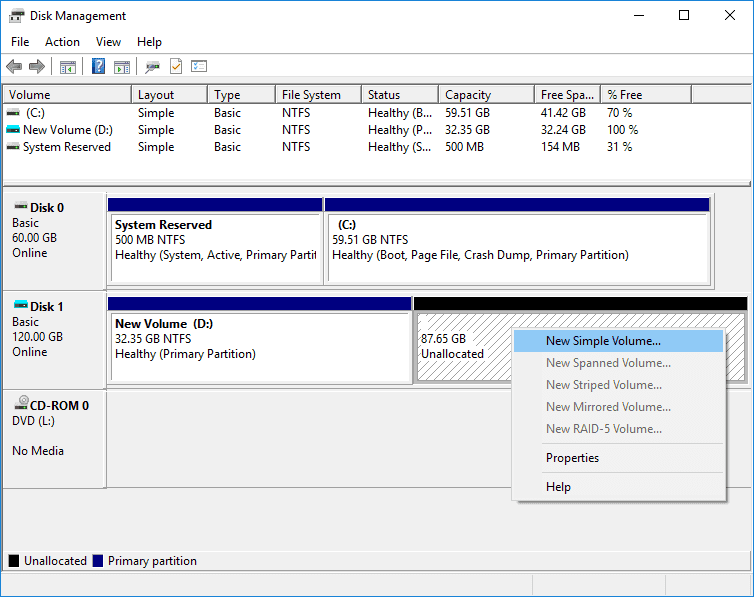
3. Click on the unallocated space, then choose New Simple Volume. Follow the instructions to choose the size of the partition and the file system (FAT32, exFAT, or NTFS). To finish, click Finish.

Keep in mind that FAT32 has limits on large drives, usually those that are 64GB or larger.
Windows Disk Management has its limits, for example, it can't create EXT4 partitions. If you're setting up a USB for Linux, you'll need a different tool.
Back up first, always. Partitioning usually goes smoothly, but one wrong click can wipe your files in seconds. Better safe than sorry.
Diskpart is a command-line tool that comes with Windows and lets you control partitions very precisely. It is a powerful tool, but it's best suited for advanced users who are comfortable typing commands.
1. To open the Command Prompt, press Win + R, type cmd, and then hit Enter.
2. Type the commands below, hitting Enter after each one:
diskpart
list disk
select disk X (replace X with the number of your USB drive)
clean
create partition primary size=8192
create partition primary size=16384
format fs=exfat quick
Important reminders before you try this:
Double-check the disk number you select. Pick the wrong one, and you might wipe your system drive by mistake.
The clean command will erase the entire USB drive. If you haven't backed up your files, they'll be gone for good.
If command lines make you nervous, or you want to minimize the chance of error, use graphical tools like Disk Management or third-partition free partition manager.
DiskGenius Free Edition is a great choice if you don't want to type commands and want something more flexible than the tools that come with Windows. It does more than just manage partitions; it also backs up and restores data, which is great if you often mess around with USB drives.
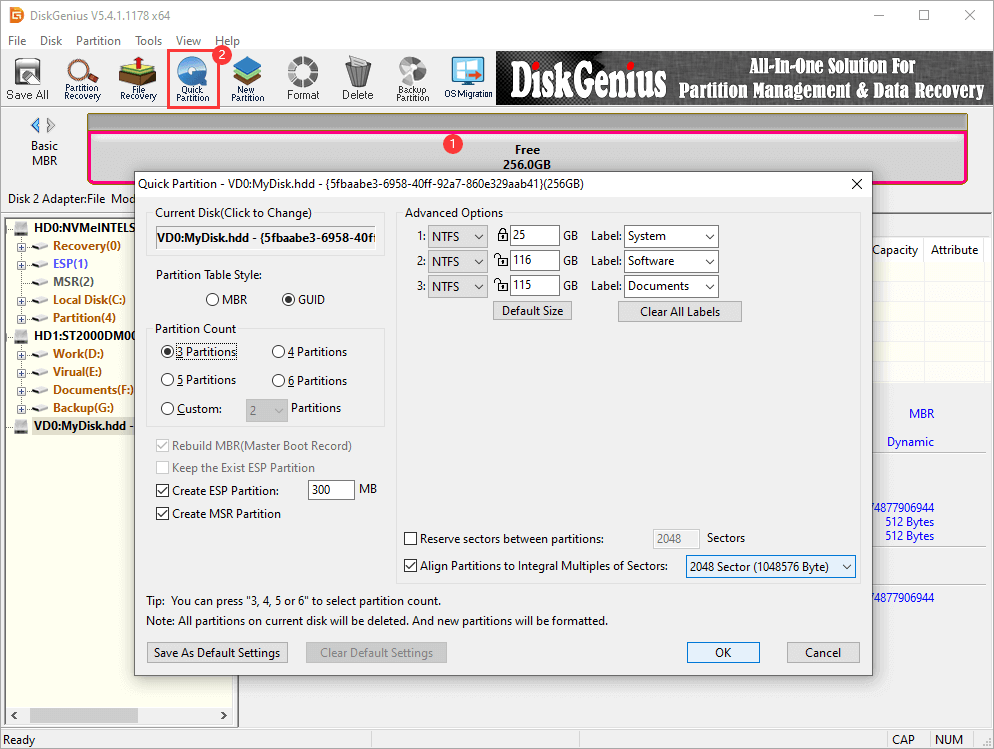
1. Open DiskGenius → select your USB drive in the left panel → click "Quick Partition". This feature will rapidly repartition the USB drive. If you want to create partitions one by one, then use the "New Partition" feature.

2. Choose partition table type (MBR or GPT), select partition number, set partition size. Click OK to proceed.
3. A warning message box will show up. Click "Yes" to continue, otherwise click "No" to cancel.
Tip: Quick Partition is the fastest way to start fresh, but remember that it erases the entire drive. Back up your files first if you don't want to lose them.
👉 Why choose DiskGenius?
On macOS, the easiest way to partition a USB drive is with Disk Utility, a built-in graphical tool. The process is straightforward, but you'll want to pay attention to the file system format so your partitions work properly across devices.
1. Start Disk Utility by going to Applications → Utilities → Disk Utility, or you can quickly open it by typing "Disk Utility" in Spotlight.
Disk Utility shows all of your internal drives and any external storage devices that are connected. It also shows information like the size of the drives, the partitions that are already there, and the type of file system.
2. Choose your USB drive and start dividing it up.
• Plug in your USB drive and check that macOS sees it.
• Choose the right USB drive from the left sidebar of Disk Utility. Don't choose your system drive or any other important disks.
• To get to the partition setup interface, click the Partition button at the top.
3. Make New Partitions
• To add a new partition, click the "+" button.
• Change the size of each partition and give it a name that describes what it does so you can find it later.
•Pick the right file system for each partition: exFAT works with both macOS and Windows, making it great for storing big files and using them on different platforms. Mac OS Extended (HFS+) is the native macOS format. It works well, but Windows can't read it by default. APFS is Apple's newest file system. It works best with SSDs and high-performance computers, but Windows can't access it directly.
💡 If you plan to use your USB drive on both Mac and Windows computers, ExFAT is usually the safest choice. APFS or HFS+ is faster and more reliable for Mac-only use.

4. Make the Changes
Before you click Apply, make sure your partition settings are correct. Disk Utility will do the partitioning, don't take out the USB drive until it's done.
After you're done, each partition will show up in Finder as a separate volume. You can use them like any other disk to store, organize, or move files.
Linux has full support for partitioning and can recognize and work with almost all major file systems, such as EXT4, FAT32, exFAT, NTFS, and others. Linux has good tools for making and managing USB partitions, whether you like using a graphical interface or the command line. Here are two ways that people often do it:
GParted is the most popular graphical partition manager on Linux, perfect for users who want a visual, intuitive approach to partitioning.
1. Launch GParted. You can install it from the Software Center if it isn't already available.
2. Choose your USB drive in the upper right corner. Double-check your choice to make sure you don't accidentally change your system disk.
3. If the USB drive already has existing partitions, delete them first to free up unallocated space.
4. Click "New" → set the partition size and choose the file system type (e.g., EXT4, FAT32, exFAT) → confirm your settings.
5. Click Apply, and wait for the process to finish. Once complete, each partition will appear as an independent volume in your system.
💡 Tip: Always back up your important files before modifying partitions. Even with a graphical tool, mistakes can lead to data loss.

1. Open a terminal and type: sudo fdisk /dev/sdX
Replace X with the correct letter for your USB drive. You can identify it with lsblk or sudo fdisk -l.
2. To create a new partition, type n and follow the prompts to choose the partition type, number, and start/end sectors.
3. Save the changes by typing w. This writes the updated partition table to the USB drive.
4. Format the new partitions with the desired file systems. For example:
sudo mkfs.ext4 /dev/sdX1
sudo mkfs.vfat /dev/sdX2
sudo mkfs.exfat /dev/sdX3
⚠ Reminder: Before making any changes, always check the target USB drive with lsblk or sudo fdisk -l. Be careful with every command; even small mistakes can lead to losing data forever.
1. I only see one drive after partitioning my USB. Why?
On Windows 7 or earlier, the system usually recognizes only the first primary partition of a USB drive. File Explorer will only show the first partition, even if you make more than one. This is a problem with the operating system, not the USB itself. You could try one of these solutions:
Upgrade to Windows 10 or 11, which can see all of the USB drive's partitions.
Use a partition manager like DiskGenius to see all the partitions on the USB, even if Windows hides them.
2. My USB partition failed. What should I do?
There are a number of reasons why a partition might fail:
The USB has bad sectors or logical errors.
The tool was used incorrectly or the file system is incompatible.
The USB was in use by the system during the operation.
Solutions: Back up your data, then use Disk Management or DiskGenius to delete old partitions and create new ones.
3. Can I repartition a bootable USB?
Technically yes, but not recommended. A bootable USB contains specific boot areas and system partitions. Changing the partition layout can make the USB unbootable or corrupt essential data.
4. My multi-partition USB is not recognized on some devices. What can I do?
Some devices, like TVs, car stereos, and set-top boxes, only recognize the first primary partition. They might not work with file systems like NTFS or EXT4. If the USB is mostly for these devices, you should only have one partition with a file system that works with a lot of different devices, like FAT32 or exFAT.

DiskGenius is a one-stop solution to recover lost data, manage partitions, and back up data in Windows.
Download