
Updated on Oct. 22, 2025
Position: Resource - Partition Management - The "Extend Volume" Is Greyed Out? Causes and Fixes
It's one of the most common frustrations Windows users face when trying to manage disk partitions. You open Disk Management, right-click your C: drive hoping to extend it, and there it is the dreaded "Extend Volume" option, completely greyed out. You can see free space somewhere on the same disk, yet Windows refuses to let you use it.
You're not the only one who has heard that before. This happens to millions of people, from IT pros to regular PC users, and it doesn't mean that something is broken. That's just how Windows works. Disk Management has very strict rules for when and how it allows you to resize partitions, and those rules often block you from doing what seems perfectly logical.
This guide tells you why "Extend Volume" is greyed out, the technical reasons for it, and how to securely unlock and fix it, step by step. You will also find out when it is best to use professional partition software or even acquire a bigger drive. Whether you're maintaining servers or just trying to get a few extra gigabytes on your C: drive, this tutorial covers every angle in clear, practical language.

It seems like extending a partition should be easy at first: you have some free space on the same drive, so you add it to an existing partition. But Disk Management doesn't see it that way. For Windows, certain technical conditions must be met before it even enables the "Extend Volume" button. If those aren't satisfied, the option is disabled automatically.
Imagine your disk as a map in real life. Each division is like a fenced-in area of land, and unallocated space is like open land. You can't just combine your plot and the free area if they aren't next to each other. Windows strictly enforces this to keep the file system from getting messed up or losing data.
Here's a simple explanation of why it happens:
| Recovery | EFI Partition | System (C:) | Data (C:) | Unallocated |
If you delete the D: drive, you might expect C: to extend automatically into the freed space. But Windows still won't let you do it because the freshly unallocated region isn't next to C:. Unless that free space sits immediately to the right of the partition you're trying to expand, the system won't proceed.
This limit is caused by the way the partition table is created. The partition table is a low-level structure that shows where each partition begins and ends. To extend a volume safely, the system needs to move its endpoint further to the right in physical disk order. Windows will stop the procedure completely if there is another partition in the way.
So, if "Extend Volume" isn't available, it's not a random problem. It happened because one or more severe architectural standards weren't met. Let's look at each one in more depth.
This is by far the most common cause. Windows will only extend a volume into unallocated space that is right next to it.
If there is even a small Recovery or EFI partition between the two, the process fails right away.
This is an example of a problematic layout:
C: Drive | Recovery Partition | Unallocated
The system can't securely jump over the Recovery Partition because it's in the middle. Disk Management doesn't provide a way to move or relocate partitions; it can only merge or extend them when the layout is already correct.
You can see right away if your target partition isn't touching the unallocated block by opening Disk Management and looking at the graphical layout view.
You can solve it without deleting anything by utilizing third-party partition management software. We'll talk about that later in the solution section.
MBR is an archaic way of organizing partitions that has been around for decades. It can only have four primary partitions, or three primary partitions and one extended partition that can hold more than one logical partition.
There are some rules that come with this design:
• You can't make a primary partition bigger by adding free space inside an extended partition.
• You also can't make logical drives bigger by adding free space outside of their container.
The Disk Management pane may show that the space is "free," but it may actually be part of a different logical zone that Windows can't combine with.
To fix this, you can try changing the MBR disk to GPT (GUID Partition Table). GPT doesn't have any limits on containers. By default, it can accommodate up to 128 partitions and works better with very large drives (over 2 TB).
Windows comes with a safe built-in utility called MBR2GPT.EXE that can convert drives without damaging them. We'll show you how to use it later on in this guide.
Most home and office computers use Basic Disks, however certain systems, like older ones or servers, may employ Dynamic Disks. Dynamic Disks handle volumes in a different way than a normal partition table. They use a database instead.
Because of this, Disk Management can't extend dynamic volumes like it can basic partitions. Instead, it needs special tools or to be changed back to a Basic Disk format.
If you see "Dynamic" next to your disk in the management interface, that's probably why "Extend Volume" isn't available.
If you don't want to use RAID or spanned configurations, stick with Basic Disks. They're easier to use, work with more types of hardware, and Windows' built-in resizing tools work with them.
🚩 Further Reading: How to Convert a Dynamic Disk to Basic Without Losing Data?
Windows can only add space to partitions that are formatted with NTFS or ReFS.
The "Extend Volume" button won't work if the drive is formatted with FAT32, exFAT, or another older format.
The answer is simple: these older systems weren't made to resize while they're running. FAT32, in particular, has strict capacity constraints and doesn't allow journaling, which makes dynamic expansion dangerous.
For resizing a FAT32 or exFAT partition, you can either format it to NTFS use a third-party partition tool.
If the partition is protected by encryption like BitLocker, Windows won't let you change the size or boundaries of the volume.
Encryption protects the integrity of the volume's header and metadata by locking them. The system immediately turns off scaling functionalities since any attempt to change the size of the encrypted boundary could break the security chain.
To fix this securely, simply pause or suspend encryption before making any structural changes. After completing your resizing task, re-enable encryption to restore full protection.
Check the root cause for two minutes before you try to fix anything.
1. Open Disk Management and see if the unallocated space is right adjacent to the partition you wish to make bigger.
2. To check the style of the disk, right-click on the label (Disk 0, Disk 1, etc.) and choose "Properties" and then "Volumes." Check to see if it's MBR or GPT.
3. Find Barriers: Find any minor partitions, especially Recovery or EFI, that might be in the way of adjacency.
4. Make sure the partition is either NTFS or ReFS.
5. Make sure that BitLocker or any other encryption software is turned off.
6. Check the type of disk: "Basic" or "Dynamic".
You will nearly always be able to figure out why the "Extend Volume" option is greyed out if you follow these instructions.
Now that you know what caused the problem, it's time to solve it. Each of the following methods is meant for a certain situation.
1. Make a copy of all the crucial files on the partition you want to remove.
2. In Disk Management, right-click the partition to the right of the target (for example, D:) and choose "Delete Volume." After that, the disk space is Unallocated.

3. Click on the partition you want to extend (C:), then "Extend Volume," and follow the wizard to do so.

Warning: Deleting a partition erases its contents. Do not delete recovery/EFI partitions unless you have created recovery media and understand the consequences. Back up first.
If the partition blocking the path contains vital data you absolutely cannot delete (like applications or user documents), a professional third-party partition manager is your only way to safely move the blocking partition.

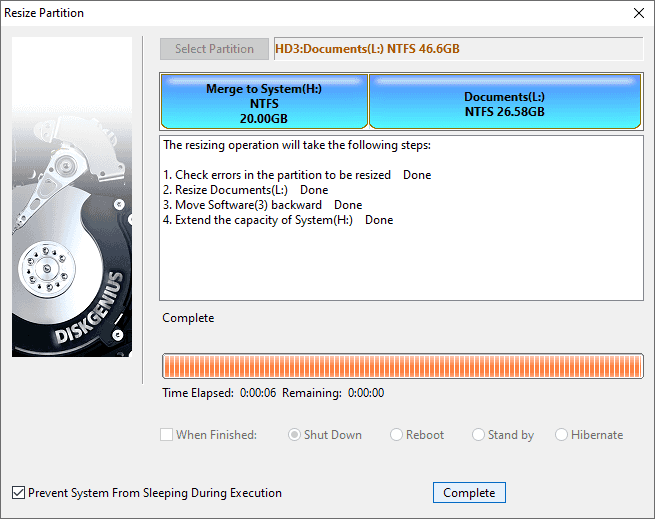
1. Get DiskGenius Free, a free partition tool, and install it.
2. Open the tool, right-click on the partition you want to extend, and then click "Extend Partition".
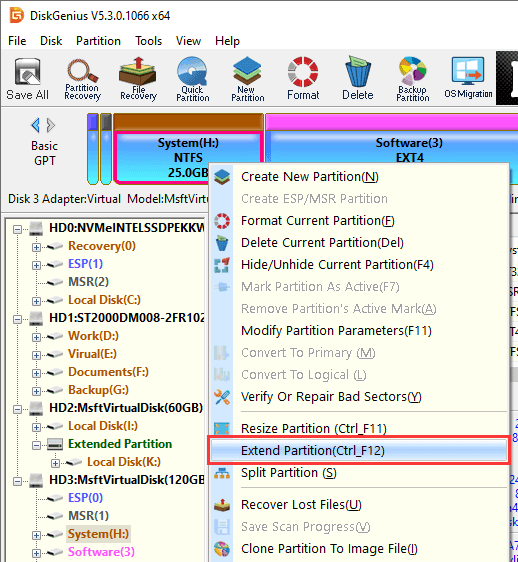
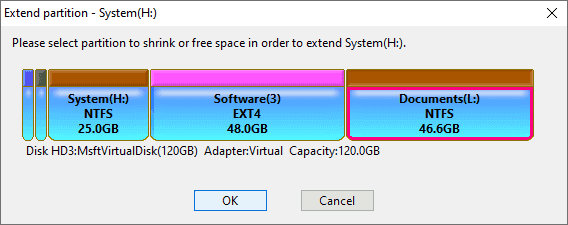
3. Choose a partition that has enough free space to be moved to other partitions. Then hit "OK".
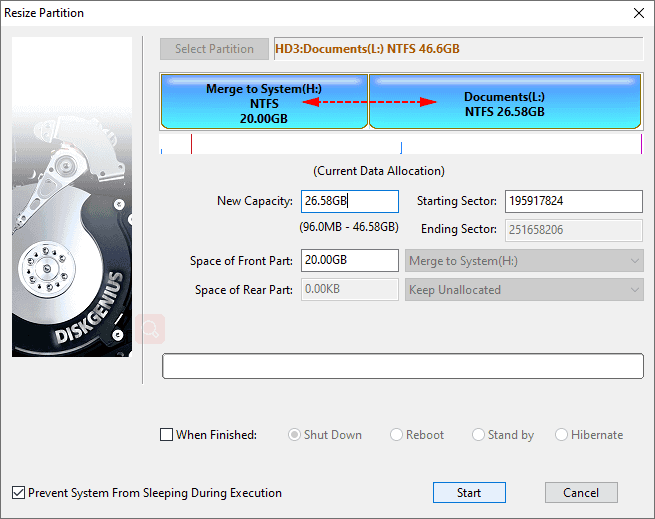
4. Click Start after setting the size of the partition.
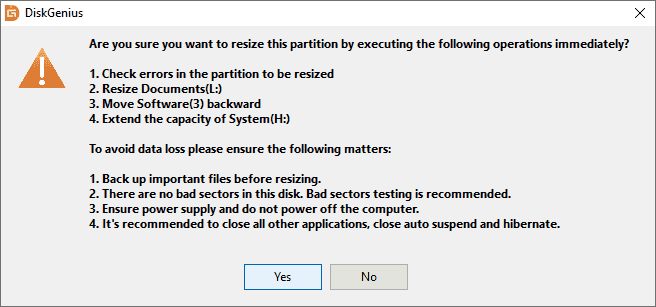
5. Look at the things that need to be done and the risks that might come with them. To confirm and move on, click Yes.
6. Wait for the software to finish expanding the partition.
If you found out that your disk uses MBR and you have reached the 4-partition limit or have container conflicts, the best way to fix it is to upgrade to GPT.
For convert a system disk from MBR to GPT:
1. Open Command Prompt as Administrator
2. Validate the disk (replace 0 with your disk number): mbr2gpt /validate /disk:0 /allowFullOS
3. Convert the disk to GPT: mbr2gpt /convert /disk:0 /allowFullOS
4. After conversion, you must enter the BIOS/UEFI settings and confirm the system is set to boot in UEFI mode.

📌 Read more:
Fix MBR2GPT Cannot Find OS Partition
Fixed: MBR2GPT Disk Layout Validation Failed for Disk 0
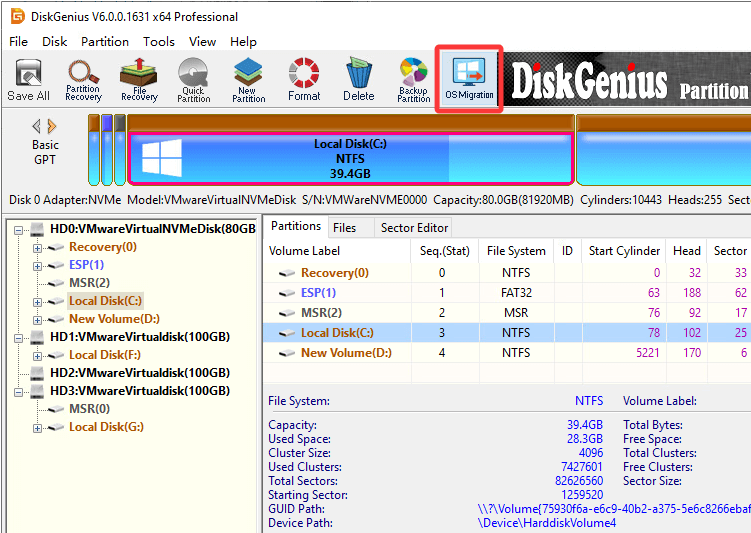
For non-system disks, you can use free partition software DiskGenius to do the conversion:
1. Open DiskGenius, right-click the MBR disk you want to convert and choose "Convert to GUID Partition Table".

2. Click "Save All" to save changes to partition table.

It might not be worth the trouble to move things about if your whole drive is almost full, including the system, data, and recovery partitions.
The best long-term solution is to use a cloning tool to upgrade to a bigger SSD or HDD.
Many programs, such as DiskGenius, can do System Migration or Disk Cloning tasks that:
• Move all of the system files and data to the new disk.
• Automatically change the sizes of the partitions to use all of the space.
• Keep the boot function so that the new disk starts up like it should.
You can either replace the old disk or preserve it as a safe backup after the cloning is done. Without having to reinstall Windows, this is a quick way to get additional space.
There is always a risk when working with changing partition size. A single mistake or power outage might cause a lot of data to get corrupted. Keep these important rules in mind to lower the risk of losing data:
• Use stable power. If you're using a laptop, plug it in. Think about getting a UPS for your PC.
• Make a backup: Before resizing, always make a copy of important files on another drive or in the cloud.
• Don't do more than one thing at a time: Don't run other programs while partitioning is going on.
• Check the health of your disk: If it has bad sectors or makes weird noises, replace it before changing partitions.
• Environment for booting: To avoid file-locking issues when working on the C: drive, use WinPE or a bootable partition tool.
DiskGenius is a one-stop solution to recover lost data, manage partitions, and back up data in Windows.
Download Facebook
 YouTube
 X
X