
Updated on Jul. 01, 2025
Position: Resource - Partition Management - How Do You Format an SD Card for a Camera?
Before you even take your first shot with a new SD card, formatting it correctly is a critical step that many users overlook. A camera may technically read an unformatted or previously used card, but relying on that without reformatting can lead to unexpected problems: corrupted files, writing errors, slow performance or even a complete failure to save your photos or videos.
Unlike simply deleting files, formatting sets up the SD card in a way that aligns perfectly with your camera's internal file system. This process ensures that the data structure is clean, free from residual or incompatible metadata, and ready for seamless operation.
Formatting is especially important if:
Whether you're a hobbyist photographing family vacations or a professional filmmaker shooting in 4K, using a properly formatted SD card reduces the risk of file corruption and ensures that your camera can write data quickly and efficiently frame after frame, shot after shot.
A common mistake is thinking that deleting old files is "good enough". It's not. When you delete photos or videos through your camera or computer, the system only marks those files as deleted, it doesn't actually clear the file system or remove background data such as cache, folder structure, or system logs. Over time, this leftover data can interfere with how your camera writes new files, leading to slow performance or even file corruption.
Some reasons to format SD cards regularly:
Here's a real-world example:
Say you've used an SD card in a GoPro, then later in a MacBook, and now you're inserting it into a Canon DSLR. Each device has a different way of writing metadata to the card. Without reformatting, your camera may encounter conflicts that lead to errors or unreadable files even if the card "looks" empty.
That's why photographers and videographers often develop a habit: back up your files, then format the card inside the camera before each major shoot. It's a small step that can save you from catastrophic data loss later.
Tip: Always format the SD card in the camera you'll be using it with. Even if you've formatted it on a computer, it's best to insert it into the camera and format it again from the menu. This ensures full compatibility with the camera's expected file structure.
Ask yourself, "Is there anything on this SD card that I might need later?" before you even consider clicking "Format". The data is sometimes lost forever once the card is formatted. There is no guarantee that recovery software will be able to recover lost files, particularly if new data is later written to the card.
Making a complete backup for your SD card is essential if there's even the slightest possibility that you might want to preserve any of the data on the card, including pictures, videos, documents, and even camera settings.
Step 1. Connect the SD card to a computer.
If your laptop has an SD card slot, use it or a dependable card reader. Steer clear of generic or low-quality adapters as these may result in file transfer problems or read errors.
Step 2. Await the full mounting of the card.
It will show up under "This PC" in File Explorer on Windows. It will appear on the desktop or in the Finder on macOS. Try a different USB port or reader, or eject and re-insert the card if it doesn't appear.
Step 3. Make a backup folder with a clear label.
Don't move the files; just copy them.Press Ctrl+A to select all the files on the SD card, then use Ctrl+C to copy and Ctrl+V to paste the files into your backup folder. Avoid using "cut and paste" since a system failure or disconnect during the transfer could cause irreversible loss.
Step 4. Verify the backup one more time.
Open a few picture and video files from the backup folder once the transfer is complete to make sure everything is still there. Don't assume that everything was successfully copied.
Step 5. Think about creating a second backup.
Before formatting the SD card, it's a good idea to copy the data to two different locations (such as an external hard drive and cloud storage) for particularly important footage, such as wedding videos or professional shoots.
Many users are unaware that formatting does more than simply remove files that are visible. Additionally, it removes:
• Hidden folders produced by your computer or camera (such as DCIM thumbnails,.trash, and.spotlight).
• Video segments are indexed using metadata.
• High-end cameras that embed GPS or timestamp logs.
This data is lost as soon as formatting begins if you skip the backup, and it is typically irretrievably lost.
Pro tip: Custom settings or LUT profiles may also be saved on the SD card by certain cameras. Before deleting any data from a shared or borrowed card, make sure it contains this kind of information.
If you're planning to use an SD card for photos or video recording, the safest and most reliable way to prepare it is by formatting it directly in your camera. This step is often skipped, especially when the card is brand new and seems to be working just fine. But even with a new card, it's a good habit to format it before use, especially if you're not sure whether it's been used in another device before.
Formatting the card in the camera helps avoid all kinds of potential problems later on. It sets up the correct file system, creates the necessary folder structure (like DCIM and MISC), and makes sure the card is fully compatible with how your camera stores data. If the card was previously used in a phone, a drone, a GoPro, or even just plugged into a computer, it might still have system files or hidden data that could confuse your camera or slow down performance.
Here's what the general process looks like (most cameras follow a similar pattern):
It usually only takes a few seconds. After it's done, you can double-check the card by going to your playback screen, it should say "No images" or "No files" which means it's been wiped and is ready to use.
A few things to keep in mind:
• Make sure the battery has enough charge. If the camera loses power halfway through the process, there's a small risk of damaging the card's file structure.
• Back up anything important first. Formatting in the camera deletes everything, including hidden files or folders you may not realize are there.
• Don't interrupt the process. Once it starts formatting, let it finish. Don't press buttons, turn off the power, or remove the card.
Many experienced photographers make it a routine to format the card before each major shoot. It's not just about clearing space, it's about making sure the card is in a clean, reliable state. If you're shooting an event, an interview, or anything you can't re-do, the last thing you want is for the camera to stop recording because of a card error.
Most of the time, formatting your SD card directly in the camera is the preferred way to go. But there are situations where your camera either can't detect the card or gives you an error when trying to format it. This could occur if the file system was corrupted in some way or if the card was previously used in a device without a camera (such as a smartphone, dashcam, or Raspberry Pi). In those situations, computer formatting can assist in restoring the card's functionality.
Before you start, make absolutely sure you've backed up anything important. Formatting on a computer will completely erase the card's contents, including files you might not normally see in the camera's playback screen.
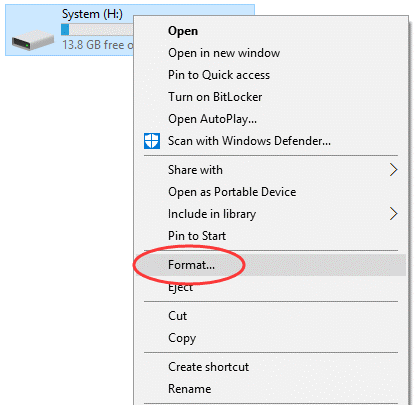
Step 1. Insert the SD card into your computer using a built-in SD slot or a USB card reader. Make sure Windows detects it. It should show up under "This PC" with a drive letter.
Step 2. Right-click the card and select "Format" from the context menu.
Step 3. You'll see a format window. Here, you can select file system, allocation unit size, and quick format.
Step 4. Click Start and wait for the process to finish. It usually takes less than a minute.
⚠️ Keep in mind that Windows does not support using File Explorer to format SD cards larger than 32GB to FAT32. You'll need to use third-party software like DiskGenius to do that if your camera requires FAT32 and you're using a 64GB+ card (see next section).
Step 1. Open Disk Utility (Applications > Utilities > Disk Utility).
Step 2. Find your SD card in the sidebar. Make sure you're selecting the correct volume, you don't want to format your internal drive by accident.
Step 3. Click Erase at the top of the window.
Step 4. Choose a format: MS-DOS (FAT) for 32GB or smaller; ExFAT for cards 64GB or larger.

Step 5. Click Erase, then wait for confirmation.
Once the card has been formatted, it's a good idea to put it into your camera and use the menu to format it once more. This guarantees complete compatibility and aids the camera in reconstructing the proper folder structure.
Formatting your SD card on a computer makes sense when:
• The SD card is unreadable or unrecognized by your camera.
• You need to switch between incompatible file systems (e.g., from EXT4 back to FAT32).
• You're troubleshooting a corrupted SD card that can't be fixed inside the camera.
• You want to prep the card for a different type of use, like installing firmware or boot files.
But even after a successful computer format, you should treat it as a temporary fix. Once the card is recognized again by your camera, reformatting it in the camera is still recommended before actual shooting.
In most cases, formatting your SD card in-camera is all you need. But there are times when the built-in tools on your camera or computer just aren't flexible enough. For example, maybe you need to format a 64GB or 128GB card to FAT32 because your camera doesn't support exFAT. Or you want to use EXT4 for a Linux-based device. Or maybe you've got multiple SD cards to prepare at once and want to save time. That's where a tool like DiskGenius comes in handy.
DiskGenius is a free disk utility and partition management tool for Windows. It allows you greater control over the formatting of your SD card and is especially helpful when Windows' built-in format tool isn't working as intended. With DiskGenius, you can do the following:
• Format large SD cards (64GB or more) as FAT32. Windows doesn't allow this by default, but some older cameras require FAT32 only.
• Format to EXT4, which is useful for Raspberry Pi, Android-based devices, or certain Linux-compatible cameras.
• Batch format multiple SD cards at the same time. Ideal if you're prepping cards for an event, classroom, or production environment.
Here's how to use it to format an SD card:
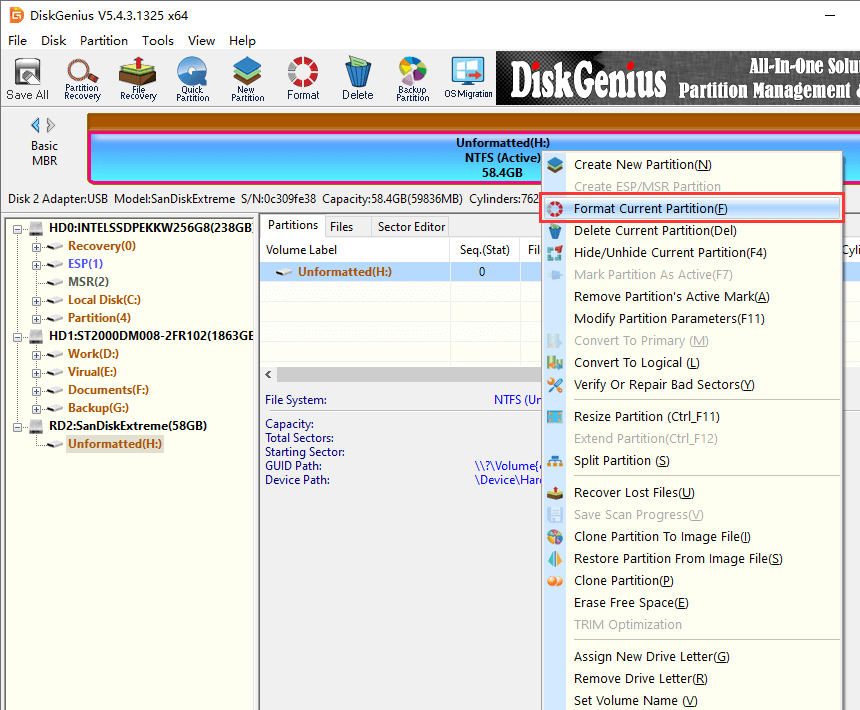
Step 1. Get DiskGenius from the official website and install it.
Step 2. Connect your SD card or cards to the computer.
Step 3. Launch DiskGenius. On the left pane, you can see your SD card in the list of drives.
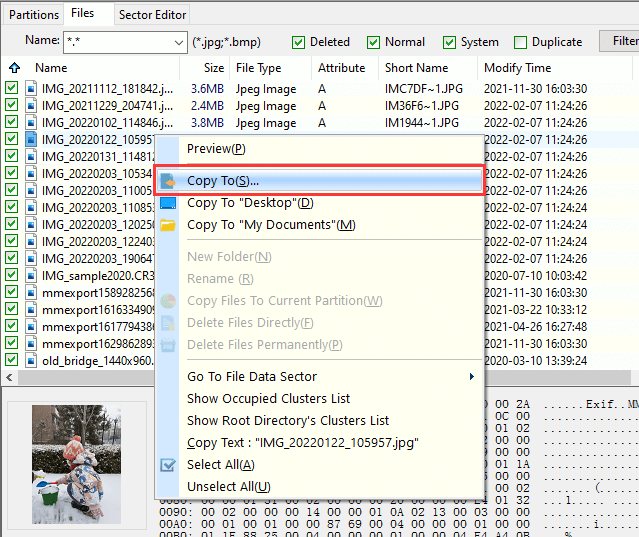
Step 4. Select and right-click the SD card, and choose the "Format Current Partition" option.
Step 5. Select the necessary file system, such as FAT32, exFAT, EXT4, NTFS, etc. Then click Format.
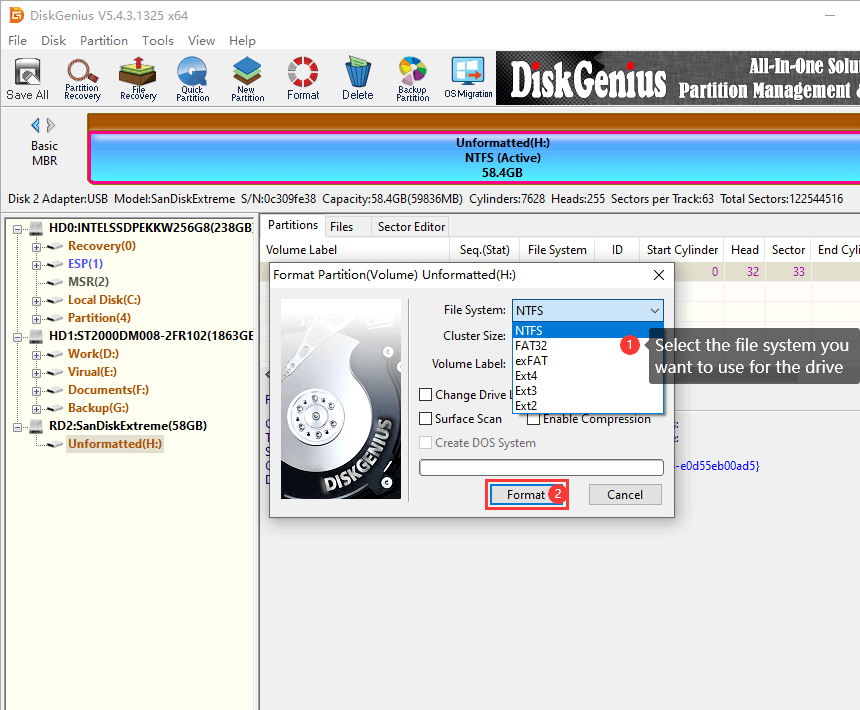
Step 6. Confirm the formatting operation, and the software begins to format the SD card immediately.
The video guide on formatting a 64 SD card or bigger SD card to FAT32 in Windows 10:
The basic formatting procedure is simple, even though the interface may initially appear somewhat technical. Simply choose the correct drive; if you're not paying attention, it's easy to format the incorrect disk by mistake.
If you think your SD card may be failing, DiskGenius also provides features like checking SD card health.
You can't just do formatting once and forget about it. Formatting ought to be a regular part of your workflow if you use your camera frequently, particularly for high-volume or professional photography. The following useful advice will help you stay clear of problems and get the most out of your cards:
Before every big shoot, format. Before beginning a new project, it's a good idea to format the card, even if it appears empty. This lowers the possibility of file corruption and removes any hidden files or leftover metadata.
Avoid switching devices without first reformatting them. Before using the card in your primary camera again, reformat it if you've already used it in a phone, computer, or another camera. Devices produce various kinds of system files, and combining them can result in strange behavior, such as your camera not identifying the card or folders that aren't playing.
Remain with well-known and trustworthy cards. Not every SD card is made equally. Cards that are inexpensive or unbranded have a higher chance of failing. To prevent counterfeits, use reputable brands such as SanDisk, Lexar, or Samsung and only purchase from reputable vendors.
Put labels on your cards and switch up how you use them. Consider labeling each SD card you use (e.g., "Card A," "Card B," etc.) and switching them up between shoots. This keeps a single card from wearing out too much and allows you to backup and offload data at your own pace.
Keep an eye out for failure indicators. The card may need to be retired if your camera takes longer than usual to write files or if you begin to see errors when playing back. SD cards do eventually degrade, particularly when used extensively.
It occurs more frequently than you might imagine: you format the incorrect SD card while getting ready for a shoot, or you are browsing the menu and inadvertently hit "Format". You have a good chance of recovering your SD card data if you take prompt action.
First, immediately stop using the SD card. Remove the card from the camera as soon as you recognize the error, and stop taking any more pictures or videos. The data is simply marked as free space when a card is formatted; it is not immediately deleted. Until they are overwritten by new data, the actual files remain.
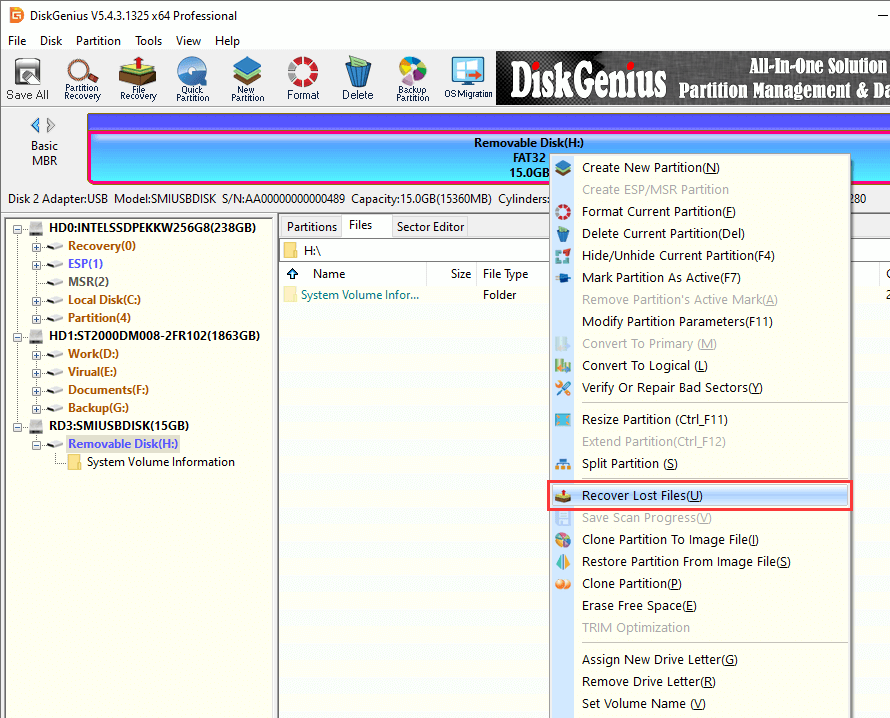
Use data recovery software after that. Tools that can scan the card and recover unoverwritten files include DiskGenius, CuteRecovery Free, Eassos PhotoRecovery. DiskGenius is a good choice among these since it facilitates the recovery of formatted partitions and provides a visual file tree for simpler recovery. With DiskGenius, the SD card recovery usually proceeds as follows:
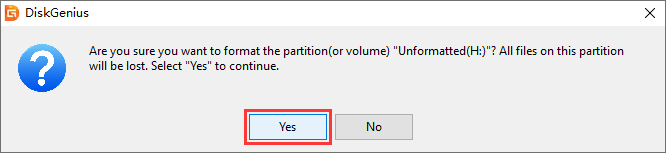
Step 1. Put the SD card into the computer.
Step 2. After launching DiskGenius, right-click the formatted SD card, and choose "Recover Lost Files".
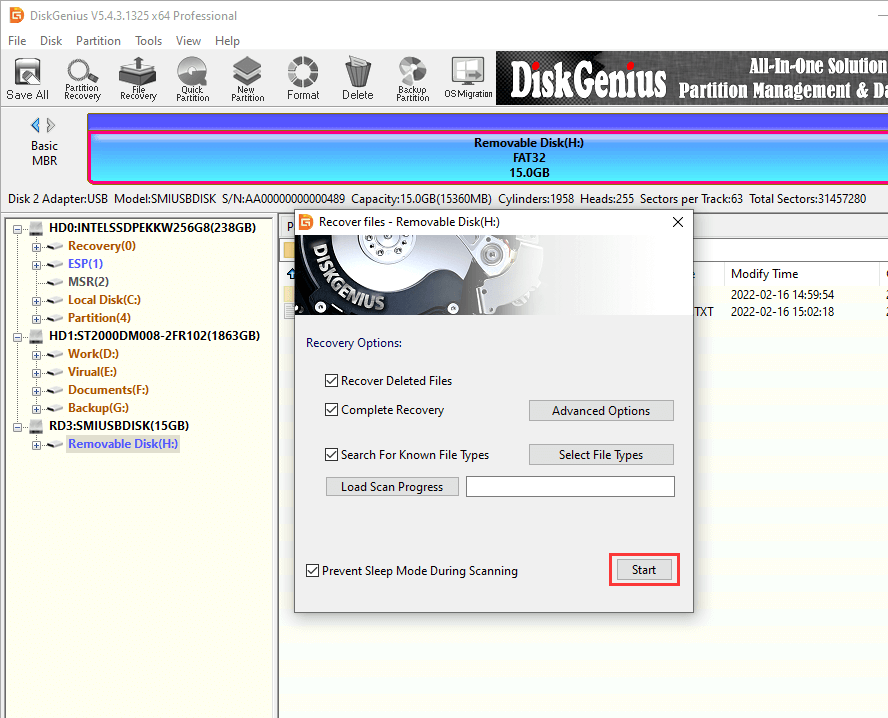
Step 3. Click "Start" to allow the program to scan the card.
Step 4. View and preview lost photos and video so that you can check if these files are corrupted.
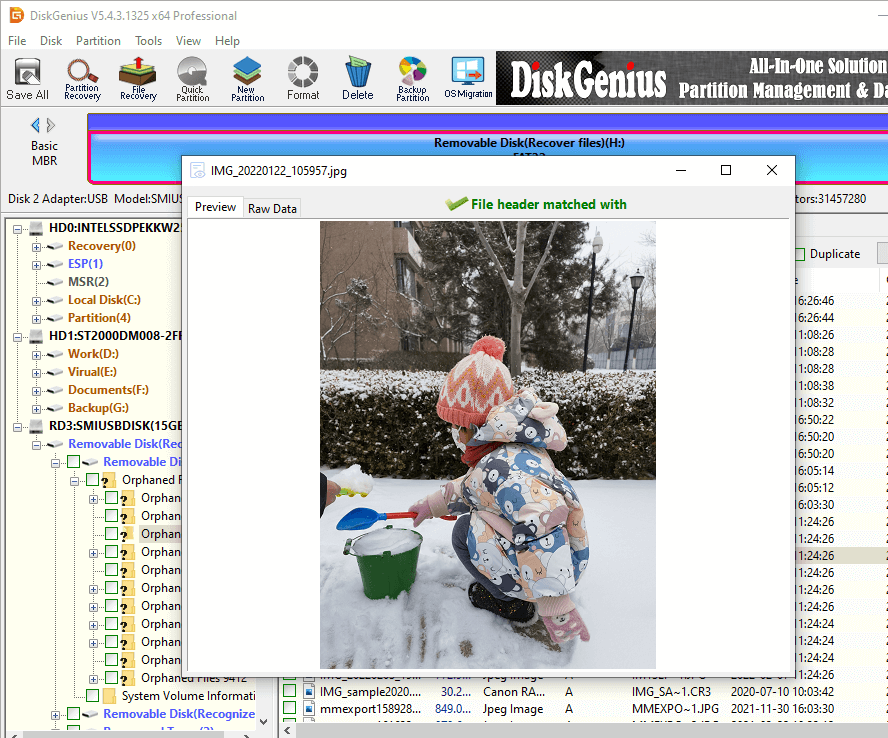
Step 5. Select files you want to recover, and copy them to another drive.
You should format your SD card on a regular basis as part of responsible camera use. Having a properly formatted card gives you one less worry when you're behind the camera, whether you're taking informal family portraits or filming footage for a client.
The key is understanding when, where, and how to format. If the card is going to live in your camera, let the camera format it. If you're switching devices or trying to fix a card that's acting up, your computer or a dedicated tool like DiskGenius gives you more control.
It's also worth remembering: formatting doesn't just "clear space". It resets the structure of the card so your camera can save files without error. Skipping this step, especially when using used or repurposed cards, is asking for trouble and recovering lost footage is never fun.
And if you ever find yourself needing to format multiple cards at once, deal with non-standard file systems like EXT4, or format a 128GB card to FAT32, tools like DiskGenius can save you a lot of hassle.

DiskGenius is a one-stop solution to recover lost data, manage partitions, and back up data in Windows.
Download Facebook
 YouTube
 X
X