
Updated on May. 13, 2025
Position: Resource - Partition Management - Migrate Windows 10/11 OS to Multiple SSDs or HDDs Simultaneously
Reinstalling the Windows operating system, reconfiguring settings, or installing programs is not only time-consuming, but also easy to lost data. In fact, there is a more worry-free way. With DiskGenius, a free partition manager, you can migrate the complete Windows operating system to another new or old hard disk, SSD, external hard disk, or even USB flash drive without reinstalling the OS and applications, truly achieving one-click migration. This article will give a comprehensive introduction to the system migration function and provide detailed operation steps to help you migrate the Windows 10/11 OS to SSDs or HDDS.
System migration refers to the process of copying the partition where the current system is located and all data related to its startup to another disk, so that the new hard disk also has the ability to boot and run the system. After migration, you only need to adjust the boot order to start the computer from the new hard drive. All applications, settings and data in the original system are retained without reconfiguration.

DiskGenius supports migrating the Windows 11/10/8/7 operating system to various types of storage devices, including traditional hard drives, SSDs, M.2 NVMe SSDs, external hard drives, and even USB flash drives. Feature highlights include:
Connect the target disk: Attach the target disk (e.g., SSD or USB drive) to your computer and make sure it is recognized in DiskGenius. If you're migrating to multiple disks, connect them all before starting.
Back up important data on the target disk: The migration process will erase all data on the target disk, so be sure to back up anything important in advance.
Check disk capacity: The target disk can be smaller than the source, but it must be large enough to hold the actual used space of the system and selected partitions.
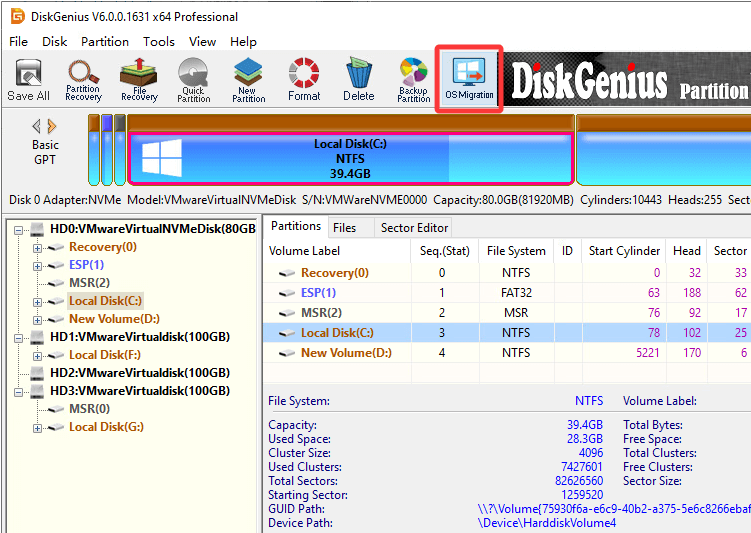
Open DiskGenius and click the "OS Migration" button on the toolbar, or go to the menu bar and select "Tools" > "System Migration".
In the popup window, select a target disk and click "OK".
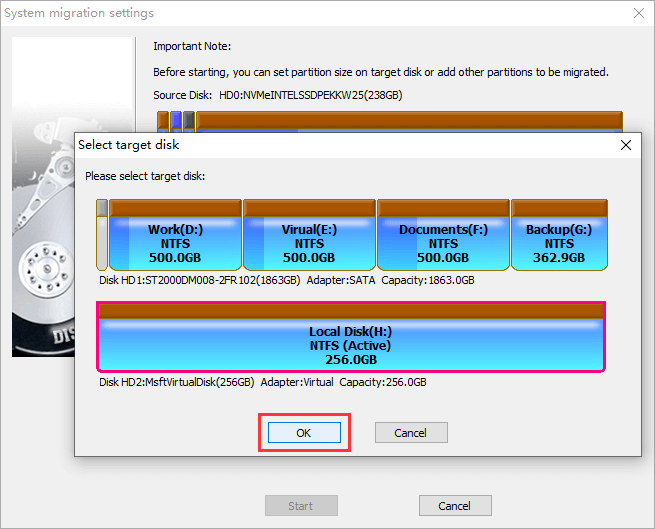
Note: All data on the target disk will be erased. Make sure to back it up beforehand.
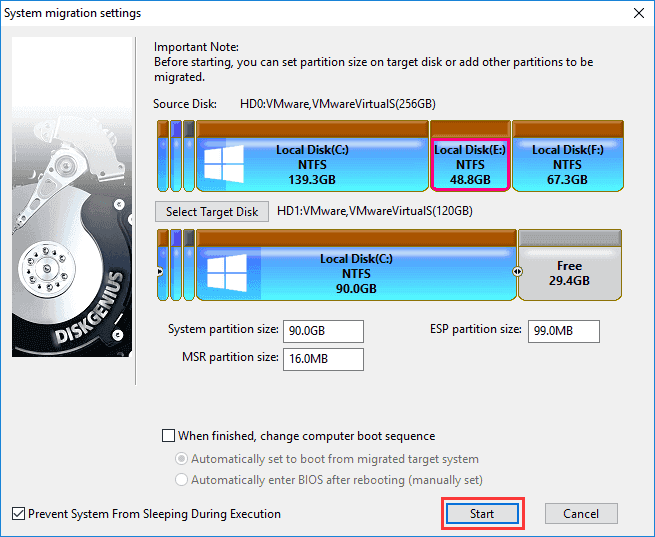
To migrate to multiple disks, click the "Add Target Disk" button to add them one by one.
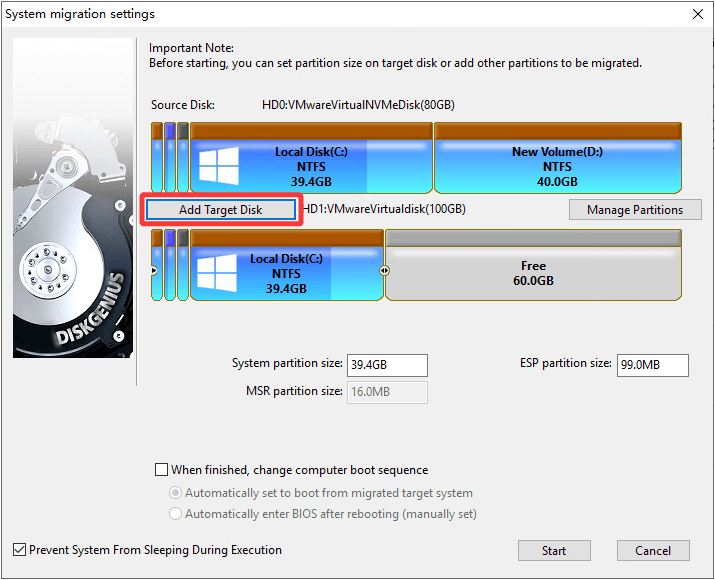
Click the "Manage Partitions" button to choose which partitions to migrate. For example, just the system and boot partitions, or include other data partitions.
You can also resize the partitions on the target disk by dragging partition borders or manually entering the capacity values. For example, if your original C: drive is too small, you can expand it during migration.
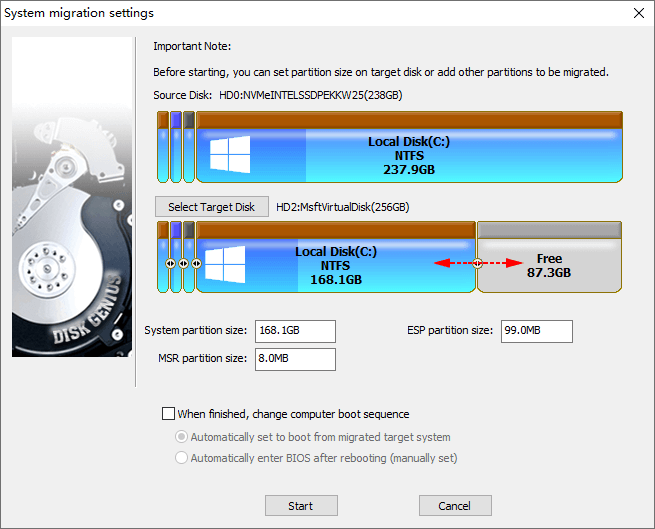
On UEFI computers, you will see the option "When finished, change computer boot sequence". After checking this option, you can choose one of the following:
Automatically set to boot from migrated target disk: After the migration is completed, the system will automatically boot from the migrated target system, which is convenient and fast.
Automatically enter BIOS after rebooting (manually set): After the migration is completed, the computer automatically restarts and enters the BIOS. Then you need to manually set the boot device. It is suitable for users with certain computer skills.

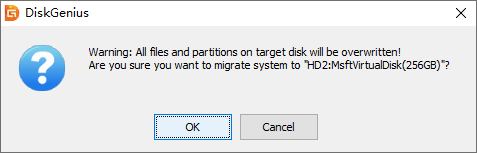
Carefully check all settings, confirm that the target disk, partition layout, boot options, etc. are correct, and click the "Start" button. DiskGenius will prompt you again that data on the target disk will be erased. Confirm to proceed.
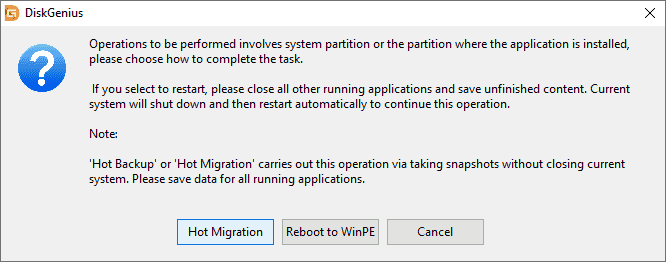
Hot Migration: The migration can be completed without restarting the computer. The computer can be used normally during the migration system. This is suitable for most cases and offers a smooth, efficient experience.
Reboot to WinPE: The system will restart and enter the WinPE environment for migration. When hot migration cannot be performed, this mode can be selected.
In general, the Hot Migration mode is recommended first, as it does not interrupt your work and can quickly complete the migration.
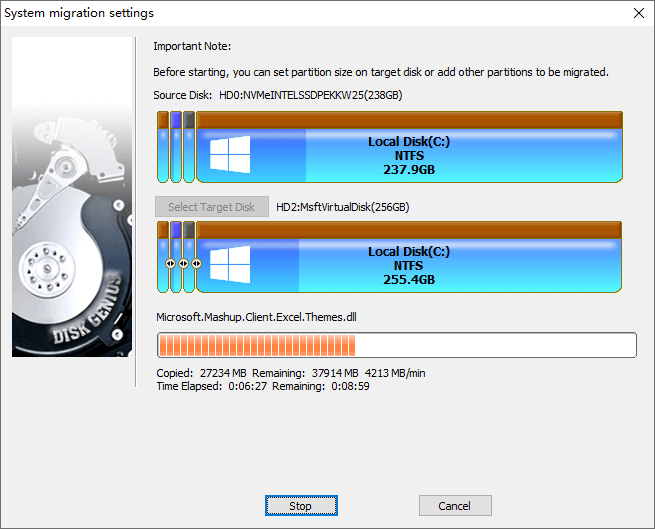
After the migration starts, wait patiently. The interface will display the migration progress, remaining time and other information in real time.
During this process, do not shut down the computer or unplug the disk to avoid migration failure.
After the migration is completed, if you choose automatic startup, the computer will boot directly from the new disk to enter the system; if you choose manual settings, you need to enter the BIOS to adjust the boot order. After entering the new system, you will find that the Windows environment, installed programs, user data, etc. are exactly the same as the original system, and can be put into use immediately without reconfiguration.
1. Can I delete the original system on the old drive after migration?
Yes, but it is recommended to format the original hard disk after confirming that the target system can be normally started and used smoothly to ensure safe data transition.
2. Can the system be migrated to a USB flash drive?
Yes, but the USB flash drive must have sufficient capacity and high read and write speed, otherwise it may affect the system experience. It is recommended to use a high-speed solid-state USB flash drive.
3. What should I do if the system fails to boot after migration?
Enter BIOS and ensure the correct boot disk is selected. Alternatively, use Windows installation media to repair the boot loader.
4. What's the difference between Hot Migration and WinPE Migration?
Hot migration does not require restart, which is convenient and fast and suitable for most situations. If system files are locked during migration, Hot Migration might not work in which case, you'll need to use WinPE mode by rebooting.

DiskGenius is a one-stop solution to recover lost data, manage partitions, and back up data in Windows.
Download Facebook
 YouTube
 X
X