
Updated on May. 08, 2026
Position: Resource - Backup & Restore - How to Backup Windows 11 or Windows 10 to an External Drive?
Picture this: your laptop won't boot. The screen stays black. A repair shop tells you the drive is dead and your data is gone. Years of work, photos you never printed, project files with no other copy. All of it, just... gone.
It happens more often than people think. Hard drives are mechanical (or electronic) devices with a finite lifespan. Ransomware is everywhere. Sometimes a Windows update goes sideways and bricks your system. The question isn't really if you'll need a backup someday. It's whether you'll have one ready when that day comes.
An external hard drive is one of the most practical ways to protect yourself. No recurring subscription fees. No waiting for uploads to finish. You own the hardware, you control the data, and restoring from a local drive is significantly faster than pulling hundreds of gigabytes from the cloud.
This guide covers every realistic way to back up Windows to an external drive. Quick file copies. Built-in Windows utilities. Professional-grade tools like DiskGenius that can image, clone, and migrate your entire system. By the end, you'll know exactly which approach works best for your situation.
The word "backup" gets thrown around a lot, and not everyone means the same thing by it. Some people say "backup" when they copy their Documents folder to a USB flash drive. Others mean a complete, bit-for-bit replica of their entire operating system installation. These are fundamentally different operations with different outcomes, and understanding the gap between them will save you from a rude surprise when you actually need to restore.
File-level backup is what most non-technical people picture. You copy your personal files (documents, photos, videos, music) to an external hard drive. If your computer dies, those files survive. The catch? You'll need to reinstall Windows from scratch, then reinstall every program, reconfigure every setting, re-enter every license key. It's tedious, but your irreplaceable data is safe.
System image backup is a snapshot of your entire Windows operating system, compressed into a single file. It captures the operating system, every installed program, all your settings, boot partitions, and your personal files. Restore this image and your computer wakes up exactly as it was at the moment you created the backup. No reinstallation needed. No setup wizard. It just works.
Disk cloning goes one step further. It writes an exact copy of your hard drive directly onto another drive, byte for byte. The result is bootable. You could literally swap the cloned drive into your computer and start working immediately. This is the go-to method when upgrading from an HDD to an SSD, but it also serves as a bulletproof backup approach.
Each type has strengths. The best backup plan often combines two or even all three.
Don't just grab any old drive and start copying. A few minutes of preparation here prevents headaches down the road.
Size. For backing up personal files only, 500 GB is usually more than enough. For system images or full disk clones, your external drive should be at least as large as the used space on your Windows drive. If your C: drive has 300 GB of data on it, get at least a 500 GB external drive to leave room for compression overhead and future backups.
Speed. This is where people get burned. USB 2.0 technically works, but transferring 200 GB over USB 2.0 takes forever, we're talking hours, not minutes. USB 3.0 is roughly ten times faster. If your computer has a USB-C port, even better. The interface matters more than most people realize.
File format. NTFS is the way to go for Windows backups. It handles files bigger than 4 GB (which system images almost always are) and plays nicely with Windows permissions. You could use exFAT if you also want macOS compatibility, but for a dedicated Windows backup drive, NTFS is the straightforward choice.
A word about existing data. Some backup methods will format or overwrite the destination drive. If there's anything on the external drive you care about, move it somewhere else first. Don't learn this the hard way.
Sometimes you just need to get your files off the machine. No fancy imaging, no system snapshots. Just the stuff that matters to you.
Open File Explorer. Navigate to 'C:\Users\YourName'. You'll see the usual suspects: Desktop, Documents, Downloads, Pictures, Videos, Music. Select what you want to keep, then drag it all to the external drive.
That's genuinely all there is to it. No special software. No configuration. Just copying.
The limitation is obvious, of course. You'll miss things. App data tucked away in 'AppData' (browser profiles, game saves, email archives). Files stored outside your user folder. System settings and registry entries. Driver configurations. If you've spent any amount of time customizing your setup, a manual copy preserves none of that context.
Think of this method as a quick grab of your most valued files, not a comprehensive backup strategy. It's great as a supplement, especially when you need a fast copy before a major system change. On its own though, it leaves too many gaps.
Windows actually ships with backup utilities. Most people have never opened them. Some don't even know they exist.
Yes, it still says "Windows 7" in the name, but it still works in Windows 10 and 11.
1. Search for "Control Panel" in the Start menu, then click "Backup and Restore (Windows 7)."
2. From there you can create a system image by clicking "Create a system image".

A system image is a copy of the drives required for Windows to run. lt can also include additional drives. A system image can be used to restore your computer if your hard drive or computer ever stops working; however, you can't choose individual items to restore.
3. You can choose to save the snapshot of your Windows drive saved to a hard disk, DVDs, or a network location. Then click Next.

4. Select drives that will be included in the backup and click Next.
Partitions that are required for Windows operating system to run will be included by default, and you cannot exclude them. Moreover, the drive that will be used to store the backup files cannot be included either.

5. Review the settings and click Start backup.

The Windows backup process can take anywhere from 20 minutes to several hours depending on the amount of data and the speed of your drive. You just need to wait for the completion.
File History is the newer approach. It automatically backs up copies of your files from Libraries, Desktop, Contacts, and Favorites to an external drive at regular intervals. Turn it on, select your external drive as the target, and it quietly runs in the background.
The limitations are worth knowing. File History only handles files. It doesn't create a system image, won't back up your programs, and doesn't touch boot partitions. In recent Windows 11 updates, Microsoft has started nudging users toward OneDrive instead, and File History feels like it's being left to wither.
For versioned file backups, being able to recover a document from three edits ago, File History is genuinely handy. As a complete backup solution though? It falls short.

The Bottom Line on Built-in Tools
They're free, they require no installation, and for basic scenarios they work. The trade-off is control. No incremental system image backups. No compression tuning. No integrity verification. No granular scheduling for full system backups. If your needs are simple, start here. If you want more power and flexibility, keep reading.
DiskGenius is a disk management and backup tool that handles an impressive range of tasks under one roof. Partition management, data recovery, disk cloning, system migration, and backup imaging, all in a single application. The free version covers core backup features that most people will ever need.
Here's how to use it for the four main backup scenarios.
System Migration can move your Windows installation to another drive, and still be able to boot it. It's similar to cloning, but optimized for moving an OS, and it automatically takes care of the boot-related partitions that are easy to overlook if you're doing things manually. You can migrate your Windows operating system to another hard disk drive, an SSD, a USB drive or even a virtual machine.
Transferring Windows to a USB disk:
1. Connect your external hard drive into the computer. Ensure the capacity of the drive is enough to hold the OS and ensure it can be recognized by computer.
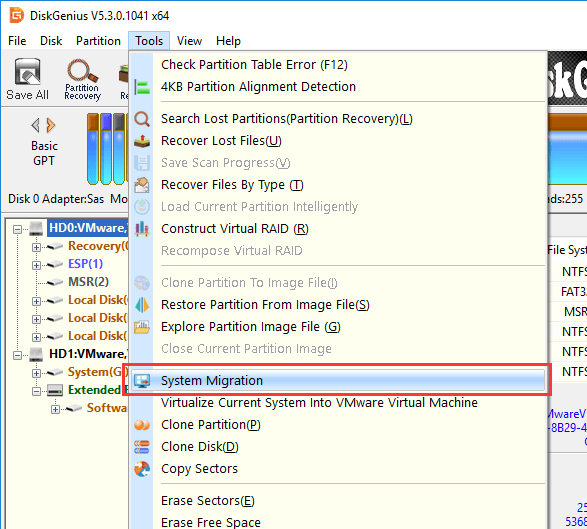
2. Launch DiskGenius Free Edition. Go to Tools - System Migration.
3. Select the target drive and click OK.

4. You can resize partitions on the destination disk if needed. DiskGenius lets you adjust sizes during the migration, which is convenient when moving to a drive with different capacity. Also, you can select "Set target disk to boot system via USB" which will make the target drive bootable (works like Windows to go).

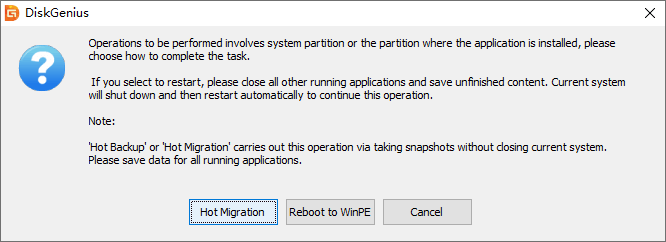
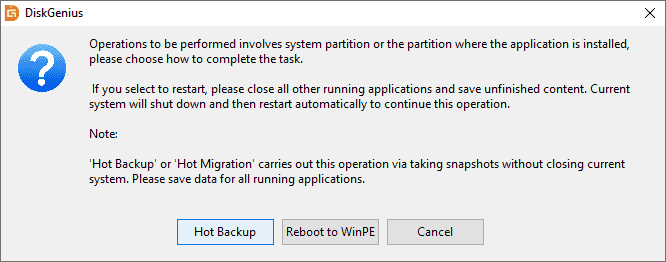
5. Click Start. Then DiskGenius will ask to choose a migrating method: Hot Migration or Reboot to WinPE.
You can try the Hot Migration first, as this option can finish the task without interrupting your work.
6. After the migration completes, the destination drive holds a working Windows installation. If you've migrated to a new internal SSD, physically swap the drives and boot normally. For an external drive, you can boot from it on compatible hardware.

This is the cleanest path when your goal is to move Windows to a new drive, whether for an upgrade or as a bootable backup.
Cloning copies every single sector from your internal drive to the external drive. The result is an identical and one-to-one duplicate. Swap the drives and your computer behaves as if nothing changed.

Step to clone a hard drive:
1. Open DiskGenius and go to Tools - Clone Disk.

2. Pick your source disk (the one Windows lives on) and click OK.

3. Choose the external drive as the destination and click OK.

If you want to clone the source disk to multiple disks simultaneously, you can click "Add Target Disk" to add more target disks.
4. Choose a mode for cloning.
The default option is "Copy all files" and you can choose other options according to your needs. "Copy valid data sectors only" skips empty sectors and finishes much faster. "Copy all sectors" does a raw, byte-for-byte copy if you need forensic-level completeness.

5. Hit Start. A warning will appear about the destination disk being overwritten. Confirm and let it run.

6. Select a disk cloning option. You can try Hot Migration first, it will finish the job without rebooting the computer.

How long it takes will depend on how much data you are moving and how fast your connection. Just hang in there.

A partition image is a compressed file that contains everything of a single partition. This backup method is more space efficient than cloning a partition, as the compression during the backup shrinks the data. What's more you can store multiple images on one external drive.
Here's the process:
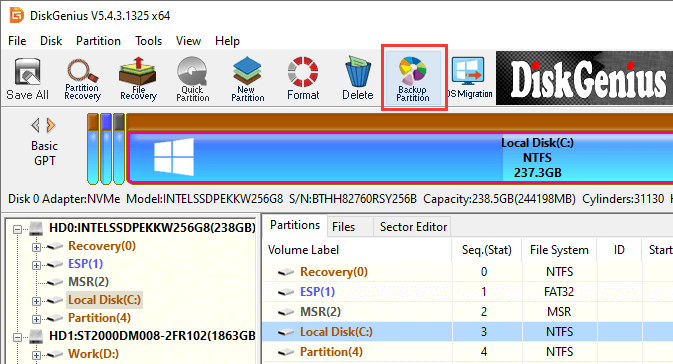
1. In DiskGenius, click Windows partition (typically C:), and click "Backup Partition". Also, you can find the feature by clicking Partition – Clone Partition To Image File.
2. Click "Select Image File" to set a location and name for the image file. Click Start.
If you want to save the backup image on your external hard drive, then set the location on that drive.
If you want to set a compression level, backup mode, and more details, click Settings.
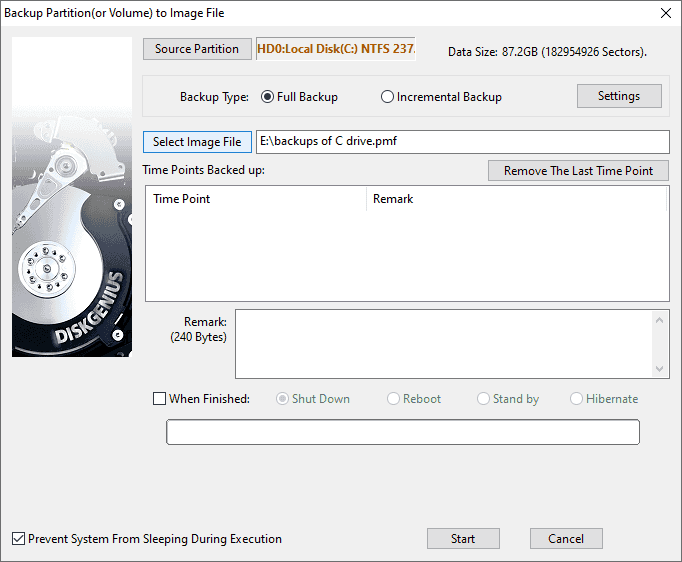
3. Enable Hot Backup if you want the backup to run while Windows is actively being used. No restart required.
The result is a '.pmf' file sitting on your external drive. To restore, open DiskGenius, select Partition - Restore Partition From Image File. In addition to backing up C drive, you can also create a backup for ESP partition.
The real advantage here is flexibility. You can take an image before a risky Windows update, another one after installing new drivers, and keep several versions rolling. If anything breaks, you roll back to a known-good state in minutes. It's like a time machine for your hard drive.
This is the most complete choice you have. Instead of imaging a single partition, this method will include every partition on your system disk into the image file: the EFI System Partition, Microsoft Reserved, Windows C:, recovery partition, everything.
Steps:
1. Select and right-click the entire disk (not just a partition) in the DiskGenius interface. Choose "Backup Disk To Image File".

2. Click "Select Image File" to set a location and name for the disk image file.

3. Click "Start".

4. Select the way to complete the disk imaging task.

5. Wait for the disk imaging process to finish.
The resulting image file (.pmfx) contains your complete disk layout and all data. If your drive fails, if malware destroys your system, if a catastrophic update renders Windows unbootable, you can restore the entire disk to its exact previous state. Every partition, every boot flag, every hidden recovery tool.
The trade-off is resources. Imaging a full 500 GB disk takes time and the image file will be large even with compression. For a monthly "full protection" backup that covers every conceivable disaster, though, this is as comprehensive as it gets.
The right method depends on what you're actually worried about.
Worried about losing personal files? Manual copying or Windows File History. Fast, simple, zero learning curve.
Want a full system backup using only what Windows provides? Backup and Restore. Dated interface, limited options, but it's built in and requires no third-party software.
Need flexibility, compression, and multiple backup types from one tool? DiskGenius. It covers partition imaging, disk imaging, disk cloning, and system migration. The free version handles the essentials.
Upgrading your drive or need a bootable backup right now? Disk cloning with DiskGenius. One operation, bootable result, no restoration step later.
Honestly, most people are best served by layering approaches. Use a DiskGenius system image as your monthly disaster recovery anchor. Combine it with File History or regular manual copies for day-to-day file protection. Belt and suspenders.
The 3-2-1 rule has been standard advice in the IT world for years, and it still holds up: maintain 3 copies of your data, stored on 2 different types of media, with 1 copy kept offsite. An external drive backup covers one strong copy. Add a cloud backup service for the offsite piece and you're protected against nearly anything short of a global catastrophe.
Take a backup before major system changes. Windows feature update coming? New driver installation? Suspicious software you want to try? Create a quick DiskGenius image first. If things go sideways, you'll be back to normal in minutes instead of hours.
Label and rotate your backup drives. If you use two external drives in rotation, mark them clearly. "Backup A, Week 1/3" and "Backup B, Week 2/4." Mixing up which drive has the current backup is a mistake that usually reveals itself at the worst possible moment.
Keep a bootable USB recovery drive handy. Windows can create one through the Recovery Drive tool in Settings. Combine it with your DiskGenius backup images on the external drive. If your internal drive is completely dead, you boot from the USB, launch DiskGenius, and restore from the image. The whole recovery process can be done in under an hour.
Write down your restoration steps. This sounds overly cautious until you're the one trying to remember how to restore a system image at midnight while your only working computer is the broken one in front of you. A printed or handwritten note with the basic steps, tucked into the case with your backup drive, costs nothing and could save you significant stress.
Keeping the backup drive next to the computer. If a thief takes your laptop, they'll grab the external drive sitting right next to it. If there's a fire or flood, both are destroyed together. Store the backup drive in a different location, a relative's house, your office, a fireproof safe.
Never testing the backup. This is probably the most common and most dangerous mistake. A backup you've never successfully restored is just a file you're hoping works. Test it. Mount the image file, verify the contents, try a partial restore.
Only making one backup and calling it done. Drives fail. Backups get corrupted. A single backup from eight months ago might not cover the files you created last week. Set a schedule. Weekly for system images. More frequently for critical work files.
Running other operations on the backup drive during a backup. Don't browse files on the drive while a backup is writing to it. Don't start a second backup to the same location. And absolutely do not unplug the drive mid-process. Corruption during backup writes is real and incredibly frustrating to deal with.
Ignoring boot and recovery partitions. A backup of just the C: partition misses the EFI partition that Windows needs to actually boot. DiskGenius captures these automatically when you image the full disk or migrate Windows. If you're using another method, make sure those hidden partitions are included.
How long does backing up Windows to an external drive actually take?
It depends on three things: how much data you're backing up, how fast your external drive is, and which connection type you're using. A file-level copy of 100 GB over USB 3.0 takes roughly 15 to 20 minutes. A full system disk image with compression might take one to three hours. USB 2.0 will multiply those numbers significantly, sometimes by a factor of five or more.
Can I store other files on the backup drive alongside the backup images?
Yes, but with caution. If the drive is formatted as NTFS and has enough free space, there's nothing stopping you from keeping regular files alongside DiskGenius images. Just don't fill the drive to the point where there's no room for the next backup. And remember: if the drive fails, you lose both the backups and those extra files.
Do I need to format the external drive before using it for backups?
A brand-new drive should be formatted as NTFS before use. If the drive already has data on it, back that data up somewhere else first. Certain backup operations (especially disk cloning) will overwrite everything on the destination. DiskGenius includes formatting and partitioning features if you need to prepare the drive.
What if I accidentally unplug the drive during a backup?
The backup will be incomplete and almost certainly unusable. Worse, there's a small chance it could affect the source partition's integrity, though this is rare with modern tools. Always wait for the "backup complete" confirmation before disconnecting. Safely eject the drive through Windows before physically unplugging it.
Does this work with Windows 11?
Everything described in this guide works with Windows 10 and Windows 11. The built-in tools are slightly different in their exact menu locations across versions, but the concepts are identical. DiskGenius works on both.
Should I back up the EFI and recovery partitions too?
If you want the backup to be fully restorable and bootable, yes. The EFI partition contains the boot loader Windows needs to start. The recovery partition holds Windows recovery and repair tools. DiskGenius includes these automatically when you image the full system disk.
There's no shortage of ways to back up Windows to an external drive. The manual copy approach works in a pinch. Windows built-in tools cover the basics. For comprehensive protection though, DiskGenius gives you everything under one roof: disk cloning for immediate bootable backups, partition imaging for space-efficient snapshots, system migration for drive upgrades, and full disk imaging for complete disaster recovery.
Pick the method that matches your comfort level and the importance of your data. Then actually do it. The best backup strategy in the world is worthless if it stays theoretical. Twenty minutes setting things up now could easily save you twenty hours of panic and recovery work down the line.

DiskGenius is a one-stop solution to recover lost data, manage partitions, and back up data in Windows.
Download Facebook
 YouTube
 X
X