
Updated on Apr. 13, 2026
Position: Resource - Partition Management - How Do I Wipe an External Hard Drive in Windows 11/10? A Full Guide to Erase and Clear External HDDs
External hard drives are convenient. They hold years of photos, old projects, backups, videos, installers you forgot you saved, and sometimes a surprising amount of private information. Then one day you decide to reuse the drive, give it to someone else, or sell it. At that point, a simple question comes up: how do I wipe an external hard drive?
A lot of people also ask it a slightly different way: how to clear an external hard drive. Those two phrases are close, but not always identical. Sometimes "clear" just means removing everything so the drive looks empty again. "Wipe" often goes further. "Wiping" can mean erasing data in a way that makes recovery impossible.
If you only want to free up space and start fresh, a quick cleanup may be enough. If the drive contains important documents, client files, family photos, saved passwords, work materials, or anything even mildly sensitive, you probably want something more thorough. This guide walks through both sides of the problem. It explains how to clear an external hard drive in ordinary use, how wiping differs from deleting or formatting, and when it makes sense to use a more capable disk wiping tool such as DiskGenius.
People use the words delete, clear, format, erase, and wipe almost interchangeably. Windows users do it. Tech blogs do it. Even support threads blur them together. But they do not always mean the same thing.
Deleting files is the lightest option. You select folders, press Delete, empty the Recycle Bin, and the drive appears cleaner. But in many cases, the underlying data is still there until it gets overwritten later. That is one reason deleted files can often be recovered.
Clearing an external hard drive is a broader phrase. It may mean deleting everything on it. It may mean formatting it. It may simply mean making it ready to use again. It does not always imply secure data destruction.
Wiping a hard drive usually points to something stronger. In many cases, it means erasing data more completely, often by overwriting sectors so old files are much harder to recover. That is the better choice when privacy matters.
Formatting sits somewhere in the middle. It is commonly used to reset a drive, create a file system, and prepare the device for reuse. But not all formatting is equal. A quick format is fast and convenient, though it does not necessarily destroy old data in a way that prevents recovery. A fuller process may do more, but even then, people who care about privacy often prefer a dedicated wipe method instead of relying on basic formatting alone.
So if your real goal is "make this drive empty," clearing or formatting may be enough. If your goal is "make sure the old data is not easily recovered," wiping is the more accurate word and the safer direction.
Read more: How Do I Format an External Hard Drive for Windows and Mac?
Not always, and by now you can probably see why.
If someone says they want to clear an external hard drive, they may simply mean deleting everything or formatting the device so it can be used again. That is a common, reasonable goal.
If someone says they want to wipe an external hard drive, the meaning is often stronger. It more often suggests permanent removal or at least a more thorough attempt to make old data hard to recover.
That is why a single article can cover both phrases, but it also has to explain the difference. The overlap is real, yet the intent is not always identical. Some readers just want the drive empty. Others want peace of mind.
Those are related needs. Not the same need.
Sometimes the reason is obvious. You are about to sell the drive online and you do not want your personal files going with it. That one is easy.
Other times it is less dramatic. Maybe the drive has turned into digital junk storage. Old installers, duplicate backups, video clips from three phones ago, mystery folders with names like "new final." You just want a clean slate. That is probably the most common everyday scenario.
There are also technical reasons. The drive may have file system errors (e.g., RAW external drive). It may behave strangely between Windows and macOS. It may be cluttered with partitions from older uses, or filled with data after a malware incident where starting over feels safer than picking through every folder by hand.
And then there is the privacy side, which people sometimes underestimate. External drives often store exactly the kind of information you would not want a stranger to recover. Scanned IDs. Contracts. Financial spreadsheets. Personal photos. Archived emails. If that sounds familiar, wiping the drive is a smarter move than simply deleting visible files.
Before doing anything destructive, slow down for a minute. This part is boring, yes, but it prevents the kind of mistake that ruins an afternoon.
First, make sure there is nothing on the drive you still need. Once you begin a wipe or full erase process, recovery may become difficult or impossible. Back up important files before you touch the disk.
Second, confirm that you are choosing the correct drive. This matters more than it sounds. If several USB devices are connected, or if you also have an internal secondary disk, it is easier than people think to select the wrong one. Look at the drive letter, capacity, partition layout, and label before proceeding.
Third, know what outcome you actually want. Are you trying to clear an external hard drive for personal reuse? Are you preparing it for sale? Are you trying to remove traces of deleted data? These goals overlap, but they are not identical, and the best method depends on the answer.
It also helps to know whether the device is an HDD or an SSD. The overall goal may be the same, but storage type can affect which wiping method makes the most sense. You do not need to become a storage expert here. Just be aware that not every device behaves exactly the same.
And one more practical thing. Keep the drive connected throughout the process. Interruptions in the middle of formatting or wiping can cause errors, corrupted partitions, or incomplete results.
If your goal is simply to remove everything and reuse the drive, Windows gives you a few straightforward options.
Step 1: Connect the external hard drive to your computer and open Windows File Explorer.
Then Wait for Windows to detect the drive. Open it so you can see the folders and files stored there.
Step 2: Select files and folders you want to remove.
You can delete specific items, or just select everything if your goal is to empty the drive completely.
Step 3: Press Delete on the keyboard or right click and choose Delete.
Step 4: Empty the Recycle Bin if needed.
Some deleted items may still remain there until the Recycle Bin is cleared.
But it is not a real wipe. It does not mean the old data is gone beyond recovery. So if you are about to give away the drive or dispose of it, manual deletion is usually not enough.
For many users, this is what they mean when they ask how to clear an external hard drive.
Step 1: Connect the external hard drive to your computer and open This PC.
Find the external hard drive in File Explorer and make sure you are selecting the correct device.
Step 2: Right click the drive and choose Format.
This opens the formatting window where you can choose how the drive will be reset.
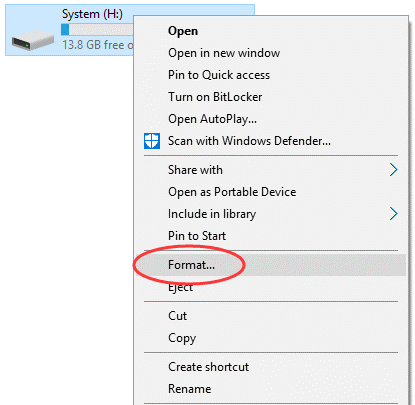
Step 3: Select the file system.
You can choose NTFS if the external hard drive will mainly be used with Windows. If you want broader compatibility across Windows and macOS, you can consider exFAT or FAT32.
Step 4: Decide whether to use Quick Format.
Quick Format is faster and works well if you just want to reset the drive for normal reuse. If you leave Quick Format unchecked, Windows performs a full format, which takes longer time and is more thorough than a quick one.

Step 5: Click Start and wait for the format to finish. Once the process is complete, the drive will be cleared and ready to use again.
Step 5: Click Start and wait for the format to finish. Once the process is complete, the drive will be cleared and ready to use again.
Formatting is useful because it removes the existing file system structure and prepares the drive to be used again. It is one of the easiest ways to make an inaccessible drive usable again. It is also a common fix for file system problems and compatibility issues.
Still, formatting is not always the same as securely wiping. If your concern is privacy, it is worth remembering that "drive looks empty" and "old data is unrecoverable" are not quite the same sentence.
Disk Management gives you a little more control, especially if the external drive has partition issues or you want to rebuild it from scratch.
Step 1: Open Disk Management. Press Win + X and choose Disk Management from the menu.
Step 2: Locate the external hard drive carefully.
Look at the capacity, partitions, and drive status so you do not confuse it with another disk.
Step 3: Delete the existing volume or partition if necessary.
If your goal is to recreate the drive from scratch, you can remove the existing volume: Right-click the partition and choose "Delete Volume".
Step 4: After deleting the old partition, create a new one so the disk can be used again: right-click the unallocated space and choose "New Simple Volume".
Step 5: Format the new volume.

You can choose whether to perform a quick format.

This method is useful when the partition has become inaccessible, or you want to reconfigure the device for a fresh start. It feels a bit more "technical," but it is still manageable for ordinary users.
Just keep the same caution in mind. Deleting a partition and creating a new one does not automatically mean the previous data is securely wiped. It means the drive is being restructured and prepared for reuse.
If you want to wipe an external hard drive in a deeper, more privacy focused way, basic deletion and standard formatting may not be enough. You can use DiskGenius to do the task.
Step 1: Connect the external hard drive to your PC and launch DiskGenius Free Edition.
Once the program opens, let it load the connected disks and display the drive list.
Step 2: Identify and select the correct external disk carefully.
Check the disk size, partition layout, and other details before doing anything. This step matters more than people expect. Wiping the wrong drive is the kind of mistake that gets remembered.
If you want to erase the entire disk including all partitions and partition table, you should choose the entire disk, such as HD2: ASMT200...
If you just want to wipe a single partition without affecting other partitions, you can select the specific partition.
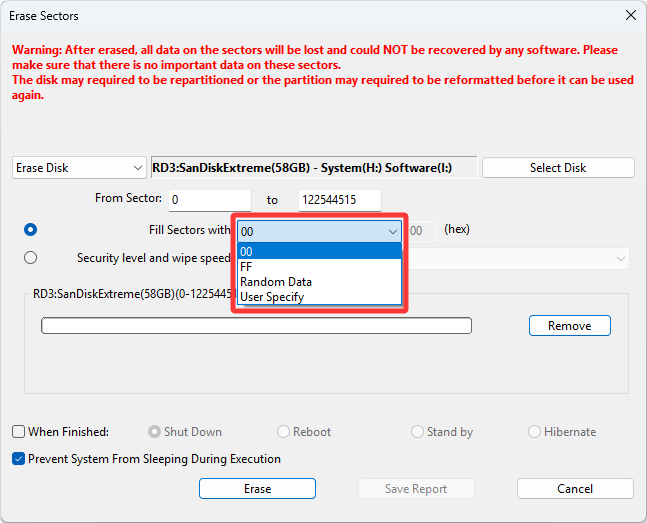
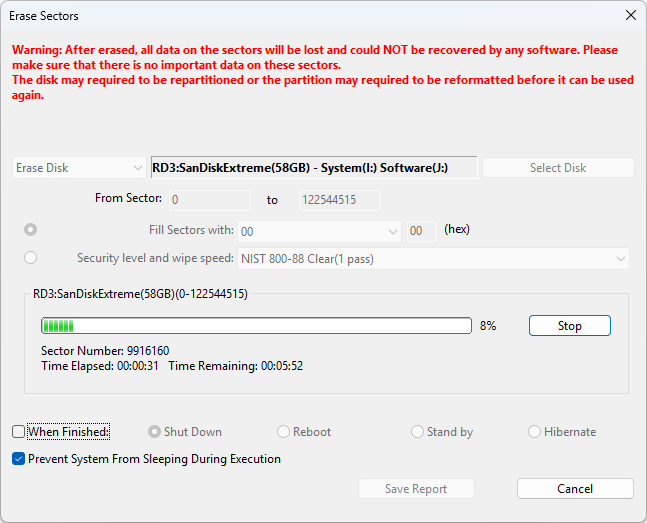
Step 3: Click "Tools" – "Erase Sectors".

Step 4: Select a wiping method if needed.
One advantage of using a dedicated tool is that you are not limited to a single basic erase approach.
DiskGenius Free Edition supports multiple wiping algorithms, including 00, FF, Random Data, or characters specified by users.
DiskGenius Professional Edition supports more data erasing standards such as NIST 800-88, DoD 5220.22-M, Gutmann, and HMG IS5. Moreover, the Professional Edition also can wipe multiple disks at the same time.
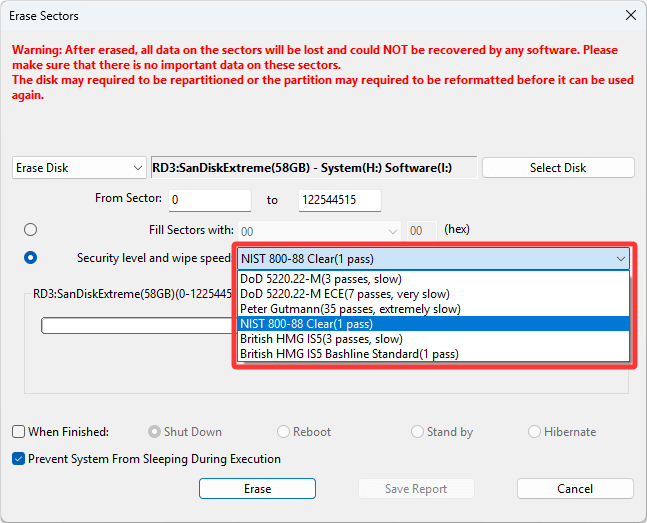
For most situations, the Free Edition is already good enough. If you have special needs about erasing data, you can consider the Professional edition.
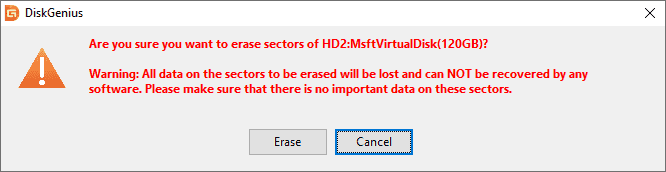
Step 5: Confirm the operation carefully.
Read the warning message before you proceed. Really read it. This is not a step to click through on autopilot.

Step 6: Wait for the wiping process to complete.
The time required depends on the size of the drive, the connection speed, and the wiping method you selected.
Step 7: Repartition or format the drive if you plan to use it again
After the wipe is finished, you can create new partitions, choose a file system, and prepare the drive for storage, backup, transfer, or whatever comes next.
After the process finishes, you can recreate partitions, format the drive with the file system you want, and prepare it for reuse. These steps are helpful when you are selling the hard drive, handing it over to someone else, or clearing sensitive material and wanting more confidence that the old data is not easily recoverable.
There is no single answer, and anyone who gives one without caveats is being a little too confident.
The time depends on several things:
• the hard drive's capacity
• whether it is an HDD or SSD
• the USB connection speed
• the health condition of the hard disk
• the data erasure method used
Deleting files is usually fast. Quick formatting is also fast. A more thorough wipe or overwrite process can take much longer, especially on large external hard drives.
A small portable drive might be done fairly quickly. A multi terabyte backup drive, especially an older HDD connected over a slower interface, can take a lot longer. If the process involves deeper erasure rather than a quick reset, patience becomes part of the toolset.
Suppose you already deleted a bunch of files earlier. The drive looks fine now. You still want to use it, and you do not want to erase the current content, but you are worried that the previously deleted files might still be recoverable. In that case, wiping free space can make sense.
Free space wiping targets the unused areas of the disk where deleted data remnants may still exist. It does not erase the files you are currently keeping. It's useful if you want to make sure that deleted files cannot be recovered.
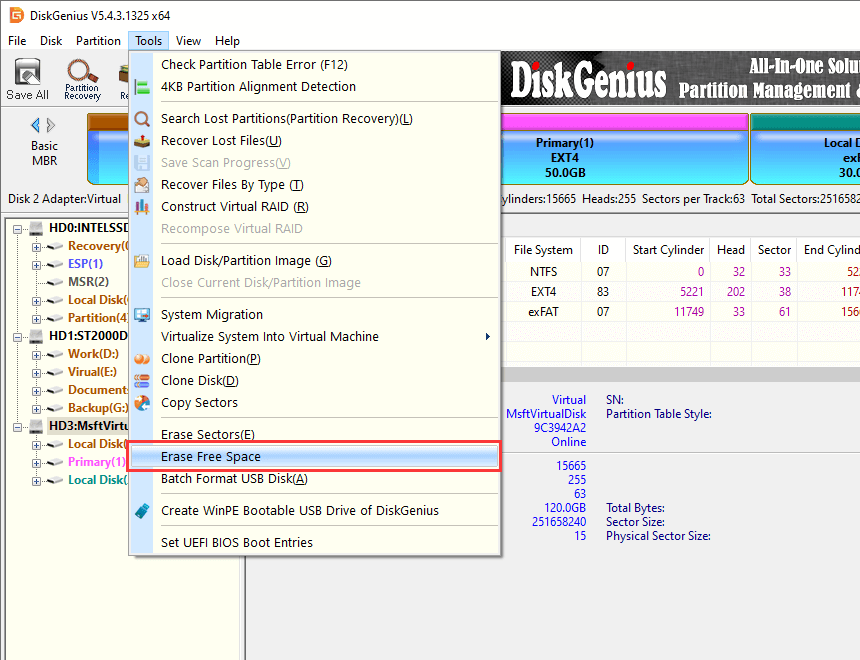
Here are steps to erase free space using DiskGenius Free Edition:
Step 1. Click "Tools" – "Erase Free Space".
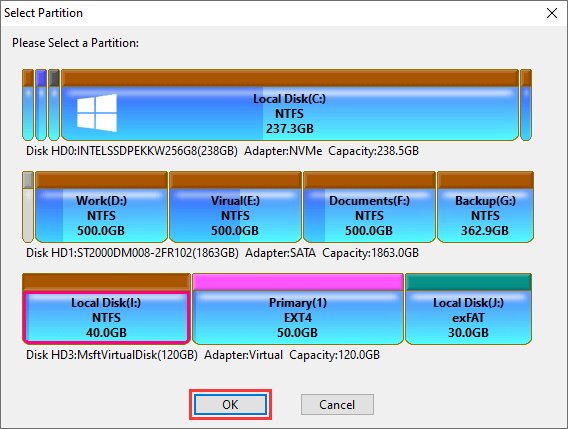
Step 2. Select the partition for which you want to erase free space (wipe deleted data) and click OK.
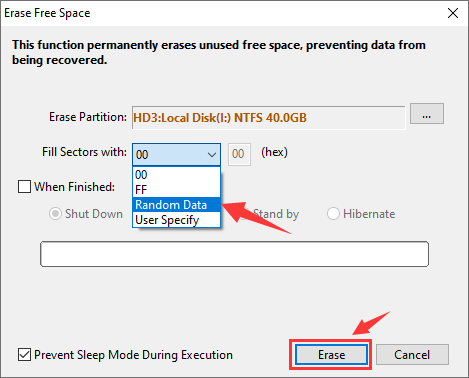
Step 3. Select characters that will be used to overwrite the free space. Then double-check if you've chosen the correct partition. The Click "Erase" to start.
One of the most common mistakes is assuming that deleted files are gone forever. They may not be. That misunderstanding leads people to sell or give away drives that still contain recoverable data.
Another mistake is using quick format when privacy is the real concern. Quick format is convenient, but convenience and privacy do not always travel together.
Choosing the wrong drive is another classic. It sounds obvious until it happens. External hard drives, USB flash drives, and even secondary internal disks can look similar at a glance, especially if you are working quickly.
Some people also forget to back up what matters before starting. That one tends to be followed by panic and then bargaining and then a quiet, defeated stare at the screen.
Interrupting the wipe process is also a bad idea. Disconnecting the drive too early can leave the device in an unstable state or create formatting issues that need to be repaired afterward.
And finally, users sometimes choose the wrong file system at the end, then wonder why the drive behaves oddly across different devices. The wiping part may have gone perfectly, only for the setup afterward to cause confusion.
1. How do I clear an external hard drive quickly?
The quickest way is usually to delete the files manually or format the drive in File Explorer. If your goal is basic reuse and not secure erasure, that is often enough.
2. How do I wipe an external hard drive so data cannot be recovered?
A more thorough disk wiping method is not simply deleting files or formatting the drive, you should overwrite the drive sector by sector:
Step 1. Launch DiskGenius Free Edition.
Step 2. Select the external disk, click Tools – Erase Sectors.
Step 3. Select a wiping method, and click "Erase".
3. Does formatting an external hard drive erase everything?
Formatting clears the external hard drive, the file system structure gets deleted and the drive is ready to use again. But formatting doesn't always wipe permanently, so you can try data recovery after formatting.
4. Should I wipe an external hard drive before selling it?
Yes. If the external hard drive has ever stored personal, financial, family, or business data, wiping it more thoroughly is a smart precaution.
If you came here asking how to clear an external hard drive, the answer may be fairly simple. Delete the files, or format the drive, and it is ready for reuse.
If you came here asking how do I wipe an external hard drive, the answer is a bit more serious. Wiping usually means going beyond ordinary cleanup, especially when privacy matters and you do not want old data hanging around in recoverable form.
That is really the heart of it. Clearing, formatting, deleting, wiping. They overlap, but they are not interchangeable in every situation. The right method depends on what you are trying to achieve.
For basic cleanup, Windows tools may be enough. For deeper erasure, better control, and follow up disk management, DiskGenius can be a useful option. And when the drive in question contains information you would rather not leave behind, a more thorough approach is usually worth it.
DiskGenius is a one-stop solution to recover lost data, manage partitions, and back up data in Windows.
Download Facebook
 YouTube
 X
X