
Updated on Jun. 30, 2026
Position: Resource - Disk Utilities - Fixed: DISK BOOT FAILURE INSERT SYSTEM DISK AND PRESS ENTER
DiskGenius - A free and useful tool for Window users to create a bootable USB disk, repair MBR, check bad sectors, extract ISO file, export directory to an HTML file, clone HDD to SSD, etc.
This Article Contains:
The "Disk boot failure, insert system disk and press enter" is an error message that appears when the computer is unable to boot from the hard disk or SSD. This error message typically indicates that the boot process is unable to find the operating system files on the hard disk or SSD.

Here are some common symptoms of this error:
If you are experiencing any of these symptoms, it is likely that your computer is experiencing a disk boot failure issue. You may need to troubleshoot the issue or rescue data from the crashed computer.
The disk boot failure error can be caused by a variety of issues, including:
Fixing the "DISK BOOT FAILURE INSERT SYSTEM DISK AND PRESS ENTER" error can range from relatively easy to quite difficult, depending on the root cause of the issue.
If the error is caused by something simple like a loose cable or an incorrect boot order in the BIOS, it may be relatively easy to fix with basic troubleshooting steps. On the other hand, if the error is caused by a failing hard drive or other hardware issue, the solution may be more complex and may require advanced technical knowledge or the help of a professional.
Here are some solutions you can follow to fix the OS boot failure issue:
Disconnect any external devices that are not required for booting, such as USB drives, external hard disks, or memory cards.
Note: If your computer cannot boot to Windows after restarting, you can just shut down computer and remove external drives directly.
To safely disconnect external devices from your computer, follow these steps:
Step 1. Save any open files and close all programs that are using the device.
Step 2. Locate the "Safely Remove Hardware" icon in the notification area of the taskbar (usually located on the bottom right of the screen).
If you do not see the "Safely Remove Hardware" icon in the notification area, you may need to click the arrow next to the icons to show hidden icons. If you still cannot find the icon, you can also safely remove the device by shutting down your computer and disconnecting the device while it is powered off.
Step 3. Click the icon to open the "Safely Remove Hardware and Eject Media" window. Then select the device that you want to remove from the list of devices.
Step 4. Wait for the message that says it is safe to remove the device. Then disconnect the device from your computer.
Step 5. Restart computer and check if the error still occurs.
Check the hard disk or SSD connections to ensure that they are properly connected and not loose.
Step 1. Power off your computer and unplug it from the power source. Open the computer case to access the internal components.
Step 2. Locate the hard disk or SSD, which is typically a rectangular-shaped device that is connected to the motherboard using a SATA cable.
Step 3. Check that the SATA cable is securely connected to both the motherboard and the hard disk or SSD.
Step 4. If the connection appears loose, gently push the cable into the socket until it clicks into place. If your hard disk or SSD is connected via an older IDE or SCSI interface, check the cable connections and ensure that the jumpers are set correctly.
Step 5. After ensuring the connections are secure, close the computer case and reconnect the power source.
Step 6. Turn on your computer and check if the hard disk or SSD is detected in the BIOS or in the operating system.
Note: If you are not comfortable with opening your computer case or making hardware changes, it is recommended to seek assistance from a qualified technician.
Ensure that the boot order is correctly set in BIOS, so that the computer tries to boot from the correct device. The system disk should be the first boot device in the boot order.
Step 1. Turn on your computer and press the key to enter the BIOS setup utility. The key to press may vary depending on your computer's manufacturer and model, but it is usually displayed on the screen during startup. Common keys include F2, Del, Esc, or F10.
Step 2. Navigate to the Boot tab using the arrow keys and press Enter to select it. You will see a list of boot devices in the Boot Priority or Boot Order section. The top device in the list is the first boot device, followed by the second, third, and so on.
Step 3. Check that the device containing your operating system, usually your hard disk or SSD, is listed as the first boot device.
Step 4. If the boot order is incorrect, use the arrow keys to highlight the device you want to move and press the + or - key to move it up or down in the list.
Once you have set the correct boot order, press F10 to save and exit the BIOS setup utility. Confirm that you want to save the changes and exit.
Your computer will now boot from the first device in the boot order, which should be the device containing your operating system.
If the Windows installation disc is not available, you can use a bootable USB drive to repair/rebuild MBR (Master Boot Record).
Step 1. Insert a USB drive to a computer that can boot to Windows 11 or Windows 10. Then launch DiskGenius Free Edition to create the bootable USB. Here are the detailed steps to create a bootable USB drive.
Step 2. Insert the bootable disk to the computer that is reporting the "DISK BOOT FAILURE" error. Enter BIOS to make the USB drive as the boot device. Restart computer.
Step 3. Computer boots from the USB drive and DiskGenius Free Edition will be launched automatically.
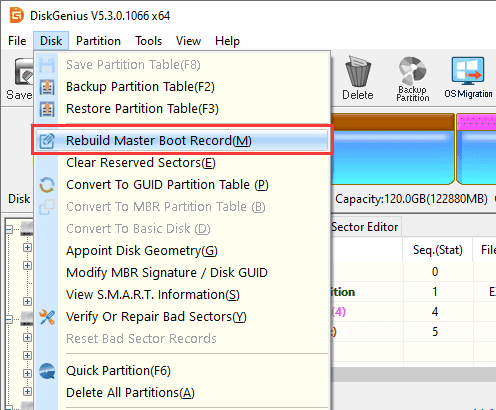
Step 4. Click "Disk" – "Rebuild Master Boot Record". Then click "Yes" to confirm the option.
Checking for bad sectors on a hard drive or SSD can help identify potential problems with the drive before they become more serious issues. Bad sectors are sections of a hard drive that are physically damaged and cannot be read or written to. If bad sectors are present on a hard drive, they can cause data loss, system crashes, and other issues.
By checking for bad sectors on a hard drive, you can detect these potential problems early on and take appropriate action, such as repairing the sectors or replacing the drive if necessary. Regularly checking for bad sectors can also help prolong the life of your hard drive and ensure that your data is safe and secure.
Since DiskGenius Free Edition has been launched after computer boots from the USB drive in Fix #4, you can check if the boot hard disk or SSD has bad sectors using DiskGenius Free Edition.
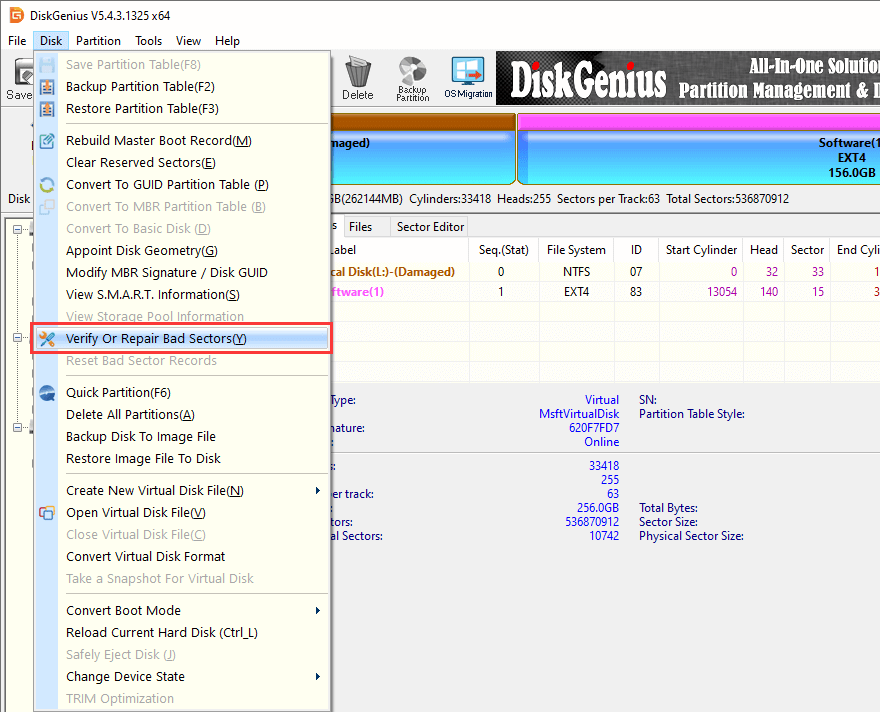
Step 1. Select the boot disk on the left pane, and click "Disk" – "Check or Verify Bad Sectors", see the picture below:
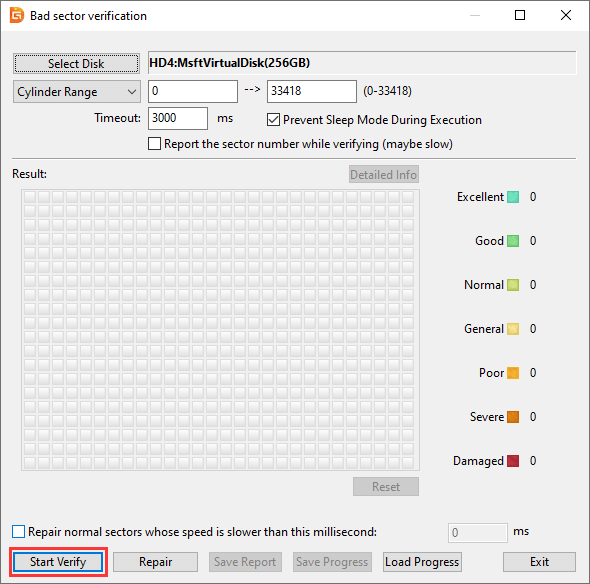
Step 2. Click "Start Verify" button to start the bad sector scanning process.
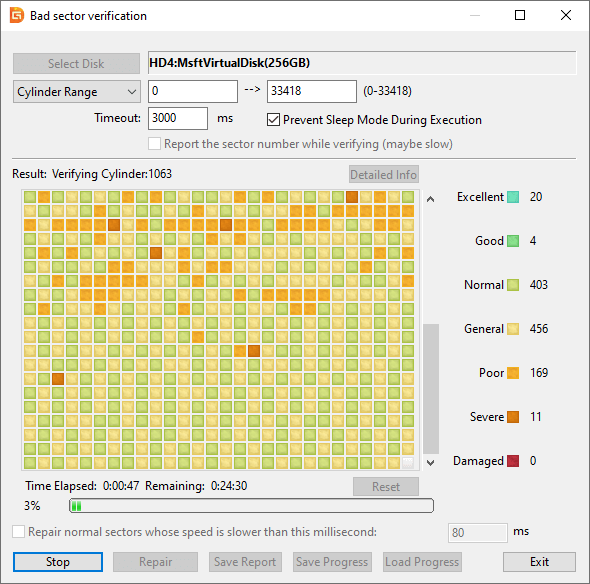
Step 3. DiskGenius is analyzing the disk.
Once bad sectors are found, the "Damaged" block will record number of bad sectors. If the boot hard drive or SSD has bad sectors, you should back up files as soon as possible and then replace the drive with a new one.
Step 1. Boot the computer using the bootable USB disk created in Fix #4.
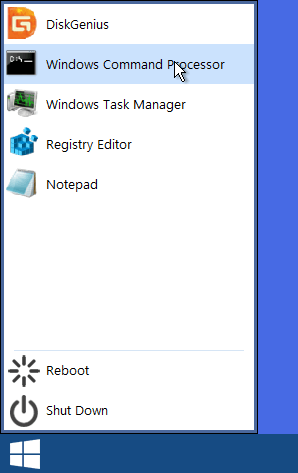
Step 2. Click the start menu and choose "Windows Command Processor" to launch Command Prompt.
Step 3. Type the command sfc /scannow and press Enter. This will initiate the System File Checker scan.

Step 4. Wait for the scan to complete. This may take some time, so be patient and avoid interrupting the process.
After the scan is complete, the Command Prompt will display the results of the scan. If the scan finds any corrupted system files, it will attempt to repair them automatically.
Step 5. Once the repair process is complete, restart your computer and check if the boot failure error still appears.
If the above fixes cannot resolve the boot failure, the issue may involve multiple boot components at the same time. DiskGenius provides a "Windows Boot Repair and Conversion" feature that can repair boot partitions, boot files, and MBR/PBR in a single process. It also supports converting between GPT and MBR partition tables and switching between UEFI and Legacy BIOS boot modes.
Note: This fix requires a WinPE bootable USB drive. If you have already created one in Fix #4, skip to Step 4.
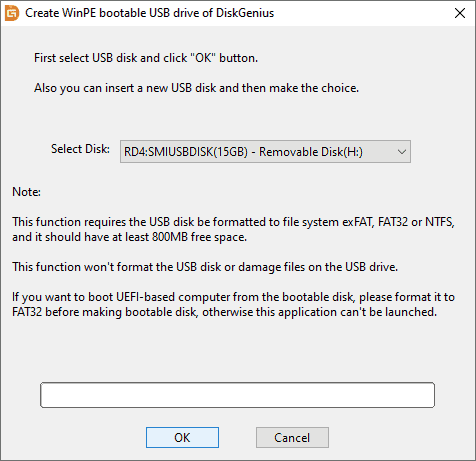
Step 1. Connect a USB drive to a working computer, launch DiskGenius, and click "Tools" - "Create WinPE Bootable USB Drive of DiskGenius". Wait for it to complete.
Step 2. Insert the USB drive into the problem computer, change the boot order in BIOS to boot from the USB drive, and restart. DiskGenius will launch automatically.
Step 3. Click "Tools" and select "Windows Boot Repair and Conversion".

Step 4. In the dialog box, check the Windows system partition(s) you want to repair. Then select the correct boot mode. UEFI works with GPT disks and is the default for most modern systems. Legacy BIOS works with MBR disks and is for older systems.

Step 5. Choose a boot partition from the drop-down menu. If no boot partition is available, select "Create Boot Partition" and DiskGenius will create one automatically. If you selected Legacy BIOS mode, check the "Rebuild MBR / PBR Boot Record" option.
Step 6. Click "Execute" to start the repair. Do not shut down or interrupt the process.
Step 7. After the repair completes, remove the USB drive and restart the computer. If you switched the boot mode (for example, from Legacy to UEFI), make sure to change the BIOS Boot Mode setting to match, otherwise the system will not boot.
If the error occurred after installing new software or making changes to the system, perform a system restore to roll back to a previous working state.
If previous restore points are not available, you will have to consider reinstalling Windows or resetting computer to factory settings. You should pay attention to that reinstalling Windows or resetting computer erases all data on your computer, so it's important to back up your important files, documents, photos, and other data to an external hard drive, cloud storage, or another device.
There are some dos and don'ts to keep in mind when fixing the DISK BOOT FAILURE error:
It is recommended to prioritize data recovery before attempting to fix the "DISK BOOT FAILURE INSERT SYSTEM DISK AND PRESS ENTER" error. This is because attempting to fix the error may involve further troubleshooting steps, such as reinstalling the operating system or replacing hardware components, which can potentially cause data loss or damage to the hard drive.
Therefore, it is best to first attempt to recover any important data from the disk that won't boot, either by connecting it to another computer as an external drive or by using data recovery software, before proceeding with any fixes for the boot failure error. Once the data is safely backed up, you can then proceed with attempting to fix the boot failure error without worrying about potential data loss.
If you are experiencing a DISK BOOT FAILURE error, it may be possible to recover or backup your data using the following steps:
Step 1. Use A Bootable USB Drive to Boot the Computer
Once the computer boots from the USB bootable disk, you can run data recovery software, disk repair tools, or data recovery software to either rescue data or repair disk errors. Or alternatively, you can connect the disk with booting issues to another computer as an external drive.
Here is an easy-to-follow method to make a USB drive bootable:
1. Connect the USB drive to a computer that runs Windows 10 or Windows 11. Forma the USB drive to either FAT32 or exFAT file system.
2. Install and launch DiskGenius Free Edition. Select the USB drive in the software and click "Tools" - "Create WinPE Bootable USB Drive of DiskGenius".

3. Click "OK" button and wait for a while.
4. Connect the USB drive back to the crashed computer. Change boot order in BIOS and restart computer. Once booted from the USB drive, DiskGenius will be launched automatically.
Step 2. Rescue Data from The Crashed Computer
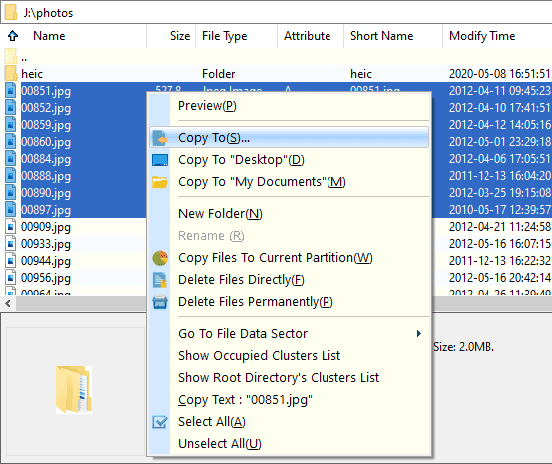
1. Backup files. If partitions on the boot disk are still accessible, you can export files to another disk:
Select files you want to keep > right-click selected data > select "Copy To" > specify a location and start exporting files.
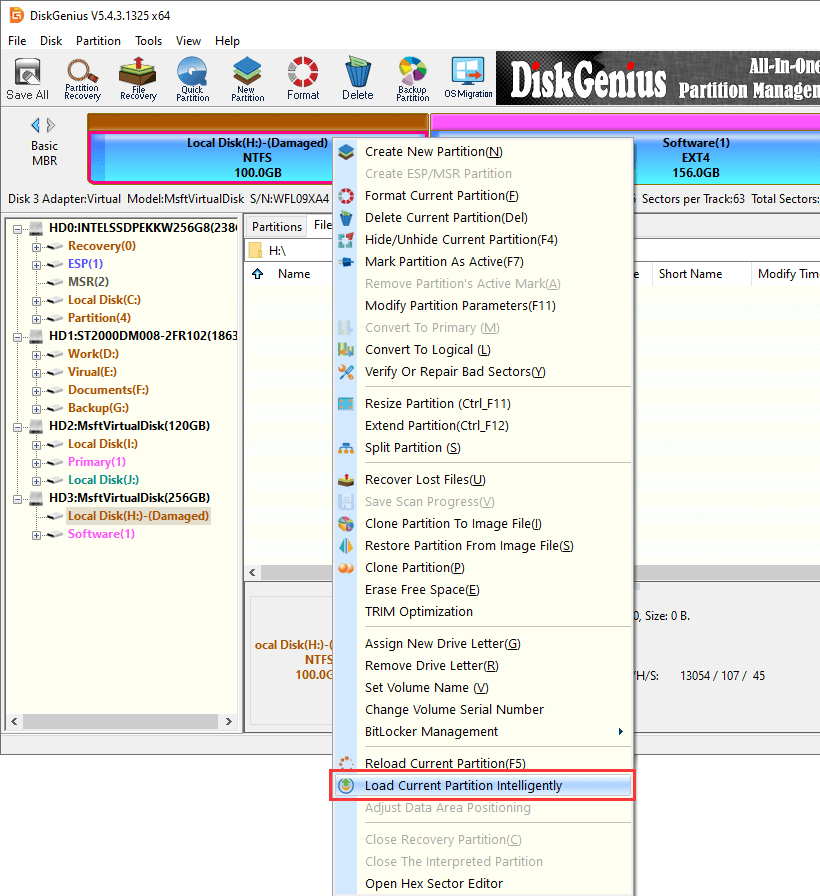
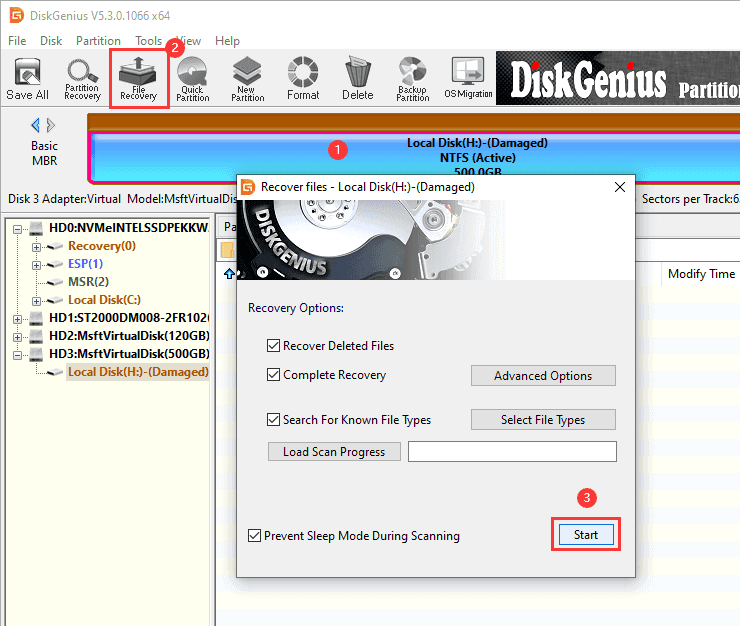
2. If the hard drive becomes corrupted, for example, partitions are shown as Unformatted, Damaged, or RAW, you can use the "Load Partition Intelligently" feature or "File Recovery" feature to look for lost data from the drive.
Load Partition Intelligently:
File Recovery:
It is important to note that data recovery is not guaranteed, for the hard drive might be physically damaged, which is beyond the ability of data recovery software. In that case, you need to seek help from professional data recovery services.
Fixing the "DISK BOOT FAILURE INSERT SYSTEM DISK AND PRESS ENTER" error can be safe and easy if done correctly and with proper precautions. However, if you are not familiar with troubleshooting computer issues, it is recommended to seek professional help to avoid causing further damage or data loss.
It is also important to backup any important data before attempting any fixes to the boot failure error, as some fixes may involve reinstalling the operating system or replacing hardware components, which can potentially cause data loss. Additionally, it is important to follow recommended troubleshooting steps and avoid using unverified or untested solutions, as they may cause further issues or damage to the hardware.
1. How to fix invalid system disk replace the disk and then press any key?
The "Invalid system disk, replace the disk and then press any key" error message usually appears when the computer is unable to find a valid operating system on the disk that it is trying to boot from. This could be due to a variety of reasons, such as a damaged disk, a corrupted boot sector, or a misconfigured BIOS setting.
Here are some steps you can take to fix this error message: Check the boot order in your BIOS, check for disk errors, repair the Master Boot Record (MBR), or replace the disk.
If you have important data on the disk, you may want to try to recover it before attempting any of these steps. There are data recovery tools like DiskGenius that can help you recover data from a damaged disk.
2. How do I fix the problem for reboot and select proper boot device or insert boot media in selected boot device and press a key?
This error "reboot and select proper boot device or insert boot media in selected boot device and press a key" message typically appears when a computer is unable to find a valid operating system to boot from. It usually indicates that the computer is attempting to boot from a device or location that does not have a valid operating system installed on it, or that the boot order settings in the BIOS are incorrect.
To resolve this error message, you should first ensure that your bootable storage device (usually your hard drive) is properly connected to your computer. You should also check your BIOS settings to ensure that the boot order is set correctly, with the first boot device being the one containing the operating system.
If you have recently installed or changed any hardware or software, try disconnecting the new hardware or reverting the software changes to see if that resolves the issue. If the issue persists, you may need to use recovery tools to repair your operating system or reinstall it entirely.
3. How do I fix reboot and insert proper boot device?
The error message "Reboot and select proper boot device" typically occurs when the computer is unable to find a valid boot device or operating system. This can be caused by a variety of issues such as a faulty hard drive, misconfigured BIOS settings, or corrupted boot files.
Here are some steps you can take to fix this error message: Check the boot order in the BIOS, check the hard drive connections, run startup repair, check for corrupted boot files, reinstall the operating system. Remember to back up any important data before attempting any of these steps, as they may result in data loss.
4. How to fix disk error in BIOS?
If you are seeing a disk error message in your computer's BIOS, it usually means that there is a problem with the hard drive or other storage device that the BIOS is trying to access. Here are some steps you can take to fix the disk error in BIOS: Check the hard drive connections, check bad sectors for the drive, check the boot order in BIOS, update BIOS, replace the damaged disk with a new one, etc. If you have important data on the disk, you may want to try to recover it before attempting any of these steps. There are data recovery tools available that can help you recover data from a damaged disk.
5. How to repair boot from BIOS?
The BIOS is responsible for initializing hardware components and booting up the operating system. If there is a problem with the boot process, it could be due to a faulty hardware component, corrupted boot files, or misconfigured BIOS settings. Here are some steps you can take to repair boot from BIOS: make sure the boot order is correct, repair MBR, run Startup repair, use SFC to repair corrupted boot files, check hardware connection. Remember to back up any important data before attempting any of these steps, as they may result in data loss.
6. What causes disk failure?
There are many factors that can cause disk failure, including: physical damages, manufacturing defects, wear and tear, power surges, viruses and malware, bad sectors, file system corruption, human error, driver issues, etc. It's important to back up important data regularly to avoid data loss in case of disk failure.
7. How do I reboot my computer without a boot disk?
You can reboot your computer without a boot disk by following these steps:
Step 1. Press and hold the power button on your computer until it turns off. If your computer is unresponsive, you may need to unplug it from the power source.
Step 2. Wait a few seconds, then press the power button again to turn on the computer.
Step 3. Enter BIOS boot menu to check if the boot order is set correctly.
Step 4. If the boot order is correct and the computer still fails to boot, you can try boot computer into the recovery environment by pressing a specific key (often F11 or F12) during startup. From there, you may be able to perform a system restore or repair the operating system without a boot disk.
8. What causes a laptop to fail to boot?
A laptop may fail to boot due to various reasons, some of the common causes include hardware failure, software issues, power failure, incorrect BISO setting, boot device failure, overheating, physical damages, etc.
It's important to identify the cause of the problem to determine the appropriate solution for a laptop that fails to boot. If you are unsure, it may be best to seek professional assistance.
9. How do I reset boot mode?
Note that changing the boot mode may affect the way your operating system is installed, so it's important to understand the implications before making any changes. If you are unsure about how to reset the boot mode or need further assistance, it may be best to seek professional help or consult the documentation provided by the computer manufacturer. To reset the boot mode on your computer, follow these steps:
Step 1. Restart your computer and enter the BIOS setup utility. The key to enter the BIOS setup utility varies depending on the computer manufacturer, but it is usually F2, F10, Del, or Esc.
Step 2. Navigate to the Boot menu in the BIOS setup utility. Locate the Boot Mode setting and select it.
Step 3. If the Boot Mode is set to UEFI, change it to Legacy. If the Boot Mode is set to Legacy, change it to UEFI.
Step 4. Save the changes and exit the BIOS setup utility. Restart your computer and check if the boot mode has been reset successfully.
10. How to repair Windows 10 boot without CD?
You can repair Windows 10 boot without a CD by following these steps:
Step 1. Restart your computer and press and hold the power button to force shutdown your computer three times in a row. This should trigger the Automatic Repair process.
Step 2. Once Automatic Repair starts, select the Troubleshoot option. Then select Advanced options > Startup Repair.
Step 3. Windows will scan your system and attempt to repair any issues that are preventing it from booting properly.
Step 4. Once the commands have been executed, restart your computer and check if the boot issue has been resolved.
11. How do I fix Windows 7 boot failure?
To fix a Windows 7 boot failure, you can try the following steps:
Step 1. Restart your computer and press F8 key repeatedly until you see the Advanced Boot Options screen.
Step 2. Select "Last Known Good Configuration" from the list of options and press Enter.
Step 3. If "Last Known Good Configuration" doesn't work, try performing a System Restore to restore your system to an earlier point in time when it was working correctly.
12. How do I know if my boot drive is failing?
There are several signs that can indicate if your boot drive is failing. Here are some of the most common signs: slow boot speed, BSOD (Blue screen of death), clicking or grinding noises, error messages like "disk read error", corrupted file, frequent freezing, etc.
If you are experiencing any of these signs, it's important to back up your important data immediately and seek the assistance of a professional to diagnose and fix the issue with your boot drive.
13. What do I do when my laptop says insert boot disk?
If your laptop says "insert boot disk," it means that your computer is not able to find the operating system or the boot device from which it can start up. Here are some steps you can take to fix this issue: remove unnecessary devices such as CD/DVD or USB drive, check boot order in BIOS settings, check the cables and connections between the boot disk and computer, run a Startup repair, restore OS to a previous state, replace the boot disk with a new one.
14. How do I fix no system disk or disk error?
"No system disk or disk error" message usually appears when the computer is trying to boot from a device other than the hard disk or SSD where the operating system is installed. Here are some steps you can take to fix this issue:
DiskGenius - The best free partition manager software to wipe hard drive, permanently delete files, migrate Windows 11/10 to SSD, image hard disk, format 64GB SD card to FAT32, extend C drive, and so on.
DiskGenius is a one-stop solution to recover lost data, manage partitions, and back up data in Windows.
Download Facebook
 YouTube
 X
X