
Updated on Jun. 20, 2025
Position: Resource - Partition Management - How to Format USB Drives Over 32GB to FAT32 on Windows, Mac & Linux?
DiskGenius - A free format tool that can format USB flash drives / SD cards / hard drives / SSDs to FAT32, exFAT, NTFS, or EXT4 file system in Windows 11/10/8/7.
Looking for a way to format your USB drive to the FAT32 file system on Windows11/10, Mac, or Linux? Look no further! In this guide, we'll present multiple methods to format USB flash drives which might be whether 8GB or 128GB to FAT32, even if your operating system does not offer the option by default.
What is formatting? Formatting is a common disk operation used to allow the device to store and read data normally. Whether it is a newly purchased USB flash drive or an old USB flash drive with problems, it usually needs to be formatted before use.
In simple terms, formatting clears the data and creates a structure that tells your operating system how to store and organize files on the drive.
The second question: Why would you format a USB drive? There are several reasons you may want to format a USB flash drive, for example:
When you format a USB drive, all existing files are removed. Even if you choose a "Quick Format", the file system is still reset, and the original data becomes inaccessible without recovery tools. Make sure to back up anything important before you begin.
If you're using a Windows PC, there are several ways to format a USB drive to the FAT32 file system. This section introduces four commonly used methods. Each method fits different scenarios, including formatting drives larger than 32GB or dealing with RAW drives. The fourth method also shows how to format multiple drives simultaneously and how to securely erase USB drives.
USB requirements: The FAT32 file system will not be available if the USB drive is larger than 32GB. If your USB drive is larger than 32GB, then use DiskGenius to do the formatting.
To format a USB drive that is smaller than 32GB to FAT32 in Windows 11/10 File Explorer, follow these steps:
Step 1. Connect the USB drive to a Windows 11/10 PC.
Step 2. Open File Explorer, locate and right-click the USB drive, and select Format.
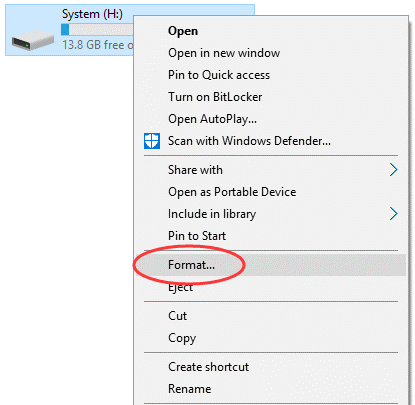
Step 3. In the pop-up window, set FAT32 as the target file system, check the box "Quick Format", and click Start to launch the format.
Step 4. Click "OK" button when Windows warns formatting will erase all data on this disk. When the process is complete, click OK to confirm. Once finished, your USB will be FAT32.
Disk Management gives you a bit more control over formatting. Like File Explorer, it's limited to 32GB drives.
Step 1. Right-click the Start menu and select Disk Management.
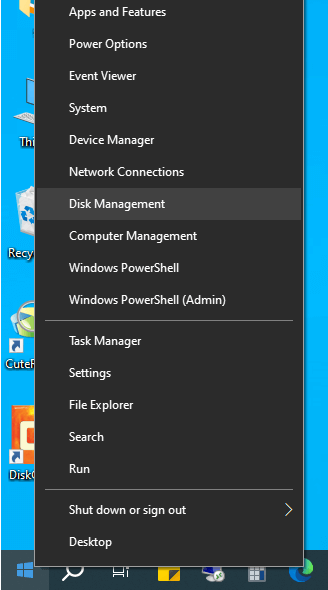
Step 2. Locate your USB drive in the list of volumes. Right-click the partition on the USB drive and choose Format.

Step 3. In the dialog box, set File system to FAT32. You can also give the drive a new Volume label if needed.
Step 4. Click OK, then confirm when prompted.
Command Prompt or Windows Powershell lets you format a USB drive through a few typed commands. Here are the steps:
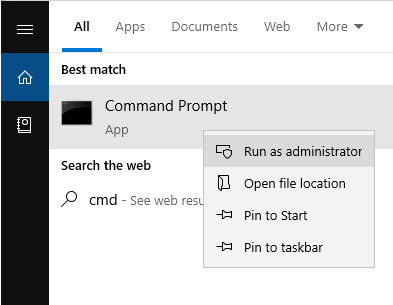
Step 1. In the Windows search bar, type cmd, right-click on Command Prompt, and select Run as Administrator.
Step 2. In Command Prompt, type the following commands one by one and hit the Enter key after each command. Then the USB drive will be formatted as FAT32.
diskpart
list volume
select volume # (replace # with the volume number of the USB drive you want to format)
format fs=FAT32 quick
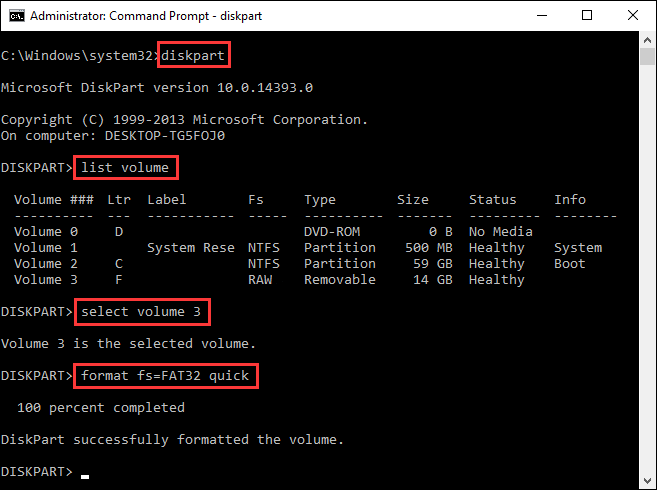
If your USB drive is larger than 32GB, this method might return an error "The volume is too big for FAT32". Use Method 4 instead.
Windows built-in tools do not allow FAT32 formatting for drives over 32GB. DiskGenius Free Edition bypasses this limit and supports all drive sizes. Moreover, you can use this tool to format a drive to EXT4.
1. Perform a quick format for USB disks:
Step 1: Download and run the free USB format tool – DiskGenius Free Edition
Step 2: Select the USB drive you want to format, and then click the Format button on the toolbar, or click the Partition menu and choose Format Current Partition.
Also, you can right-click the partition to be formatted and select the item "Format Current Partition" from the context menu.
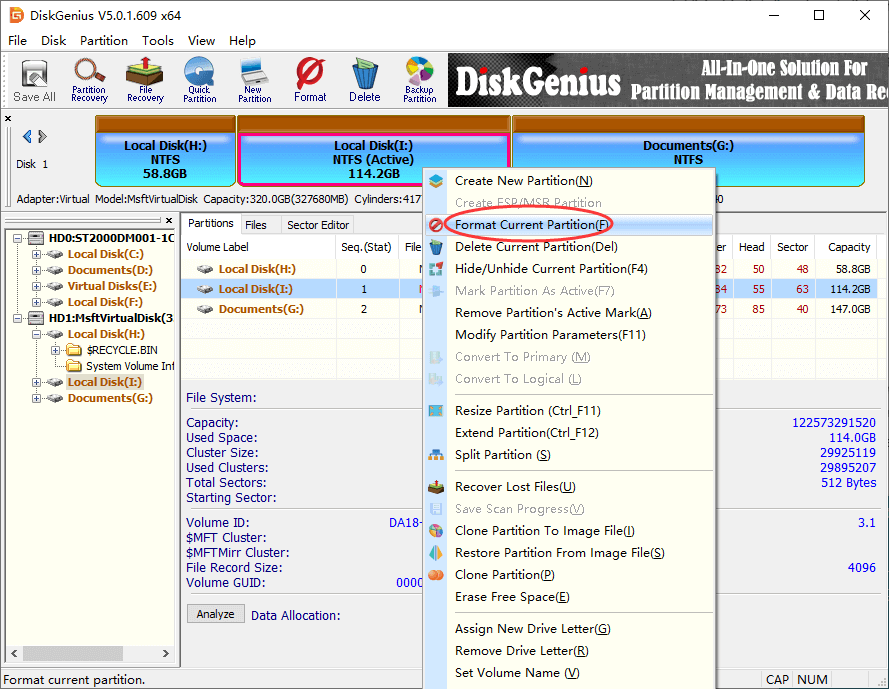
Step 3: Select FAT32 as file system type and click the "Format" button.
You can also choose to do a surface scan to check bad sectors during formatting, which can be a time-consuming task. Most USB drives, especially new ones, do not require scanning. If bad sectors are found during the scan, the formatter flags them so that they will not be used to store data.
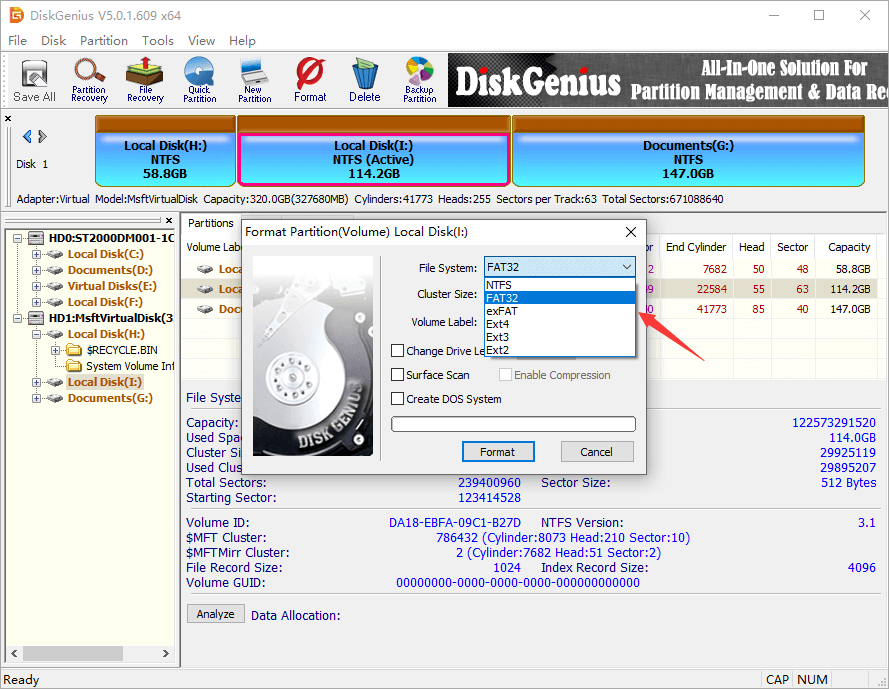
For NTFS file system, you can enable the disk compression feature of NTFS by checking the "Enable Compression" check box.
If it is a primary partition and the FAT32/FAT16/ FAT12 file system is selected, the "Create DOS System" check box becomes available. If checked, the program will set up the DOS system in the partition after formatting, and then the disk can be used to boot the computer.
Step 4: Before starting the formatting operation, the program asks for confirmation to prevent accidental errors. Click the "Yes" button to start formatting immediately.
Attention: Formatting will erase all data on the USB drive, please back up important files before formatting. If you do not back up before formatting, which may result in the loss of important data in the USB, you can also use DiskGenius to recover data.
Here is the video guide on how to format a USB flash drive larger than 32 GB as FAT32 in Windows 10:
2. Format and securely wipe USB drives
If you want to permanently erase all data from a USB drive (so it can't be recovered), DiskGenius provides a secure wipe feature that overwrites the disk during formatting. This will be useful before donating, selling, or disposing of a USB flash drive.
Step 1. Open DiskGenius Free Edition and connect the USB drive to your computer.
Step 2. Select the target USB drive from the list of disks on the left. Then click Tools > Erase Sectors from the top menu.

Step 3. In the pop-up window, select characters to overwrite the USB drive. Click Erase.
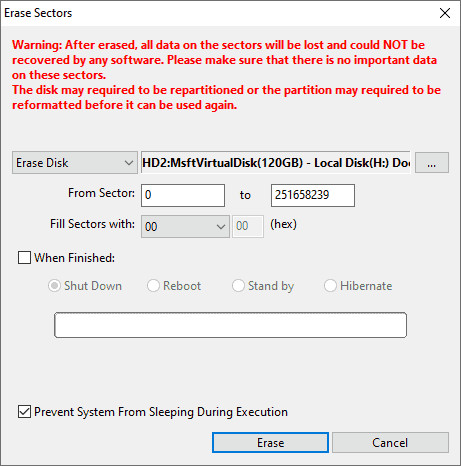
Warning: This operation will permanently destroy all data. Files erased with this method cannot be recovered even with recovery software.
Here's the vidoe guide on wipeing USB drives on Windows:
3. Format multiple USB drives at once
If you're managing several USB drives and need to format them all to FAT32 quickly, DiskGenius supports formatting multiple drives at the same time without restarting the program. And the feature automates the process based on specific conditions you define.
Step 1. In DiskGenius, click the Tools menu at the top, and select Batch Format USB Disk from the dropdown list
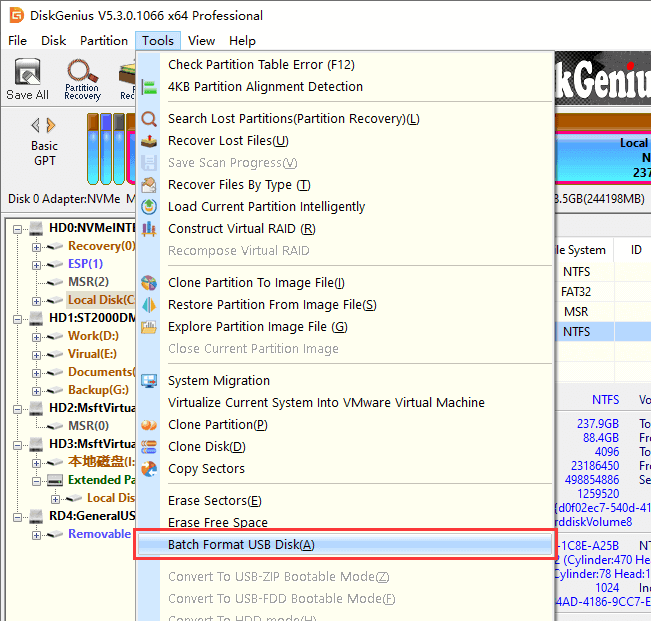
Step 2. In the pop-up window, configure the formatting rules under the Select Target Disk section:
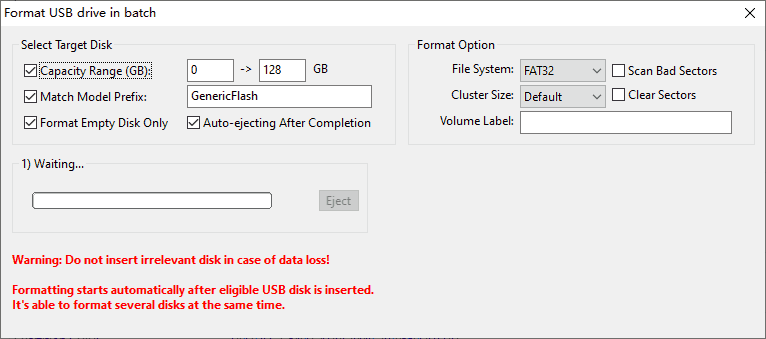
Step 3. Once settings are complete, insert USB drives one by one. DiskGenius will automatically detect and format any device that matches the conditions you set.
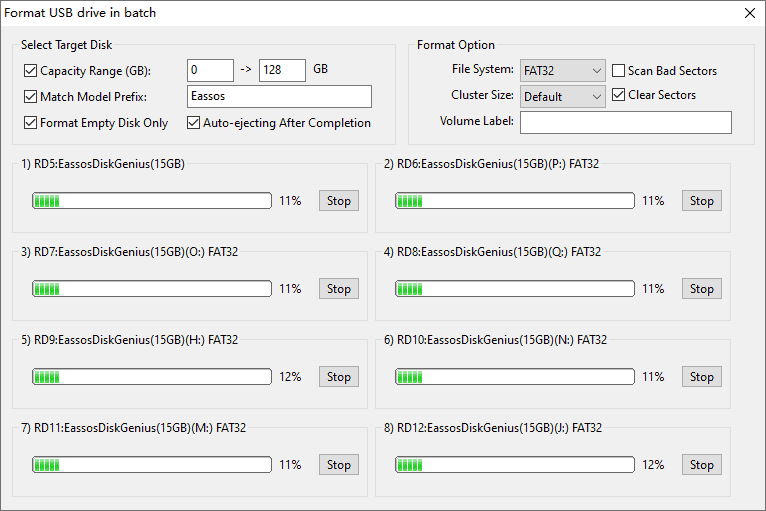
You can also enable the option to eject drives after formatting. This makes the workflow smoother and avoids confusion during batch operations.
If you're using a Mac and want to format a USB drive to FAT32, you can do so using either Disk Utility (the built-in graphical tool) or Terminal (for command-line users). Here's how both methods work.
Step 1. Plug in your USB drive to the Mac. Then go to Applications > Utilities > Disk Utility.
Step 2. In the left sidebar, select the USB drive (be sure to select the device, not just the volume), and click the Erase button at the top
Step 3. In the dialog box, set Format to MS-DOS (FAT) which is Apple's label for FAT32.
Step 4. Click Erase to begin formatting.

Step 1. Go to Applications > Utilities > Terminal
Step 2. Type the command diskutil list to list all connected disks.
Step 3. Identify your USB drive (e.g., /dev/disk2). Please make absolutely sure you're selecting the correct disk.
Step 4. Use the command sudo diskutil eraseDisk FAT32 USBDRIVE MBRFormat /dev/diskX to erase and format the USB drive as FAT32
NPTE: Replace "USBDRIVE" with your desired volume name and "diskX" with the correct disk identifier (e.g., disk2).
Most Linux distributions provide several ways to format a USB drive, both with graphical tools (like GParted) and through command-line tools (mkfs or fdisk). Here's how to do it both ways.
GParted is a free partition editor for Linux. If not installed, you can add it with: sudo apt install gparted
Step 1. Launch GParted and enter your admin password if prompted
Step 2. From the top-right dropdown menu, select your USB drive (e.g., /dev/sdb).
Step 3. Right-click the partition and choose Unmount (if mounted).
Step 4. Right-click again and choose Format to > fat32. Then click the green checkmark button to apply the changes.
Step 1. Plug in the USB and open Terminal.
Step 2. Use the command lsblk to identify your USB device.
Step 3. Once you identify the correct device (e.g., /dev/sdb), unmount it via the command sudo umount /dev/sdb1
Step 4. Format it to FAT32 via the command sudo mkfs.vfat -F 32 /dev/sdb1
FAT32 is one of the file system formats used for removable storage devices. It uses a 32-bit file allocation table to enhance the ability to manage disks, thus breaking the FAT16 limit of supporting only 2GB individual files. Theoretically, FAT32 can store up to 4GB per file. In practice, however, not all USB drives can be formatted to FAT32 in Windows, i.e., Windows does not support to format a partition larger than 32GB to FAT32 file system.
Compared with NTFS, exFAT and other file systems, FAT32 is a more traditional one. Although it does not have some modern functions, it has higher compatibility and can almost be compatible with different operating systems and devices. If individual files are not larger than 4GB, and you need to use the USB drive on different operating systems and devices, you can choose the FAT32 file system format.
In summary, if you want to use a USB drive in multiple operating systems, it is important to format it as a FAT32 file system. Through the steps outlined in this article, you can easily format a USB drive as FAT32 in Windows 11/10. So why wait? Start formatting now and enjoy seamless file transfers between different computers!
DiskGenius - The best free tool to format & reformat hard drives, SSDs, memory cards, or USB drives to FAT32, exFAT, NTFS, or EXT4 in Windows 11/10.
DiskGenius is a one-stop solution to recover lost data, manage partitions, and back up data in Windows.
Download Facebook
 YouTube
 X
X