
Updated on Oct. 12, 2026
Position: Resource - Disk Utilities - How to Check USB Drive Health: 7 Ways to Test a Flash Drive
A USB flash drive can appear to work normally while developing bad sectors, file system errors, slow write speeds, or other signs of failure. If you store important photos, documents, or backups on one, checking its health from time to time helps you catch problems before the data becomes inaccessible.
So what does a USB health check actually mean? Put simply, it means testing whether the drive can still store and return your data reliably: no unreadable areas, no file system damage, no strange read or write errors, and performance that is somewhere near what the drive delivered when it was new. A full check usually covers these areas:
One thing to know before you start: USB flash drives do not report health as clearly as SSDs do. Some models support S.M.A.R.T. information, many do not, and no single test tells you everything. In this guide, we will look at 7 ways to check USB drive health on Windows, from built-in Windows tools to third-party disk utilities DiskGenius, and we will explain what each result really means.
What this guide covers:
Health is not a single number on a USB drive. A drive can have a clean file system and worn-out memory cells, or a perfectly good flash chip and a corrupted file system. When people talk about USB drive health, they usually mix four separate things together, and it is worth keeping them apart.
This is the part you can see and feel:
• a bent or loose USB connector
• a cracked case or a damaged PCB inside
• discoloration or a burnt smell
• the drive getting unusually hot during normal use
• water damage
Physical damage is the one category that no software can fix, but software tests can point to it. A drive that disconnects during a scan, for example, is often a hardware problem rather than a memory problem.
Under the connector sits NAND flash, and every NAND cell wears out a little each time data is written and erased. Manufacturers rate cells for a certain number of program/erase cycles. Cheap drives use lower grade chips and reach that limit sooner. Along the way you may see bad blocks (areas the controller marks as unusable), degraded cells that read slowly, and wear that is spread unevenly by the drive's wear leveling logic.
The catch is this: unlike many SSDs, ordinary USB flash drives often do not expose detailed NAND health information to Windows. On a lot of drives, this layer stays invisible until files start going bad.
This is the layer Windows complains about most often:
• corrupted file system or a drive that turns RAW
• directory errors and lost folder entries
• damaged metadata after a copy was interrupted
• problems caused by pulling the drive out while data was still being written
File system problems look scary but are often repairable. They also tell you nothing about the flash memory underneath, which may be perfectly fine.
This is behavior over time rather than a single reading:
• files that cannot be copied, or a copy that stops halfway
• write protection errors that you did not set
• write speeds that drop to a crawl
• files that copy out fine and open as garbage
A USB drive can have a healthy-looking file system but failing flash memory, or a healthy flash chip but a corrupted file system. That sentence is the reason one test is never enough.
Most failing drives give you warnings first. They are easy to ignore because each one alone has innocent explanations. Watch for groups of them.
Performance signs
Data signs
Connection signs
Capacity and warning signs
None of these symptoms alone proves that the flash memory is failing. A USB port problem, a cheap hub, a flaky cable, a driver issue, or simple file system corruption can all produce the same behavior.
USB drive problem, or port, cable, or driver problem?
Before blaming the drive, run three quick cross checks. First, plug the drive straight into a port on the computer, not into a hub or extension cable. Second, try a different computer. Third, open Device Manager, find the drive under Disk drives, and check for driver warnings.
If the drive behaves normally somewhere else, the drive is probably fine and you just saved yourself a pointless repair. If the same symptoms follow the drive everywhere, keep reading.
The seven methods below go from quick and harmless to thorough and destructive. Start at the top, stop when you have your answer, and only go deeper when you need to.
This takes 30 seconds and it answers one question very well: is the flash memory in trouble, or is it just a partition or file system problem?
Step 1: Plug in the USB drive.
Step 2: Press Win + X and choose Disk Management.
Step 3: Find the USB drive in the lower pane and look at what Windows reports.
Check the capacity, the partition status (Healthy, RAW, or unallocated), the file system type, the drive letter, and whether the disk is marked Offline. A 64 GB drive that shows 8 GB of unallocated space is a different problem from a drive that shows the right size but turns RAW.
What Disk Management cannot tell you is anything about the flash memory itself. It shows how Windows sees the drive, not how healthy the storage is.
Windows can check a drive for logical errors, and it is usually the right first repair step.
Step 1: Connect the USB drive.
Step 2: Open File Explorer and right-click the USB drive.
Step 3: Select "Properties".
Step 4: Open the "Tools" tab.
Step 5: Under Error checking, click "Check".
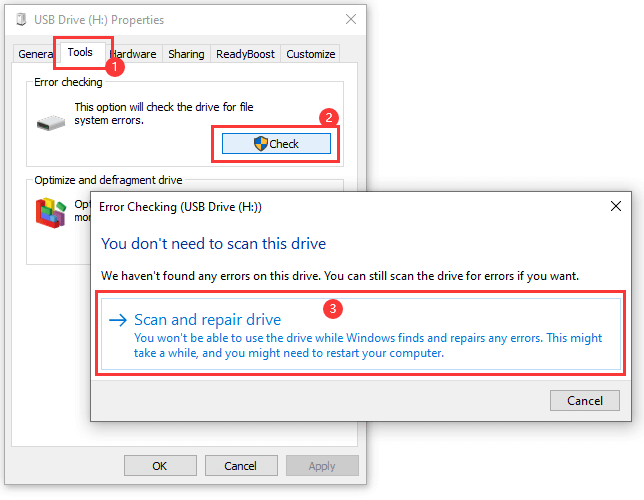
The same job is available from the command prompt. Open it and run: chkdsk X: /f
Replace X with the drive letter of the USB drive.
What this covers: file system errors, lost clusters, directory problems, and other logical damage. What it does not cover: the physical health of the flash memory. A clean CHKDSK result means the filing system is intact. It does not mean the memory cells behind it are healthy.
One warning, because it matters. If the drive holds important data and it is behaving erratically, do not run repair commands over and over. Every repair pass rewrites metadata, and on a failing drive that can make recovery harder. Copy the data out first whenever the drive will still read.
This is the closest thing to a real health scan for a flash drive, and the search term "check USB drive for bad sectors" points exactly here.
A quick note on wording first. A flash drive has no spinning platter and no sectors in the hard disk sense, but diagnostic tools and users alike use "bad sectors" to mean areas that cannot be read or cannot be trusted. The test works the same way either way: the tool reads the drive area by area and reports anything slow or unreadable.
Here is how to check USB drive for bad sectors with the free edition of DiskGenius.
Step 1: Download and launch DiskGenius.
Step 2: Select the USB drive in the disk list on the left.
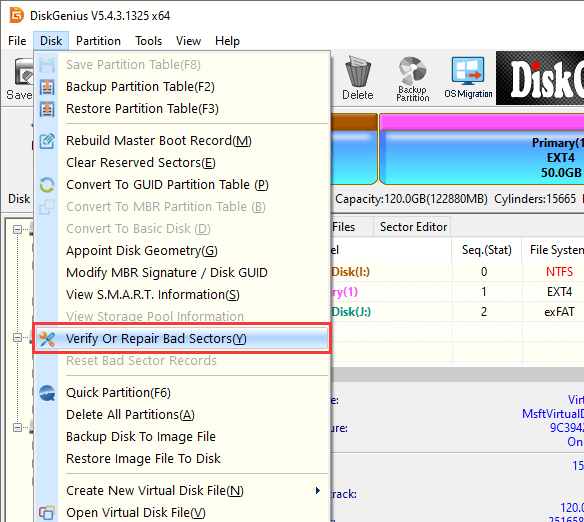
Step 3: Open the bad sector detection function: "Disk" → "Verify Or Repair Bad Sectors/Blocks".
Step 4: Click "Verify" and wait for the scan to finish. The read speed of each block is shown by color, and damaged blocks are marked in red.
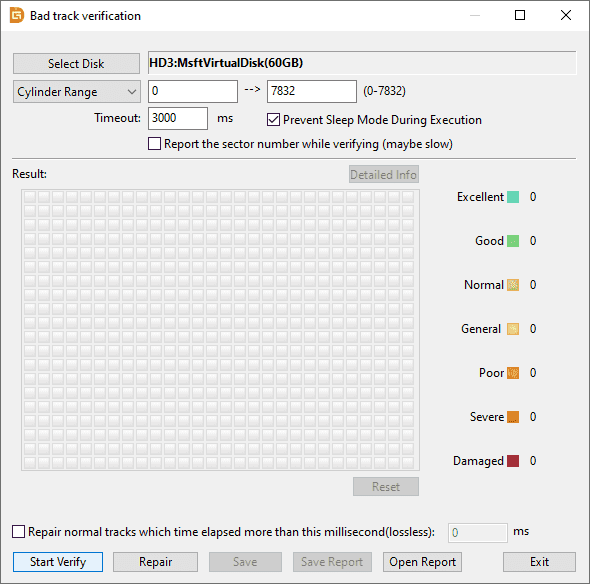
The scan window also shows the current read speed and the average speed. A healthy USB 3.0 drive holds a steady speed across the whole scan. When the line collapses toward the end of the drive or jitters wildly, that area is struggling.
"No bad sectors" is good news, but it is not a guarantee of health. A scan reads every block once. A cell that reads fine today can still fail next month, and write wear shows up in performance long before it shows up as an unreadable block. Treat a clean scan as one vote, not as a verdict.
Slowdown is one of the most searched symptoms in this area, usually phrased as "my USB drive has become extremely slow, is it dying?" A speed test turns that feeling into numbers. What to measure:
DiskGenius Free Edition includes a disk benchmark that reports sequential and random read and write speeds.
Step 1. Select the USB drive, click "Disk" → "Disk Speed Test".

Step 2. Select "File Test" or "Benchmark Test" and click "Start Test".

For reference, a healthy USB 3.0 flash drive typically reads somewhere between 80 and 400 MB/s and writes between 20 and 200 MB/s, depending heavily on the model. A budget USB 2.0 drive sits far below that. The useful signal is not the absolute number but the change from what the drive used to do, and a sudden drop in write speed partway through a large copy, which points at worn memory or a struggling controller.
Be fair to the drive before calling it slow. USB flash drive performance varies dramatically depending on file size, controller, NAND type, USB interface, and available free space. A nearly full drive writes slowly. A large batch of tiny files writes slowly. Speed that is low is not by itself a fault.
Can you check USB flash drive S.M.A.R.T. health? Sometimes, but not always, and this surprises people who are used to SSDs.
The obstacles are simple. Many USB flash drive controllers do not expose S.M.A.R.T. data at all. When a drive sits behind a USB bridge, the bridge may not pass the commands through. And manufacturers expose different attributes, so one drive gives you a full table and the next gives you a temperature reading and nothing else.
To read S.M.A.R.T. data:
Step 1. In DiskGenius, select the disk and choose "Disk" → "View S.M.A.R.T. information".
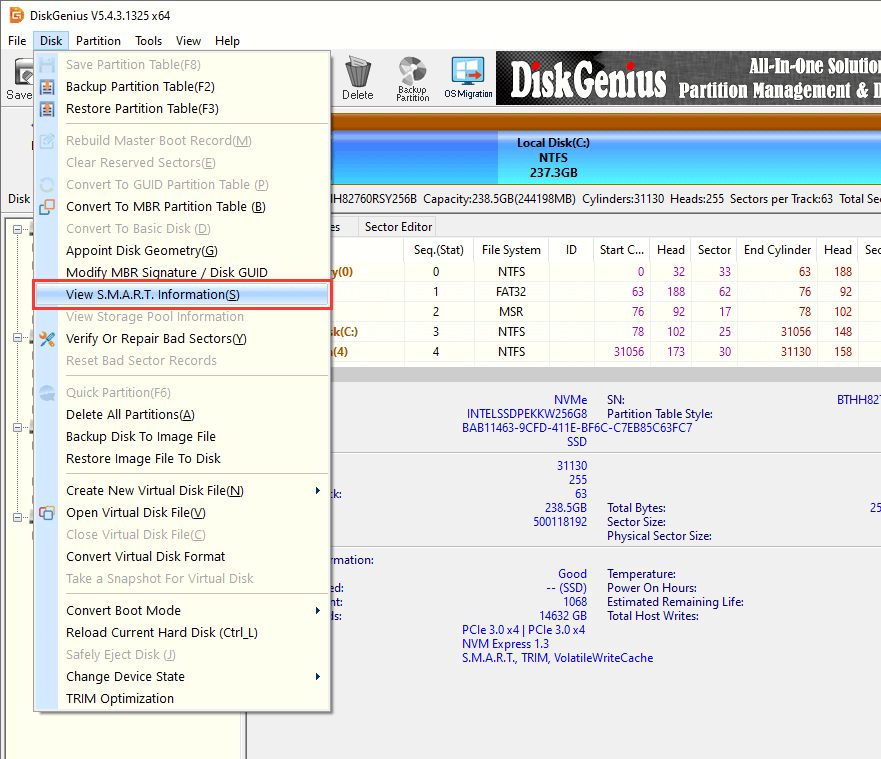
The window shows an overall health status, the temperature where available, and the attribute table behind it.
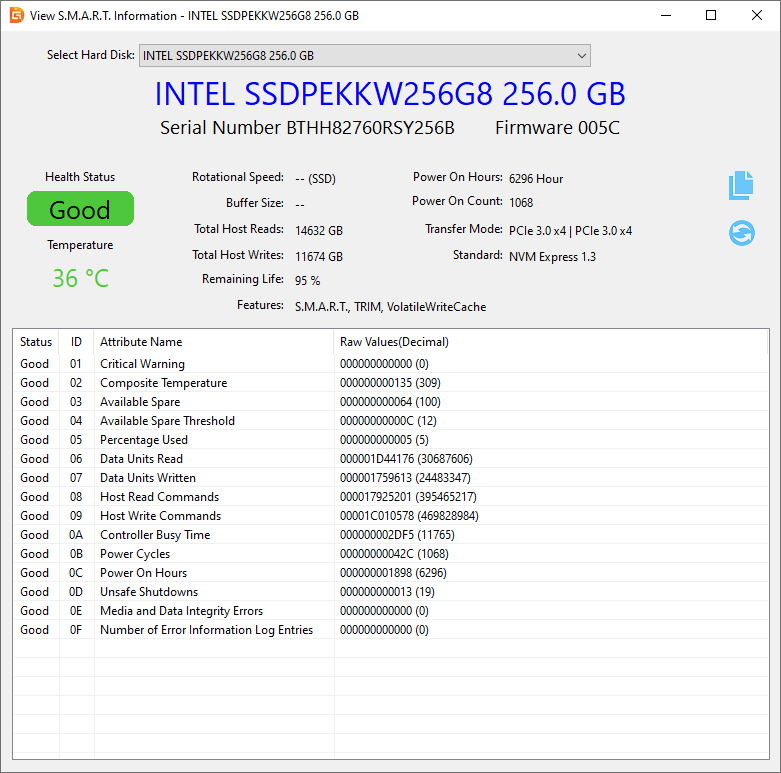
If your USB flash drive does not support SMART data, that is a limitation of the drive, not a sign of trouble, and you should lean on the bad sector scan and speed test instead.
Why Full Format works as a test: a quick format only rewrites the file system table and finishes in seconds. A full format writes to every part of the drive and reads it back, so weak areas have nowhere to hide. On a healthy 64 GB USB 3.0 drive the job takes several minutes. A format that crawls for an hour, stops at some percentage, reports an error, or finishes with the wrong capacity is telling you the drive is in trouble.
Step 1: Copy anything you need off the drive first. Formatting erases everything, and the data cannot be recovered afterward.
Step 2: Open File Explorer, right-click the USB drive, and choose "Format".
Step 3: Choose a file system and click "Start".
exFAT for large files shared between Windows and macOS, FAT32 for the widest device compatibility with a 4 GB per-file limit, NTFS for Windows-only use.
Step 4: Clear the "Quick Format" box. A quick format is not a test. Click "Start".

Step 5. Confirm the operation and watch the progress bar from beginning to end.
A full format that completes without errors and reports the correct capacity is one more vote in the drive's favor, though never a guarantee. Error messages, a hung progress bar, or a wrong final size all point at failing flash or a problem with the controller.
Two limits to keep in mind. A full format does not repair worn-out flash memory, so a drive that misbehaved before the format will usually misbehave again, and running the same format over and over is not a repair. And because this method destroys the contents, never reach for it on a drive that still holds data you have not copied somewhere safe.
Thirty seconds of looking at the drive can save an afternoon of software testing. Check the connector for bending or looseness, look for cracks in the case or discoloration on the plastic, and notice whether the drive gets very hot during ordinary copies. If you can see damage, or you can smell anything burnt, stop testing and go straight to getting the data off.
Work down this list in order. The order matters more than the individual steps.
1. Back up important files immediately. If the drive is still readable, copy important data before performing repair tests. Repair tools rewrite metadata and can make a shaky drive worse.
2. Stabilize first: image the drive before repairing. When a drive is readable but unreliable, copying files one by one is the hardest thing you can ask of it. A sector-level clone or image reads the drive in one continuous pass and gives you a stable copy to work from.
DiskGenius has a Clone Disk function that can image the drive this way, and recovery and repair should then run against the image, not against the original. This is the single step that most people skip and later regret.
3. Stop using the drive if files are becoming corrupted. Every additional write spreads the damage.
4. Try another USB port and another computer. Rule out the cheap fixes before spending time on the drive itself.
5. Check the file system with the error checking tools in Method 2, but only after the data is safe.
6. Scan for bad sectors (Method 3) to see how much of the drive is actually affected.
7. Replace the drive if reliability continues to decline. Flash drives are inexpensive. The files on them often are not.
Sometimes, and it depends entirely on which layer is broken.
Logical problems, such as a corrupted file system, partition errors, or an accidental format, can often be repaired or at least recovered from. Windows error checking fixes file system damage, disk partition tools can rebuild a lost partition table, and recovery software can often pull files back after a format.
Physical and flash memory problems are a different story: failing NAND cells, a dead controller, large numbers of unreadable areas, or a broken connector. No Windows repair tool fixes those. A tool may repair a file system problem, but it cannot restore worn-out NAND flash cells to their original condition.
Formatting is the case people ask about most. When a drive has only logical damage, a full format (slow format) recreates the file system and can return the drive to service. Choose exFAT if you move large files between Windows and macOS, or FAT32 if you need the widest device compatibility and can live with the 4 GB per-file limit. Two rules apply: back up first, because formatting destroys the data, and understand that a format hides symptoms rather than healing worn memory. If the drive went bad before the format, expect it to go bad again.
Read more: Fix Unreadable USB/Pen Drive with Free USB Repair Tool in Windows 10/11
How often should you check a USB drive? There is no magic interval, but usage pattern is a decent guide.
Disk health checks are not a substitute for backups. A green result today says nothing about next month.
How long do USB flash drives last? It depends on the NAND type, how much writing the drive actually sees, the controller and build quality, temperature, and how the drive is stored. A drive that holds an archive and gets read occasionally can last for many years. A drive that absorbs daily writes can wear out far sooner. There is no single lifespan that applies to every USB flash drive, which is exactly why periodic checks and backups beat predictions
1. Can I check USB flash drive health in Windows?
Yes. Windows gives you Error Checking and CHKDSK for the file system and Disk Management for partition status. For flash memory health you need a third-party tool such as DiskGenius, because Windows itself does not scan USB drives for bad sectors in detail.
2. How do I check pen drive health without losing data?
Use read-only tests. A read-only bad sector scan, a file system check without repair, a S.M.A.R.T. read, and a speed test all leave your files alone. Avoid write tests and avoid formatting until the data has been copied somewhere safe.
3. Can USB flash drives show S.M.A.R.T. health?
Some can and many cannot. Whether the data is available depends on the drive controller and the USB bridge. When it is available, watch attributes 5, 187, 197, and 198 first.
4. How do I know if my USB drive is failing?
Look for patterns rather than single events: repeated read and write errors, disconnections during access, files that go corrupted, bad sectors that appear or grow, and errors that follow the drive to another computer.
5. Does formatting a USB drive fix bad sectors?
No. Formatting recreates the file system and remaps the addressable space, but it does not restore physically worn-out flash memory. It can make a damaged drive look healthy until the same problems return.
There is no single test that can determine the complete health of every USB flash drive. A reliable USB health check should consider file system errors, bad sectors and unreadable areas, read and write reliability, performance, connection stability, S.M.A.R.T. information where available, and the physical condition of the drive. Two of those seven, done properly, will catch most problems before they cost you files.
If you need to examine a USB flash drive more closely, DiskGenius can help check disk information, examine partitions and file systems, and test for bad sectors. It is useful when the built-in Windows tools do not provide enough information. And whatever the tools say, keep a backup of anything you would not want to lose. Health checks warn you early. Backups are what actually save the data.

DiskGenius is a one-stop solution to recover lost data, manage partitions, and back up data in Windows.
Download

 Facebook
 YouTube
 X
X