
Updated on Jun. 12, 2026
Position: Resource - Partition Management - How To Split C Drive in Windows 11 Without Losing Data?
You just bought a new laptop. You open File Explorer, and there it is: one massive C drive holding everything. Your operating system, your games, your work documents, your random downloads from three months ago, all sitting together in a single partition. It works, sure. But it also feels like stuffing your entire house into one room.
There are real reasons to care about this. If Windows ever crashes badly enough that you need to reinstall, everything on C drive is at risk. Keeping personal files on a separate partition means a fresh Windows install won't touch them. It also makes backups simpler. You know exactly where your important stuff lives.
Windows 11 does come with built-in tools for managing partitions. They work for basic cases. But they also have frustrating limits, especially when you try to shrink a system partition that Windows itself is sitting on. This guide walks you through multiple ways to split the C drive in Windows 11, from the simplest built-in method to more capable third-party tools like DiskGenius. By the end, you'll have a clean, organized disk layout that makes sense.
The term sounds more dramatic than it actually is. You're not breaking anything. You're not wiping your disk. What you're really doing is taking the existing C partition, shrinking it down, and using the freed-up space to create a new partition, usually called D.
Think of it like rearranging a bookshelf. The books stay where they are. You're just adding a divider so that novels sit on one side and textbooks on the other. All the data that's already on C drive remains untouched. You're only claiming space that isn't currently being used by files.
People split their drives for all sorts of reasons. Some want to keep Windows separate from personal documents. Others are setting up a dual-boot system with Linux. Gamers often carve out a dedicated partition for their Steam library so it doesn't get tangled up with system files. And if you ever need to back up your data or reinstall Windows, having things separated makes the process much less painful.
Before you touch any partition tool, a few things deserve your attention. Skipping this part is how people end up with problems.
Before you touch any partition tool, a few things deserve your attention. Skipping this part is how people end up with problems.
Back Up Your Files First
Partition resizing is generally safe. Tools have gotten pretty good at this. But "generally safe" is not the same as "guaranteed." A power outage during the process, a sudden disk error, bad sectors, or even a rare software glitch can corrupt data. It doesn't happen often. But when it does, it's devastating if you have no backup.
Copy your most important files to an external drive or cloud storage before you begin. Photos, documents, project files, anything you'd hate to lose. DiskGenius also includes a partition backup feature that can create a full image of your C drive before you resize it, which is worth considering if you want a more complete safety net.
Check How Much Free Space You Have
Open File Explorer, right-click your C drive, and check Properties. You need a reasonable amount of unused space to create a meaningful new partition. If your C drive is 500GB and you've used 480GB of it, you're not going to carve out a useful D partition. The math has to make sense.
A good rule of thumb: leave at least 80 to 100GB for Windows 11 and your installed applications. The rest can potentially become a new partition.
SSD vs. HDD
If your computer has an SSD (and most modern Windows 11 machines do), the resizing process will be noticeably faster. HDDs are slower, and partition operations on them can take a while, especially if there's a lot of data and the drive is fragmented. The results are the same either way. Just be patient if you're working with a spinning disk.
BitLocker Encryption
If BitLocker is turned on your C drive, you'll likely hit a wall. Most partition tools, including Windows Disk Management, cannot resize a BitLocker-encrypted volume directly. You'll need to suspend BitLocker first or decrypt the drive before resizing.
You can check your BitLocker status by going to Settings > Privacy & security > Device encryption.
Basic Disk vs. Dynamic Disk
Most consumer PCs use basic disks, which is what you want for standard partitioning. Dynamic disks are more common in server environments and behave differently. If you're on a typical home computer, you almost certainly have a basic disk and don't need to worry about this. Worth a quick check, though: open Disk Management, look at the bottom panel, and see whether your disk type says "Basic" or "Dynamic."
This is the method most people start with, because it's already built into Windows and doesn't require downloading anything.
Step 1: Open Disk Management
There are a few ways to get there. The fastest is to right-click the Start button and select "Disk Management" from the menu that appears. Alternatively, press Win + R, type diskmgmt.msc, and hit Enter. Either way, you'll see a visual layout of all your drives and partitions.
Step 2: Find the C drive in the list, right-click it and select "Shrink Volume".
The C drive usually has a blue bar on top and says something like "(C:) 255.88 GB NTFS Healthy (Boot, Page File, Active, Crash Dump, Primary Partition)."

Windows will spend a few seconds (sometimes longer) calculating how much space it can offer you. Then a dialog box appears with a field labeled "Enter the amount of space to shrink in MB." Type in your desired amount. If you want to create a 100GB partition, enter 102400 (since 1GB is roughly 1024MB).
Click "Shrink." If all goes well, you'll see a new block of black-colored "Unallocated" space appear next to your C drive.

When Windows Won't Let You Shrink Enough
Here's where things get annoying. You might have 300GB of free space on C drive, but Windows only offers to let you shrink by 15GB. Or 8GB. Or some absurdly small number that makes the whole exercise pointless.
This happens because of unmovable files. Windows stores certain system files, like the page file, hibernation file, and system restore points, in the middle or at the end of the partition. The shrink operation can't move these files, so it stops before reaching them. It's a well-known limitation, and it catches a lot of people off guard.
You can try turning off hibernation (powercfg /h off in an elevated Command Prompt), disabling the page file temporarily, and deleting system restore points. Sometimes that frees up more shrinkable space.
Step 3: Create a new partition from the unallocated space.
Right-click the black unallocated space and select "New Simple Volume."

A wizard walks you through the steps: choose the size (use all of it or leave some unallocated for future use), assign a drive letter (D is the obvious choice), and select NTFS as the file system.
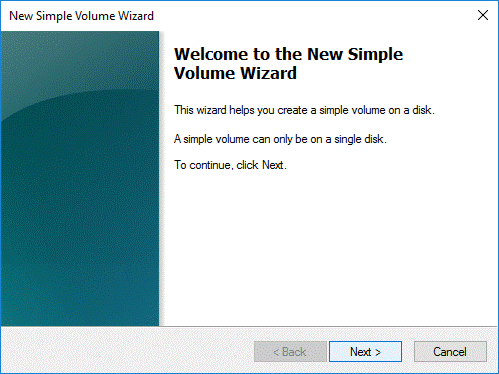
Give the partition a label if you want, something like "Data" or "Personal."
Click "Finish," and Windows formats the new partition. A few seconds later, your new D drive shows up in File Explorer.
Step 4: Verify Everything.
Open File Explorer and confirm that both C and D drives appear and that C drive still has all your original files intact. Nothing should have changed on C except that it's now smaller. The new D drive should be empty and ready to use.
DiskGenius is a free partition manager that solves the exact problem Windows Disk Management can't handle well. It's been around for years and is widely used for partition operations, disk cloning, data recovery, and backup. For splitting a C drive, it offers a dedicated "Split Partition" feature that's more flexible than the shrink-then-create dance you have to do with Windows tools.
DiskGenius Free handles basic partition management at no cost, including split, resize, merge, and format operations. There are no trial period or artificial limits on these features.
How to Split the C Drive with DiskGenius Free Edition
Step 1. Download DiskGenius Free Edition from the official website and install it. The installer is straightforward, no bundled software or sneaky checkboxes.
Step 2. Launch DiskGenius. The main window shows all your disks and partitions in a visual layout. Select the C drive partition by clicking on it.
Step 3. Right-click the C partition and choose "Split Partition" from the context menu. You can also find this under the "Partition" menu at the top.

Step 4. Drag the partition left or right to adjust how much space goes to each partition. The sizes update in real time, so you can see exactly what you're getting. Click "Start" after setting the size.

Step 5. DiskGenius won't just rush ahead. A warning dialog pops up first, listing a few things it wants you to confirm. Read through these, make sure you're covered, and click "Yes".

A second dialog appears, this time showing the sequence of operations DiskGenius is about to perform. If everything looks right, click "Yes".

Step 6. Because the C drive is the active system partition, DiskGenius can't just resize it while Windows is running. Instead, it will launch its WinPE version to handle the operation. Click "OK" to let the software start preparing the WinPE environment.

It might take a couple of minutes to prepare the WinPE version.

Once the PE environment is ready, click "OK".
Your computer restarts automatically and boots into the DiskGenius PE environment instead of loading Windows.

A specialized version of DiskGenius launches on its own and begins the partition splitting operation automatically. You'll see the progress on screen. No input is needed from you at this point, just let it work.
When the operation finishes, the computer restarts again, this time booting back into Windows normally.

Once you're back on your desktop, verify that the split worked. Open Disk Management or launch DiskGenius again. You should see your C drive at its new, smaller size, and a brand new partition sitting right next to it with its own drive letter. Both should show as healthy.
If you're comfortable with the command line, DiskPart is another built-in Windows tool that can get the job done. It's fast and doesn't require a graphical interface. But it comes with a catch: there's no visual feedback. You're typing commands into a void and trusting that they'll do what you expect. One wrong volume number and you could be modifying the wrong partition entirely.
Only use this method if you know what you're doing.
Step 1. Open Command Prompt as Administrator (right-click Start, choose "Terminal (Admin)" or "Command Prompt (Admin)").
Step 2. Then type the following commands, pressing Enter after each one:
diskpart
list volume (Identify your C drive from the list. Note its volume number.)
select volume X (Replace X with the actual volume number. Then shrink the partition)
shrink desired=102400 (This shrinks C by 100GB. Adjust the number to whatever size you want for the new partition.)
create partition primary (Now create the new partition on the unallocated space)
format fs=ntfs quick
assign letter=D

There's no single right answer, and anyone who tells you otherwise is oversimplifying. It depends on what you plan to store, how big your total disk is, and how you use your computer. But here are some general guidelines to work from.
For the C drive (Windows and applications): keep at least 150GB if you can. Windows 11 itself takes around 20 to 30GB, but between installed programs, Windows updates that pile up over time, temporary files, and the ever-growing WinSxS folder, you'll be surprised how quickly space disappears. A 100GB C drive sounds reasonable until you've had the machine for a year.
For the new data partition: use the remaining space. If you have a 512GB SSD and you've allocated 150GB to C, that leaves roughly 360GB for D. If you're a gamer and your Steam library alone is 500GB, well, a single 512GB SSD might not be the right canvas for partitioning in the first place. Consider whether your disk is large enough to justify splitting.
On a 1TB or 2TB drive, you have much more room to breathe. A common setup is 200GB for C and the rest for D. Some people create three partitions: one for the OS, one for applications, and one for personal files. That's fine too, though going beyond two or three partitions on a single disk starts to feel like over-engineering for most users.
📝 Read More: How to Partition SSDs in Windows 11/10?
Splitting a partition is a routine operation, but people do manage to mess it up. Here are the most common pitfalls.
Making C Drive Too Small
Enthusiasm for organization can backfire. You shrink C to 60GB thinking that's enough for Windows, and six months later you're getting "low disk space" warnings every time Windows Update runs. The system gets sluggish. Apps crash because there's no room for temporary files. You end up having to resize again, which is doable but annoying.
Err on the side of giving C more space than you think it needs. Windows 11 is only getting bigger with each update.
Interrupting the Process
Once a partition resize starts, let it finish. Don't force a shutdown because it's taking longer than you expected. Don't close the tool mid-operation. Don't panic if the screen goes black during a reboot-based resize. Interrupting a partition operation is one of the few ways you can actually lose data during this process.
Ignoring Disk Health
If your drive already has bad sectors or file system errors, resizing can make things worse. Before you split your C drive, it's worth running a quick health check. DiskGenius includes a disk health feature that reads S.M.A.R.T. data and can scan for bad sectors. If the drive is reporting errors, fix those first or consider replacing the disk before doing any partition work.
Forgetting About BitLocker
We covered this earlier, but it bears repeating. Trying to resize a BitLocker-encrypted partition without suspending encryption first will fail. Most tools will simply refuse, but you'll waste time figuring out why. Suspend BitLocker, resize, then re-enable it.
Will splitting the C drive erase my data?
No. Shrinking a partition preserves existing data. The new partition is created from unallocated (unused) space.
Should I partition an SSD?
It's a matter of preference. SSDs don't benefit from partitioning for performance the way HDDs sometimes did. The main reason to partition an SSD is organizational: keeping system files and personal data separate. It won't speed up your computer, but it does make backups and reinstalls more manageable.
What file system should I choose for the new partition?
NTFS. It's the standard file system for internal drives in Windows. exFAT and FAT32 have limitations (file size limits, no file permissions) that make them better suited for external drives and USB sticks.
Can I split the C drive during Windows installation?
Yes. The Windows installer includes a partition management screen where you can create and size partitions before installing. This is actually a clean way to set up your partitions from the start. However, if Windows is already installed and you want to split the drive later, the methods in this guide apply.
Splitting the C drive in Windows 11 is one of those things that sounds intimidating until you actually do it. The concept is simple: shrink the existing partition, create a new one from the freed space, and start organizing your files better.
For straightforward cases where Windows Disk Management offers enough shrink space, the built-in tool works perfectly fine. Open it, shrink, create, done. But if you hit the wall where Windows won't let you shrink past a certain point, or if you want a tool with a more visual interface and fewer limitations, DiskGenius is a solid alternative that handles these scenarios without the workarounds.
Whatever method you choose, the sequence is the same: back up your data first, make sure you have enough free space, pick your tool, and let the process complete without interruption. A well-organized disk won't make your computer faster, but it will make your digital life a little more sane. And the next time Windows needs a reinstall, you'll be glad your personal files are sitting safely on their own partition.
You may also like:
DiskGenius is a one-stop solution to recover lost data, manage partitions, and back up data in Windows.
Download Facebook
 YouTube
 X
X