
Updated on Jul. 20, 2026
Position: Resource - Disk Utilities - How to Check SSD Health in Windows 11/10? 7 Ways (2026 Guide)
SSDs feel permanent. No moving parts, no spinning platters, no mechanical arm swinging back and forth at 7,200 RPM. They sit quietly inside your laptop or desktop, doing their job, and most people never think about them.
But SSDs are built on NAND flash memory, and NAND flash has a finite number of Program/Erase (P/E) cycles. Every time data is written to a cell, that cell degrades a tiny bit. After enough writes, the cell can no longer reliably hold a charge. That's the fundamental limitation, and no amount of clever engineering has eliminated it.
The severity of that limitation depends on the type of NAND your SSD uses.
SLC (Single-Level Cell) stores one bit per cell. It can handle roughly 100,000 P/E cycles, making it the most durable option. You'll mostly find it in enterprise environments where the price tag is justified. MLC (Multi-Level Cell) stores two bits per cell and manages somewhere between 3,000 and 10,000 cycles. It was the mainstream choice for consumer SSDs for years. TLC (Triple-Level Cell) stores three bits per cell, drops to around 500 P/E cycles, and is now the most common type in consumer drives because it's cheap to manufacture and capacities are large.
Manufacturers express SSD endurance as TBW (Terabytes Written), which tells you how much total data can be written to the drive before it's expected to fail. A typical 1TB consumer SSD might be rated for 600 TBW. That sounds like a lot, and for most users it is. But heavy workloads (video editing, database operations, virtual machines) can eat through TBW faster than you'd expect.
Another metric you'll encounter is DWPD (Drive Writes Per Day), which expresses how many times you can completely fill the drive each day over the warranty period. A 1TB SSD rated at 1 DWPD with a 5-year warranty means you can write 1TB every single day for five years. Most consumer drives sit well below 1 DWPD.
There's one more factor that quietly accelerates all of this: write amplification. The SSD controller doesn't always write data in the most efficient way. It might need to read a full block, modify a small portion, and write the entire block back. That means the actual amount of data written to the NAND can be several times larger than what your operating system requested. Write amplification is invisible to the user, but it's constantly eating into your TBW budget.
The bottom line is simple. SSDs age, and that aging process is driven by writes. Regular disk health checks let you see where you are on that timeline so you can act before the drive takes your data with it.
As an SSD approaches the end of its rated lifespan, the signs can be subtle at first. Write speeds drop. The drive takes longer to respond to read requests. The operating system occasionally hangs for a second or two during disk operations, and you might dismiss it as a Windows quirk.
Then the problems get harder to ignore.
Bad blocks start appearing. These are sections of NAND that the controller has marked as unreliable, and once a critical mass of bad blocks accumulates, the drive can no longer maintain stable operation. Files become corrupted. Partitions may vanish. In severe cases, the SSD disappears from the BIOS entirely, and your computer boots to a screen that says no bootable device was found.
The cruel part is that HDDs tend to give you more warning. A failing hard drive clicks, grinds, or becomes noticeably slow over weeks or months. An SSD can go from "working fine" to "completely dead" in a matter of days, sometimes hours. The failure curve is much steeper. If you're not proactively monitoring the drive's health metrics, you might not realize anything is wrong until SSD data recovery is no longer an option.
S.M.A.R.T. stands for Self-Monitoring, Analysis, and Reporting Technology. It's a diagnostic system built into the firmware of virtually every modern SSD and hard drive. The drive's controller continuously tracks a set of internal metrics and makes them available to the operating system (or any software that knows how to ask) through standard communication protocols like ATA/SATA, NVMe, and SCSI.
In plain terms, the SSD keeps a logbook of its own condition. You just need the right tool to read it.
Here are the S.M.A.R.T. attributes that matter most for SSD health:
Percentage Used is the single most important number for most users. It represents how much of the drive's rated endurance has been consumed. A brand-new SSD shows 0%. A drive that's used half its rated P/E cycles shows roughly 50%. When it reaches 100%, the manufacturer considers the drive to have exhausted its expected lifespan. Most experts recommend starting to worry around 90%.
Data Units Written tracks the cumulative amount of data written to the SSD since it left the factory. On NVMe drives, each unit equals 512,000 bytes. This number is useful for comparing your actual usage against the drive's TBW rating.
Available Spare shows the percentage of reserve NAND blocks the controller has left. SSDs ship with extra blocks specifically to replace ones that wear out. As those spares get consumed, the drive has less room to compensate for degradation.
SSD temperature is straightforward but important. SSDs that run consistently above 70°C experience accelerated wear. If your drive is running hot, poor airflow or a heavy sustained workload might be the cause.
Media and Data Integrity Errors counts the number of uncorrectable errors the drive has encountered. On a healthy SSD, this number should be zero. If it isn't, something is wrong.
Unsafe Shutdowns logs how many times the drive lost power unexpectedly. A high count doesn't directly indicate drive failure, but frequent unsafe shutdowns can contribute to file system corruption and increase write amplification.
Reallocated Sectors Count records how many sectors have been remapped to spare blocks. Some reallocation is normal over the life of a drive. A rapidly increasing count, however, suggests the NAND is degrading faster than expected.
One caveat worth mentioning: S.M.A.R.T. is not infallible. Some SSDs have been known to report "Verified" while experiencing real-world issues like I/O timeouts or data corruption at the file system level. SMART catches many failure modes, but not all of them. For a complete picture, it's worth pairing SMART checks with surface scans and occasional performance benchmarks. Learn more about SSD benchmark software.
Knowing what to look for can save you from a sudden data loss disaster. Here are the symptoms that you may need to do SSD health check.
Slow boot times. If your computer used to start in 15 seconds and now takes over a minute, and you haven't installed any new startup software, the SSD might be struggling.
Frequent freezing. The system locks up for a few seconds, especially when opening files or switching applications. You hear the disk activity light clicking away but nothing responds.
Files becoming corrupted. Documents that opened fine yesterday now throw errors. Photos display partial artifacts. ZIP archives fail to extract. This is a strong signal that the drive is writing data unreliably.
Read/write errors in Windows. Error messages like "The request could not be performed because of an I/O device error" or "Windows cannot read from this disk" are red flags.
Blue Screen of Death (BSOD). Occasional blue screens with errors like CRITICAL_PROCESS_DIED or KERNEL_DATA_INPAGE_ERROR can point to storage problems, especially if they occur during disk-intensive operations.
SSD disappears from BIOS. If the drive doesn't show up in your BIOS/UEFI at all, it may have suffered a controller failure or severe NAND degradation.
SSD becomes read-only. Some SSDs enter a protective read-only mode when they detect imminent failure. You can still read your data, but you can't write anything new. This is actually a blessing in disguise, as it gives you a window to back up.
SMART warnings. If any health monitoring tool reports a "Failing" or "Caution" status, don't ignore it. SMART warnings exist precisely to give you time to react.
The tricky thing about SSD failures is their unpredictability. A hard drive might give you weeks of grinding noises before it dies. An SSD can transition from "slightly sluggish" to "completely unresponsive" in a single afternoon. That's why proactive monitoring matters more for SSDs than it ever did for HDDs.
DiskGenius is more than an SSD health checker. It's a full-featured disk management suite that includes one of the most accessible S.M.A.R.T. monitoring interfaces available on Windows. That distinction matters, because when your HDD/SSD health check reveals a problem, you don't want to switch to a different tool to back up your data or clone the drive. You want everything in one place.
Here's what DiskGenius can display about your SSD:
• Health Status
• Temperature
• SMART attributes (all key metrics in a detailed table)
• Remaining Life percentage
• Power-on Hours
• Total Host Writes
• Firmware version
• Interface type (SATA, NVMe)
• Drive capacity
The SMART information panel is clean and readable. Raw attribute values are listed alongside their normalized and worst-case thresholds, so you can see at a glance whether any parameter is trending toward a warning state.
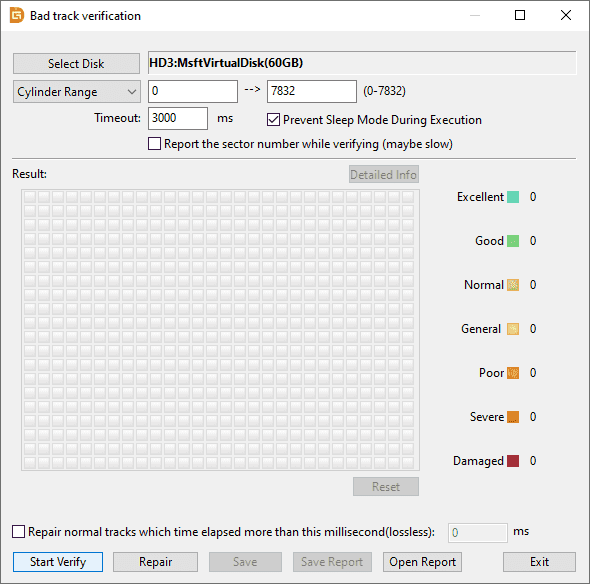
Beyond health monitoring, DiskGenius includes the "Verify Or Repair Bad Sectors/Blocks" feature that reads every sector on the drive and identifies ones that are slow to respond or completely unreadable. This catches problems that SMART alone might miss. It also supports disk cloning, partition management, and data recovery, so if your SSD is showing signs of decline, you can image the entire drive to a new one without leaving the application.
The free edition of DiskGenius includes SMART monitoring and bad sector scanning. No paid license required for those features.
Steps to HDD check SSD health with DiskGenius Free:
Step 1. Download and install DiskGenius from the official website. Launch the application.
Step 2. In the left panel, find your SSD. All connected drives are listed with their model names and capacities.
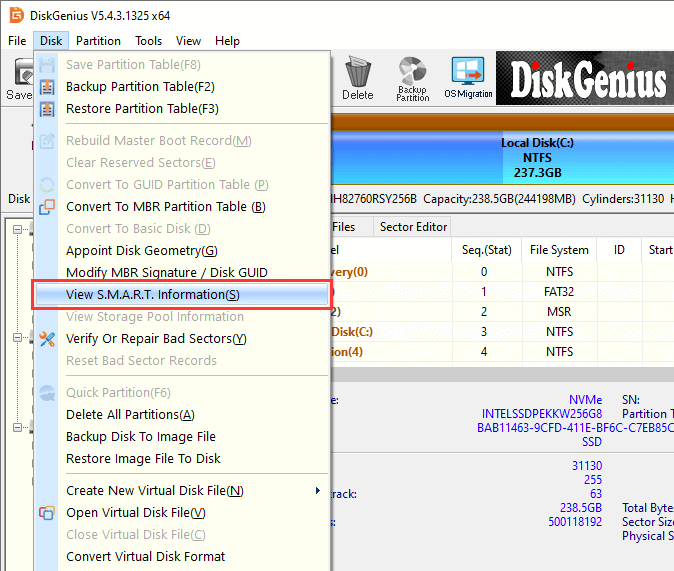
Select the SSD, and click "Disk" – "View S.M.A.R.T. Information". You can also find the option after right-clicking the SSD.
Step 3. Review the health details on the pop-out window.
Look at the overall status first, then scan through individual attributes. Pay special attention to remaining life percentage, total host writes, media and data integrity errors.
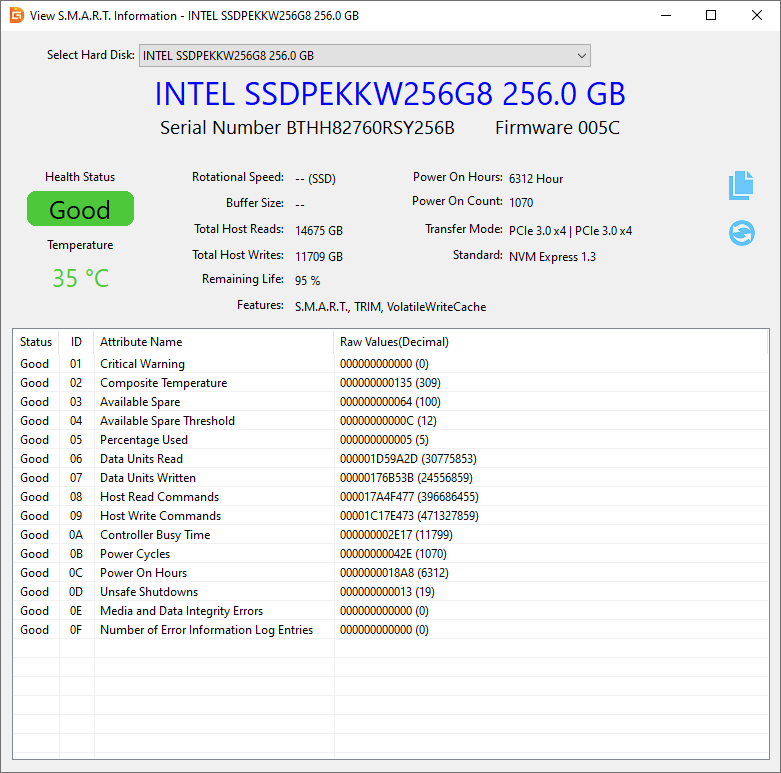
If everything looks good, you're set. If any attributes show warnings, the next steps are covered in the "What to Do If SSD Health Is Poor" section below.
Windows 11 added a basic SSD health indicator directly into the Settings app. It's limited, but it requires zero installation.
Steps:
Click Starrt > Settings > System > Storage > Advanced Storage Settings > Disks & Volumes.
Find the SSD you want to test and click the "Properties" button.
Look at the "Drive Health" section.

If available, it will display an overall health estimate and basic drive information.
The upside is obvious: it takes about 10 seconds and requires nothing extra. The downside is equally obvious: the information is sparse. You won't see individual SMART attributes, temperature trends, write amplification data, or power-on hours. For a quick sanity check, it's fine. For anything more than that, you'll need a dedicated tool.
Windows includes two command-line tools that can query SSD health information without installing third-party software. Neither is particularly user-friendly, but they work.
1. Command Prompt (WMIC):
Open Command Prompt as Administrator and run:
wmic diskdrive get status
This returns one of two values for each connected drive: OK or Pred Fail. "OK" means the drive hasn't reported a SMART failure condition. "Pred Fail" means it has.
That's it. No temperature, no percentage, no detailed attributes. It's the bare minimum. Useful for a quick script-based check across multiple machines, but insufficient as a standalone health monitoring method.

2. PowerShell:
Open PowerShell as Administrator and try:
Get-PhysicalDisk | Get-StorageReliabilityCounter
This can return more detailed information, including Temperature, ReadErrorsTotal, WriteErrorsTotal, and on some drives, Wear (a percentage similar to Percentage Used in SMART). The catch is that not all drives support all fields through this interface. NVMe drives tend to report more data than older SATA SSDs.
For a one-time quick look without installing anything, these commands are handy. For regular monitoring, a graphical tool with trend tracking and alerts is much more practical.

Most major SSD manufacturers provide their own health monitoring and management tools. These are often the best option for firmware updates, and some include features not available elsewhere.
| Brand | Software | Key Features |
| Samsung | Samsung Magician | Health monitoring, firmware updates, performance benchmarking, over-provisioning |
| Western Digital | WD Dashboard | SMART monitoring, firmware updates, drive diagnostics |
| Kingston | Kingston SSD Manager | Health status, firmware updates, disk usage stats |
| Crucial | Storage Executive | Health monitoring, firmware updates, sanitize drive |
| Intel | Intel Memory and Storage Tool | SMART data, firmware updates, secure erase |
| Solidigm | Solidigm Storage Tool | Health monitoring, firmware updates, SMART details |
These tools typically support firmware updates, health monitoring, temperature display, and performance optimization features. They're worth having alongside a general-purpose tool like DiskGenius, especially for firmware updates, which can fix bugs and improve drive reliability.
If your computer won't boot into Windows, the BIOS may still be able to read basic SMART status from the SSD.
Restart your computer and enter the BIOS/UEFI setup (usually by pressing Del, F2, or F12 during startup). Navigate to the storage or drive information section. Some BIOS implementations display a simple SMART status next to each detected drive.
This method is limited. You'll typically see only a pass/fail indicator, not detailed attribute data. But when Windows is inaccessible and you need to know whether the SSD is still alive, the BIOS can give you a quick answer.

Mac users have several options for checking SSD health.
1. System Report:
(1) Click the Apple menu > About This Mac > System Report > NVMe (or SATA).
(2) Look for the S.M.A.R.T. status field. It will show "Verified," "Failing," or "Failed." This is a quick first pass, but it provides no detailed attribute data.
2. Disk Utility:
Open Disk Utility, select the top-level physical disk (not the volume), and click "First Aid."
This runs a basic health check on the drive and file system. It can detect file system errors and some hardware-level issues, but it doesn't report SMART attributes.
The S.M.A.R.T. reports what the drive's controller sees. A surface scan tests the drive from the outside, reading every sector and measuring response times.
This matters because some problems don't show up in SMART data. A sector that's technically readable but takes 500ms to respond won't trigger a SMART warning, but it will cause noticeable system slowdowns. A surface scan catches these borderline sectors.
DiskGenius includes a built-in disk surface test that scans for bad sectors/blocks and reports their locations. If your SSD's sequential read speed used to hit 3,500 MB/s and now barely reaches 2,000 MB/s, something is wrong, even if SMART says everything is fine.
Running a benchmark every few months gives you a performance baseline. When speeds drop significantly from that baseline without an obvious software explanation, it's time for a deeper investigation.
Getting the data is half the battle. Interpreting it correctly is the other half.
Most tools translate SMART data into a simple health percentage. Here's what those numbers actually mean in practice:
| Health Range | Status | What to Do |
| 100% to 90% | Excellent | No action needed. Check again in a month. |
| 89% to 70% | Good | Start monitoring more frequently. Keep backups current. |
| 69% to 50% | Fair | Back up important data regularly. Begin planning for a replacement. |
| 49% to 20% | Poor | Replace the drive soon. Clone it to a new SSD before it gets worse. |
| Below 20% | Critical | Replace immediately. The drive could fail at any time. |
These ranges are general guidelines. A drive at 85% health that's only two years old is in a very different situation from a drive at 85% that's been running for seven years in a write-heavy server. Context matters.
| Range | Status | Action |
| Below 50°C | Normal | No action needed |
| 50°C to 70°C | Warm | Monitor. Improve airflow if consistently in this range. |
| Above 70°C | Hot | Take action. Check case ventilation, reposition the drive, add cooling. |
Sustained high temperatures accelerate NAND wear and can cause thermal throttling, which tanks performance.
Compare this number against your SSD's TBW rating. If your 1TB SSD is rated for 600 TBW and Total Host Writes shows 450 TBW, you've used about 75% of the rated endurance. That's still within the "Good" range, but it's worth keeping an eye on.
This tells you how many hours the drive has been powered on. A consumer SSD with 30,000 power-on hours has been running for over three years of continuous use. High power-on hours alone don't indicate failure, but combined with high Percentage Used, they paint a clearer picture of wear.
Reallocated Blocks: Some are normal over the life of a drive. A rapid increase is a warning sign.
Wear Leveling Count: Shows how evenly the controller has distributed writes across all NAND cells. A declining count means the drive is running out of fresh cells to rotate in.
Media Errors: Should be zero. Any nonzero value warrants attention.
Unsafe Shutdowns: High counts can contribute to file system corruption. Check if your power supply or UPS is reliable.
Percentage Used: The single best indicator of remaining life. Track it over time.
Available Spare: When this drops significantly, the drive is running out of backup blocks to replace worn ones.
SSD degradation is inevitable, but the rate is partly within your control. These habits can add years to your SSD lifespan.
Don't fill it to the brim. Keep at least 10-20% of the total capacity free. SSDs need empty blocks for wear leveling and garbage collection. A full SSD forces the controller to work much harder, increasing write amplification.
Enable TRIM. TRIM tells the SSD which blocks are no longer in use so the controller can recycle them efficiently. Windows enables TRIM by default for SSDs, but it's worth confirming. Open Command Prompt as Administrator and run fsutil behavior query DisableDeleteNotify. A result of "0" means TRIM is enabled.
Update the firmware. SSD manufacturers occasionally release firmware updates that fix bugs, improve performance, and address reliability issues. Check your manufacturer's tool (Samsung Magician, WD Dashboard, etc.) periodically.
Avoid unnecessary heavy writes. Defragmenting an SSD is pointless and harmful. Windows should automatically disable defrag for SSDs, but some third-party "optimization" tools might not. Don't let anything defragment your SSD. Also avoid running benchmarks excessively, as each benchmark run writes significant amounts of data.
Keep it cool. Good airflow inside your case goes a long way. If your SSD consistently runs above 60°C, consider adding a heatsink or improving case ventilation.
Use a UPS or reliable power source. Unsafe shutdowns stress the file system and can cause data corruption. A simple uninterruptible power supply protects against sudden power loss.
Monitor SMART regularly. A monthly check takes 30 seconds and can catch problems months before they become emergencies. Set a calendar reminder if you have to.
Back up your data. This isn't an SSD longevity tip per se, but it's the most important advice in this entire article. No amount of health monitoring replaces a good backup. If your SSD dies tomorrow, your backup is what stands between inconvenience and catastrophe.
Your SSD health check came back with bad news. Now what? Don't panic. Follow these steps in order.
Step 1: Back up your data immediately. Copy your most important files to an external drive, a cloud service, or another computer right now. Don't wait. If the drive is still functional, you have a window to save everything, but that window can close without warning.
Step 2: Clone the SSD to a new drive.
This is where having DiskGenius on hand pays off. Instead of reinstalling Windows and all your applications from scratch, you can create an exact copy of your failing SSD onto a healthy one. DiskGenius Free Edition supports disk cloning and system migration, which means the new drive boots up with your existing Windows installation, settings, and files already in place.
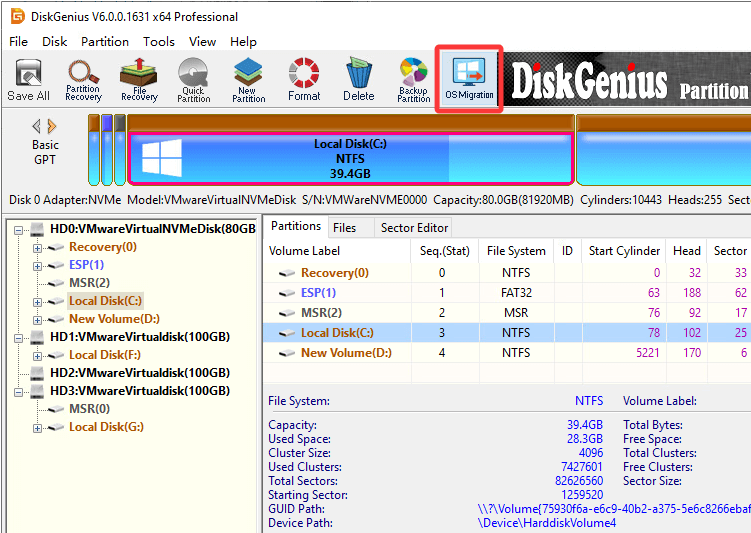
The process is straightforward: select the source disk, select the destination disk, and let the software handle the rest.
Step 3: Replace the SSD.
Once the SSD cloning (system migration) is complete and verified, swap the failing drive for the new one. If you cloned properly, your system should boot normally from the new SSD with everything intact.
Step 4: Confirm that all your data is accessible on the new drive.
Once you're satisfied, securely erase the old SSD (if it still functions) before recycling or discarding it. DiskGenius includes a secure disk wiping function for this purpose.
The key takeaway: a declining SSD is not an emergency if you catch it early and act methodically. It becomes an emergency only when you ignore the warnings.
1. Is 90% SSD health good?
Yes. 90% health means the SSD has used about 10% of its rated endurance. Most consumer SSDs at this level have years of life remaining. Continue using the drive normally and check again in a few months.
2. Does checking SSD health affect performance or lifespan?
Reading SMART data is a lightweight, read-only operation. It has no measurable impact on performance or drive lifespan. SSD bad sector scans do not write data and should be run occasionally rather than constantly.
3. Should I replace an SSD at 70% health?
Not necessarily. 70% health still represents significant remaining life for most users. But you should start backing up more frequently and have a replacement plan ready. If the drive is only a year old and already at 70%, investigate whether your workload is unusually write-heavy.
4. Can SSD health be restored?
No. NAND wear is permanent. You cannot reverse Percentage Used or regenerate worn-out cells. What you can do is slow further degradation by following the lifespan extension tips above.
5. Is 80% SSD health normal?
For a drive that's been in use for two to four years, yes. For a brand-new drive, no, and you should contact the manufacturer. Context (drive age, usage patterns, TBW rating) determines whether a given percentage is expected.
6. What SSD temperature is too high?
Consistently above 70°C is concerning. Brief spikes during heavy workloads are normal, but sustained high temperatures accelerate NAND degradation and trigger thermal throttling.
7. How long does an SSD usually last?
Most consumer SSDs last between five and ten years under normal usage. Heavy write workloads shorten this. A drive used primarily for reading (like a game library drive) can last much longer than its TBW rating suggests.
SSDs don't last forever. The technology is reliable, the performance is excellent, and for most people the drive will outlive the computer it's installed in. But "most people" is not "everyone," and the ones who lose data are usually the ones who never checked.
Windows gives you basic monitoring. Command-line tools give you raw data if you know how to read it. Manufacturer tools handle firmware updates. All of these have their place.
If you want one application that lets you monitor SSD health, read SMART attributes, scan for bad sectors, clone a failing drive to a new one, back up your partitions, and manage your disks without juggling five different programs, DiskGenius covers all of that in a single interface.

DiskGenius is a one-stop solution to recover lost data, manage partitions, and back up data in Windows.
Download

 Facebook
 YouTube
 X
X