
Updated on Aug. 07, 2026
Position: Resource - Disk Utilities - How to Secure Erase SSD? 5 Safe Ways to Wipe Your SSD Completely
You are selling your old SSD. You deleted every file, emptied the Recycle Bin, and ran a format for good measure. File Explorer shows an empty drive. It looks clean. It is not.
When you delete a file, Windows removes the pointer that tells the file system where that data lives. The actual data stays exactly where it was on the NAND flash cells, untouched and very much recoverable. A quick format does even less real work. It rebuilds the file system table and marks all space as available, but it never touches the underlying data.
The most direct way to fix this is to overwrite the entire drive. Write zeros to every sector, and whatever was there before is gone. That approach works. It is thorough. The only consideration with SSDs is that overwriting the full capacity does consume a portion of the drive's write endurance. If that is a concern, a single pass of zeros or random data is enough. You do not need three passes or 35 passes. One pass does the job.
There is also a faster option. SSDs have built-in hardware commands that reset all cells in seconds without consuming write endurance at all. Both approaches are valid. This article covers five methods to securely wipe an SSD, from one-click tools to command-line utilities, so you can pick the one that fits your situation.
Read More: Recover Data from SSD: A Complete Guide to SSD Data Recovery
SSDs write data in pages, but they can only erase data in blocks. A page might be 4KB to 16KB. A block is 256KB to 1MB or more. The drive cannot erase a single page on its own. It has to erase the entire block that contains it, copying valid pages out first, erasing the block, then writing them back. This background process is called garbage collection, and it runs on the controller's schedule.
Sitting between the operating system and the physical NAND is the flash translation layer, or FTL. It maintains a map of logical addresses (what the OS sees) to physical locations on the NAND. When you write data to what the OS calls logical block 500, the FTL decides which physical cell actually stores it.
Wear leveling adds another layer. To prevent any single NAND cell from wearing out prematurely, the controller spreads writes across all available cells. This keeps wear even but means the physical layout of data on the drive does not match the logical layout the OS sees.
SSDs also reserve a percentage of their NAND capacity (often 7% to 28%) for over-provisioning. This space is used by the controller for garbage collection and wear leveling. The operating system cannot see it or write to it directly during normal use.
Selling or giving away the SSD. This is the most common reason. Your personal files, photos, browser history, saved passwords, and financial records should not end up in someone else's hands.
Recycling or disposing of the SSD. Even if you are not handing the drive to a specific person, discarded hardware ends up in places you cannot predict.
Returning a leased or work computer. Company data, client information, project files. The professional and legal consequences of leaving that data behind can be significant.
Fixing persistent performance issues. Sometimes drives have performance issues that normal formatting does not fix but a secure erase will reset the drive to a clean state and fix the issue. For more on diagnosing slow SSD performance, see our guide on why your SSD is running slow. And if elevated temperatures have been affecting your drive, our SSD temperature guide covers that in detail.
Compliance requirements. Certain industries and regulatory frameworks require verified data destruction before drives change hands or are decommissioned.
These three terms get used interchangeably, but they describe very different things.
When you delete a file and empty the Recycle Bin, Windows removes the file system reference, the pointer that tells the operating system where that data begins and ends. The actual data remains on the NAND cells. It sits there intact and recoverable until the SSD's garbage collection eventually reclaims those blocks. TRIM may speed this up by notifying the controller that certain blocks are no longer needed, but the timing is unpredictable. The data could persist for minutes, hours, or longer. Basic data recovery software can retrieve it.
The quick format of SSD rebuilds the file system table, NTFS, FAT32, exFAT, or whatever you choose. It marks all space as available and creates a fresh directory structure. The process takes a few seconds and looks thorough. It is not. The underlying data is untouched.
A full format in Windows writes zeros to every sector. It is a legitimate wipe method and produces a clean drive. The consideration with SSDs is that the process goes through the operating system's file system layer, and some areas managed internally by the SSD controller (like over-provisioned space) may not be directly addressed. For most practical purposes, including selling or recycling a personal drive, a full format provides strong sanitization. For high-security compliance scenarios, a hardware-level method gives you a higher degree of certainty.
Secure Erase is an ATA command (for SATA SSDs) or an NVMe command (for NVMe drives) defined in the storage interface specification. It is not a Windows function or a file system operation. It is a direct instruction to the SSD controller to erase all flash pages: user data, spare blocks, hidden blocks, and over-provisioned space. The controller executes this using its own internal erasure mechanism, optimized for the NAND architecture in that specific drive. After completion, the drive is in a clean state.
Crypto Erase takes a different approach. Most modern SSDs are self-encrypting drives. They encrypt all data written to NAND by default, even if the user never set a password. Crypto Erase destroys the encryption key. Without it, every bit of encrypted data on the NAND cells is permanently unreadable. The process is nearly instant regardless of drive capacity and does not consume write endurance.
Yes. Secure Erase does not damage your SSD and does not meaningfully reduce its lifespan. SSD manufacturers themselves recommend it for drive sanitization.
This is worth addressing directly because many users have heard that writing to SSDs wears them out. That is technically true. NAND flash cells have a finite number of program/erase cycles, often expressed as TBW (terabytes written) or drive writes per day. A consumer SSD rated for 600 TBW can accept 600 terabytes of writes over its lifetime before the NAND cells are expected to degrade.
A single full-capacity overwrite on a 1TB drive consumes 1 TBW. That is 0.17% of a 600 TBW budget. A three-pass overwrite uses 3 TBW, or 0.5%. These are small numbers in the context of a drive's total lifespan, but they do add up if you wipe drives frequently.
Read More: What Affects SSD Lifespan and How to Check the Remaining Lifespan?
Hardware Secure Erase avoids this entirely. It does not write data across the drive. It tells the controller to reset all cells using the controller's own internal mechanism. No write endurance is consumed. From a wear perspective, it is the gentler option.
If you prefer the simplicity of overwriting and want to minimize endurance impact, a single pass of zeros or random data is effective. You do not need multiple passes. One full overwrite replaces all previous data with the fill pattern. For the vast majority of use cases, selling a drive, recycling it, reinstalling an OS, a single pass is sufficient.
Secure Erase is permanent. There is no undo. Before you start, go through this checklist.
Back up any files you need. This sounds obvious, but it is the step people skip most often. Photos, documents, work projects, browser bookmarks, game saves, license keys. Once the erase starts, that data is gone.
Disconnect unnecessary drives. If your system has multiple SSDs or hard drives, physically disconnect the ones you are not wiping or clearly label them. Wiping the wrong drive happens more often than anyone wants to admit. Double-check the drive model name, capacity, and serial number before confirming any erase operation.
Confirm you have the correct SSD. You can open DiskGenius to verify the drive's model, serial number, and capacity. Make sure it matches the drive you intend to erase.
Plug your laptop into power. If you are working on a laptop, connect the charger. An unexpected shutdown during an erase operation can leave the drive in an inconsistent state.
Prepare a bootable USB if needed. If the SSD contains your operating system, you will not be able to erase it while Windows is running from it. Have a bootable USB ready with your chosen erase tool. More on this later.
DiskGenius provides multiple ways to wipe hard drives, for example, you can wipe the entire disk, erase a partition, wipe free space or even wipe multiple disks simultaneously. You can choose overwrite the entire drive with zeros or random data for a straightforward single-pass erase.
For compliance scenarios or specific overwrite requirements, DiskGenius also supports multi-pass standards like DoD 5220.22-M and Gutmann, though for most users a single-pass zero fill or a hardware Secure Erase is all you need.
How to securely erase an SSD with DiskGenius:
1. Back up any data you need. This process is irreversible.
2. Download, install, and open DiskGenius Free Edition.
3. Select the SSD from the drive list on the left panel. Click "Disk" – "Erase Sectors".
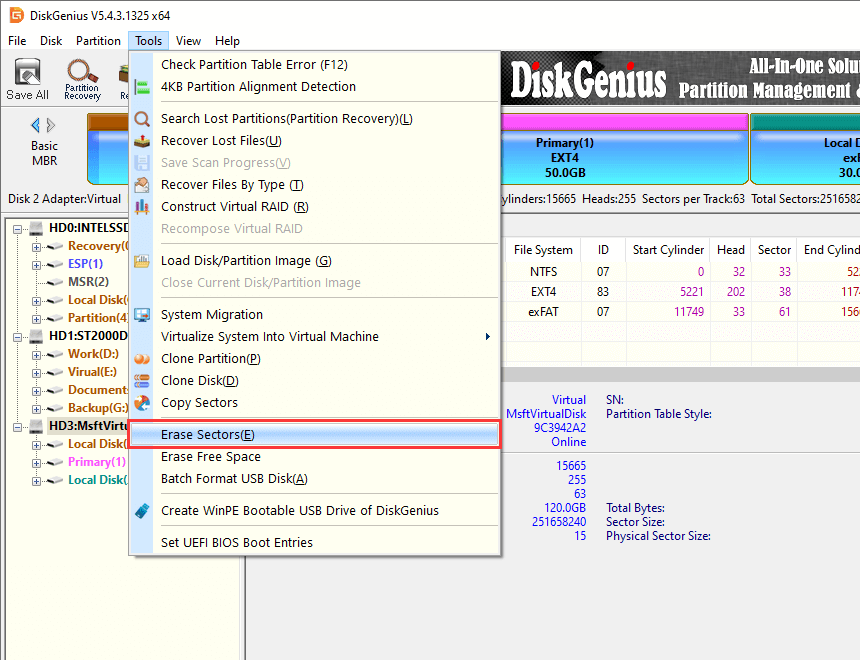
4. In the dialog that appears, choose your erase method and click "Erase".
Here, we recommend choosing "Fill Sectors with" instead of "Security level and wipe speed", as a single-pass overwrite is sufficient for erasing an SSD.
00: A single-pass overwrite that replaces all data on the drive with zeros.
FF: A single-pass overwrite using hex values.
Random data: A single-pass overwrite using random values. Functionally equivalent to zero fill for sanitization purposes.
User Specify: You can specify characters to overwrite your disk.
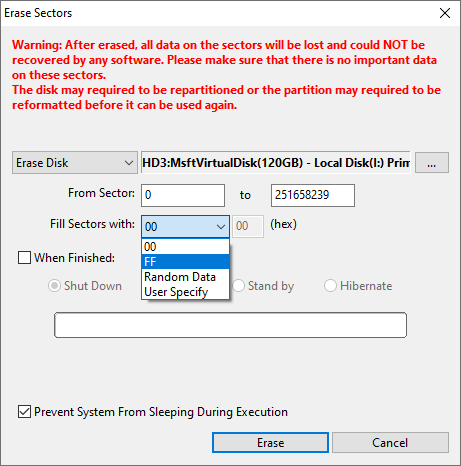
5. Confirm the operation and wait for it to complete.
Note: After the erase, the drive will appear as unallocated space. Use DiskGenius Free to partition the SSD if you plan to reuse it.
DiskGenius can do more than wipe disks, it can also monitor disk health, manage partitions, recover data and clone disks. If you are wiping a failing drive and migrating to a replacement you can first clone the old SSD drive to a new one and then securely erase the old drive afterwards.
Most major SSD manufacturers include a secure erase or sanitize function in their management software. These tools are purpose-built for their own drives.
Pros: Officially supported by manufacturer. Designed & Tested on their own hardware.
Cons: Works only with their own brand tools. Some tools will only be able to erase a secondary drive, not the boot drive.
General steps:
1. Download and install the manufacturer's tool from their official website.
2. Open the tool and select your SSD.
3. Find the Secure Erase, Sanitize, or Drive Erase function.
4. Confirm and execute.
Some modern motherboards include a built-in Secure Erase utility directly in the BIOS or UEFI firmware. This is convenient because it operates outside the operating system, which means it can wipe the boot drive without needing a separate USB environment.
Which motherboards support this? Not all of them. BIOS-level Secure Erase is typically found on mid-range to high-end boards from major manufacturers. The feature is more common on boards from 2020 onward and is most frequently available for NVMe drives. SATA SSD support through BIOS-level Secure Erase is less common.
1. Enter your BIOS by pressing Delete or F2 during boot.
2. Navigate to the Tool, Advanced, or Storage section.
3. Look for an option labeled "Secure Erase," "NVMe Secure Erase," or "SSD Secure Erase."
If you do not see it, your board does not support it. Check your motherboard manual or the manufacturer's BIOS update notes to confirm.
4. Select the target SSD and confirm. The BIOS issues the Secure Erase command directly to the drive controller. The process typically takes 30 seconds to 2 minutes.
This method is not available on all motherboards, and it is usually limited to NVMe SSDs. SATA drives may not be covered. What's more, the interface is minimal. You get a drive selector and a confirmation prompt. No overwrite options, no verification tools, no partition management.
When to use this method: When your motherboard supports it and you want a quick, no-software way to erase an NVMe drive before a fresh Windows installation. It is straightforward but bare-bones.
If you're a Linux user and comfortable with the terminal, give this method a shot. Note: This method only works for SATA drives. If you want to erase NVME SSD skip to Method 5.
1. Boot into a Linux environment.
2. Identify your SSD by running the following command (replace sdX with your drive identifier).
sudo hdparm -I /dev/sdX
3. In the output, look for the "Security" section.
It will say either "frozen" or "not frozen." If the drive is frozen, the Secure Erase command will be rejected.
To break the freeze, try suspending the system to sleep and waking it up (sudo systemctl suspend), or hot-plugging the drive after boot. Most live USB environments do not freeze drives.
4. Set a temporary user password (required by the ATA specification): sudo hdparm --user-master u --security-set-pass p /dev/sdX
5. Verify the security state now shows "enabled" and "not frozen."
6. Issue the Secure Erase command:
sudo hdparm --user-master u --security-erase p /dev/sdX
7. Wait for it to complete. When the drive is finished the password is removed and the drive is unlocked automatically.
Limitations:
• Linux only. SATA drives only.
• The frozen state issue is the most common stumbling block. If you cannot unfreeze the drive, this method will not work.
• Getting the commands wrong can temporarily lock the drive. The lock is removable with the correct password.
When to use this method: Linux users who want direct, transparent control over the ATA Secure Erase command on a SATA SSD. If you are not comfortable with the command line, Method 1 or Method 2 will serve you better.
NVMe SSDs have their own erase commands, unlike the ATA specification of SATA drives. You can find these commands in the Linux terminal using the nvme-cli utility.
Steps:
1. Boot into a Linux environment (live USB works).
2. Install nvme-cli: sudo apt install nvme-cli
3. List connected NVMe devices: nvme list. Identify your target drive by model and serial number.
4. Issue the Format command with Secure Erase Setting:
User data erase: sudo nvme format /dev/nvme0n1 --ses=1
Cryptographic erase: sudo nvme format /dev/nvme0n1 --ses=2
5. Wait for completion.
--ses=1 (User Data Erase): The controller erases all user data in the NVMe namespace. This covers over-provisioned areas and controller-managed space.
--ses=2 (Cryptographic Erase): The controller destroys the media encryption key. All data becomes permanently unreadable without physically erasing NAND cells. Fastest option, zero endurance impact.
--ses=0 (No secure erase): Normal format only. Not suitable for data sanitization.
Limitations:
• Linux only. Command-line only.
• Not all NVMe drives support every erase command. Enterprise drives typically support Sanitize; consumer drives may only support Format with Secure Erase.
• Cryptographic erase (ses=2) requires the drive to support encryption at rest. Most modern NVMe drives do.
If the SSD you want to wipe is your boot drive, you cannot erase it while Windows is running from it. The operating system is actively using the drive and the erase command will be blocked.
You have three options.
Option 1: Use a bootable USB environment (recommended for most users).
Create a bootable USB drive with a WinPE environment or a Linux live session. Boot from the USB. Once the system is running from USB, the SSD is no longer the active boot device and can be erased freely.
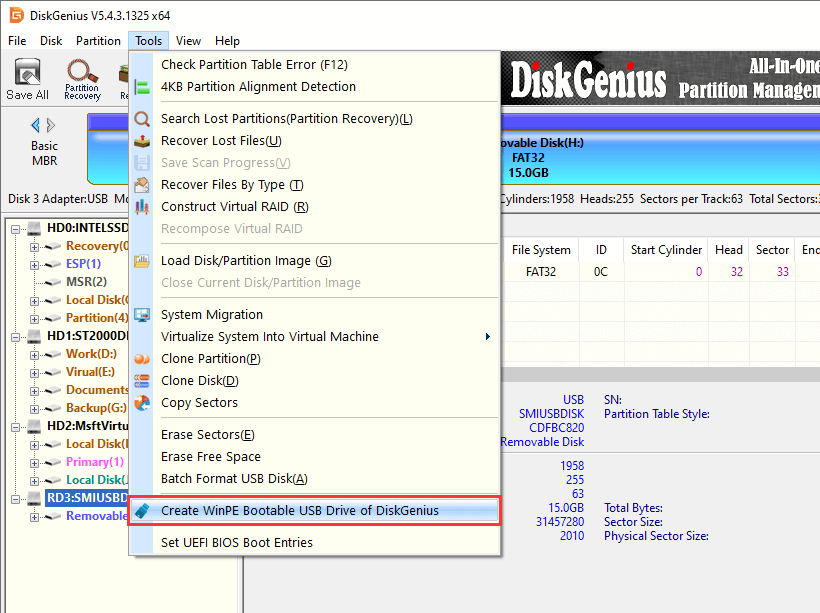
DiskGenius Free edition provides the feature (Tools – Create WinPE Bootable USB Drive of DiskGenius). Boot from it, select your SSD, and run the erase from within the WinPE environment. You stay in a graphical interface and do not need to touch the command line.
Option 2: Connect the SSD as a secondary drive.
If you have another computer, or if your desktop has a second drive bay, install a different drive as the boot device and connect the target SSD as a secondary drive. Boot from the primary drive and run the erase from there.
Option 3: Use the manufacturer's bootable tool.
Some SSD manufacturers provide bootable ISO images with their erase utilities. These are purpose-built for the job but limited to specific brands.
After wiping, the drive should show as completely unallocated space with no file system and no visible partitions. If you want stronger confirmation, here is how to check.
Step 1: Inspect the drive structure.
Open DiskGenius and select the wiped SSD. The drive map should show entirely unallocated space with no partitions. If partitions remain visible, the wipe may not have completed.
Step 2: Scan sectors for data.
Use DiskGenius to read sectors on the wiped drive. Select the disk from the left pane, and click the "Sector Editor" tab on the right pane. Then you can see the hex value on the drive.
After a zero-fill overwrite, you should see zeros across the board. After a hardware Secure Erase, the content will be zeros or ones depending on the drive's implementation. If you see recognizable file data, the wipe was not fully effective.
Step 3: Attempt data recovery.
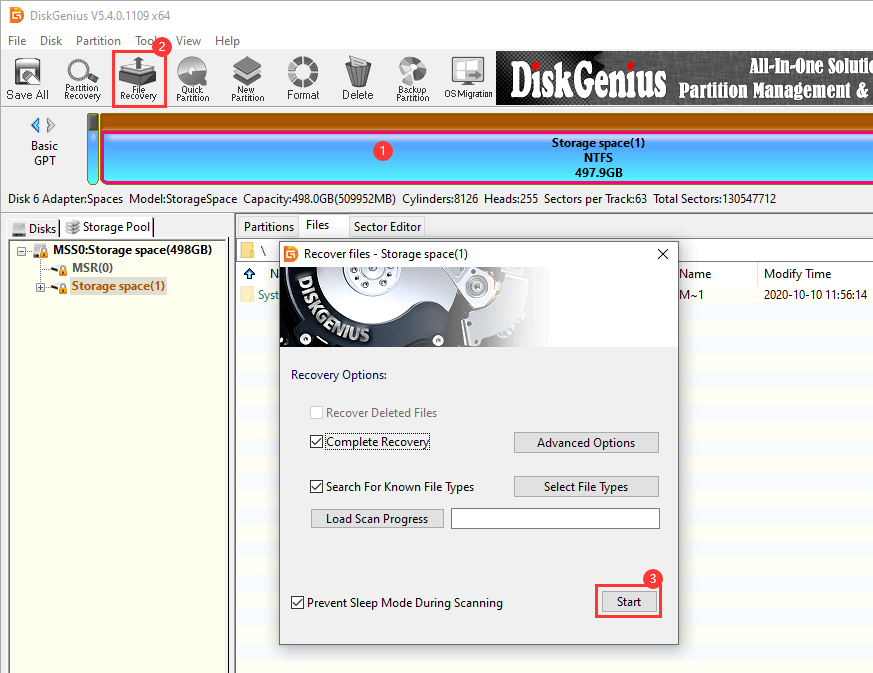
This is the strongest test. Use a data recovery tool to scan the wiped drive. DiskGenius includes a file recovery function that can scan for lost partitions and files. Run it against the wiped SSD. If the wipe worked, the scan should return nothing.
Just formatting the drive. Quick format does not erase data. Full format is better but may not reach all areas managed internally by the controller. For certainty, use a full overwrite or hardware Secure Erase.
Wiping the wrong drive. Check the drive model, serial number, and capacity before confirming any erase operation. Then check again.
Forgetting about hidden partitions. Some drives contain recovery partitions, EFI system partitions, or other hidden volumes. Make sure the erase covers the entire drive, not just the main partition.
Not backing up first. Secure Erase is permanent. There is no undo. If you might need anything on that drive, back it up before you start.
Using excessive passes. A single pass of zeros or random data is sufficient for sanitizing a personal SSD. DoD 5220.22-M (three passes) and Gutmann (35 passes) were designed for older magnetic media and consume significant write endurance on flash storage without meaningful additional benefit for most scenarios. If your organization's policy requires multi-pass, follow it. Otherwise, one pass is enough.
1. Is Secure Erase bad for SSD lifespan?
No. Hardware Secure Erase does not consume write endurance. It resets cells through the controller's built-in mechanism. Even a single-pass software overwrite on a 1TB drive consumes only about 1 TBW, a tiny fraction of any modern SSD's rated lifespan.
2. Does Secure Erase remove Windows?
Yes. Everything is removed: the operating system, applications, files, partition structures. You will need to reinstall Windows afterward.
3. Can I wipe an external SSD?
Yes. If the external SSD is connected via USB, some hardware Secure Erase commands may not pass through the USB enclosure. In that case, a software overwrite through DiskGenius works well. Single-pass zero fill on an external SSD is a straightforward and effective approach.
4. What is the difference between Secure Erase and TRIM?
TRIM is an ongoing command that tells the controller which blocks the file system is no longer using. The controller reclaims those blocks during garbage collection. It operates on deleted files and freed space.
Secure Erase is a one-time full-drive operation. It instructs the controller to reset all NAND cells at once, including over-provisioned space and blocks that TRIM does not touch. They serve different purposes.
5. How many times should I overwrite an SSD?
Once. A single pass of zeros or random data replaces all previous data with the fill pattern. For personal use cases, selling, recycling, reinstalling, one pass is sufficient. If you are concerned about write endurance, use hardware Secure Erase instead, which does not consume any write cycles at all.
6. Can I secure erase an SSD from BIOS?
Some modern motherboards include a Secure Erase option in the BIOS or UEFI, typically for NVMe drives. ASUS, Gigabyte, and MSI boards in their mid-range and higher product lines are most likely to support this. Check your motherboard's BIOS or manual.
Deleting files and formatting are not enough if you need data on an SSD to be truly gone. The data survives both operations, recoverable by anyone with basic tools and a little time.
The fix is simple. Overwrite the drive with a single pass of zeros, and the data is gone. That is it. One pass. No need for multi-pass standards designed for older technology. If you want the fastest possible approach that also avoids consuming any write endurance, use the SSD's built-in hardware Secure Erase command. Both methods work. Choose based on what matters more to you: the simplicity of overwriting, or the speed and zero-endurance-cost of a hardware command.
Among the five methods covered here, DiskGenius provides the most flexible option for Windows users. It supports single-pass zero fill, hardware Secure Erase, and multi-pass standards, all from one interface. You can verify the wipe, repartition the drive, and format it for reuse without switching tools. For Linux users, hdparm and nvme-cli give you direct command-line access to the hardware erase commands. Manufacturer tools are reliable single-brand options, and BIOS-level erasure works when your motherboard supports it.
Whatever method you choose, the important thing is that you choose one. If that SSD is leaving your hands, make sure the data on it is actually gone.

DiskGenius is a one-stop solution to recover lost data, manage partitions, and back up data in Windows.
Download

 Facebook
 YouTube
 X
X